Introduction
Salesforce Screen Flows are no longer just about automating repetitive clicks. They shape how users interact with the platform by guiding them through structured steps, collecting clean data, and automating outcomes in real time.
Unlike static automation tools such as Workflow Rules or background-only flows, Screen Flows create dynamic, user-facing journeys. Administrators and developers use them to build guided paths that simplify onboarding, sales, support, and operations.
This guide explains how to create a Salesforce Screen Flow, the technical foundations behind it, best practices from experts, and real-world scenarios where Screen Flows transform business processes. Check out our Salesforce integration services to unlock even more automation potential.

1. What is a Salesforce Screen Flow?
A Salesforce Screen Flow is an automation tool that lets you create a guided process within Salesforce, often involving user input. It’s part of the broader Flow Builder suite, which includes other types of flows, such as Record-Triggered or Scheduled Flows. The key distinction of a Screen Flow is its ability to interact with users in real time, providing an intuitive, step-by-step interface.
Screen Flows are used to streamline tasks such as collecting data, updating records, or guiding users through complex processes. For example, you might use a Screen Flow to help sales reps input data on a new opportunity or guide a user through a support request submission.
2. Why Salesforce Screen Flows Matter
A Screen Flow is more than just a form. Its purpose is to combine data capture, business logic, and automation in one interactive experience.
Older automation tools can process data but often lack context or user involvement. Screen Flows bridge that gap by enabling:
- Guided User Input: Step-by-step instructions reduce errors and training needs.
- Dynamic Logic: Conditional branching personalizes the journey.
- Seamless Automation: Automatically creates or updates records while the user interacts.
- Scalable Processes: Works across sales, service, HR, finance, and partner portals.
Example: Instead of asking sales reps to fill multiple objects manually, a Screen Flow can walk them through opportunity creation, capturing all fields and updating related contacts automatically.
3. Technical Foundations of Salesforce Screen Flows
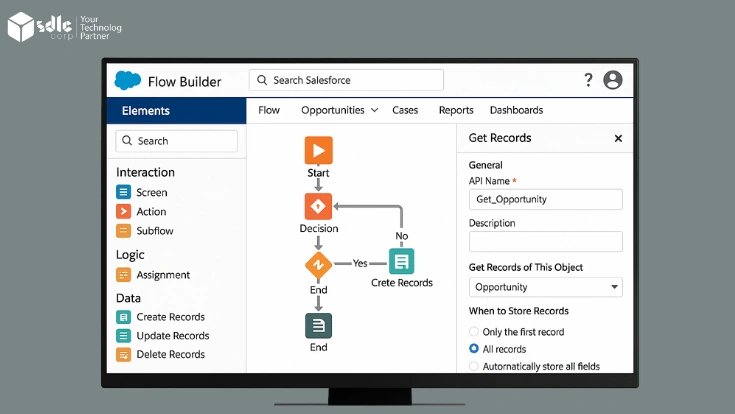
1. Flow Builder Access and Setup
- Navigate to Setup → Flows → New Flow.
- Choose Screen Flow to enable user interaction.
- The canvas opens where you’ll drag, drop, and connect flow elements.
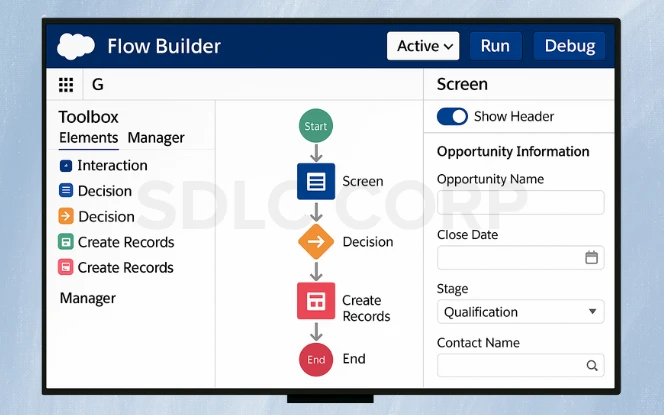
2. Screen Elements
- Collect inputs through text fields, picklists, radio buttons, or checkboxes.
- Display instructions, confirmation messages, or record previews.
- Use conditional visibility to show/hide fields dynamically.
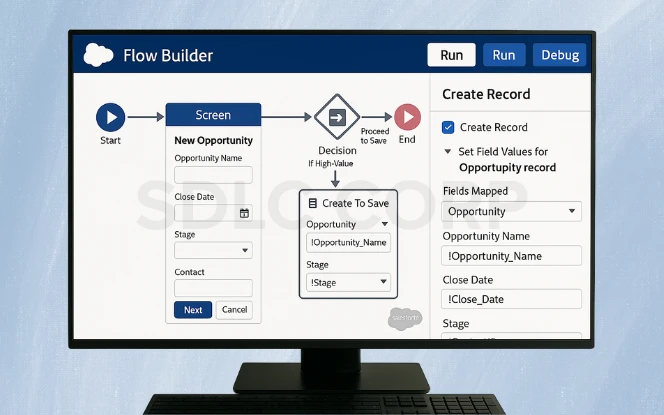
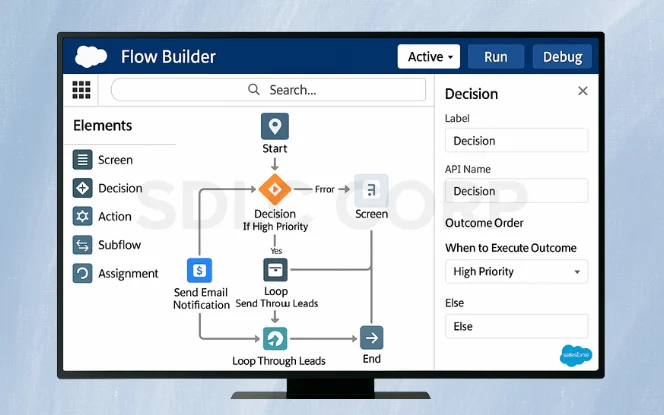
3. Decision Logic
- Add Decision elements to route users based on their inputs.
- Example: If a customer selects “High Priority,” the flow assigns the case to a Tier 2 support queue.
4. Actions and Integrations
- Perform system tasks such as creating/updating records, sending emails, or calling Apex classes.
- Example: Trigger a contract generation action after opportunity approval.
5. Variables and Collections
- Store user responses or retrieved record values.
- Example: Capture Account ID in a variable and pass it across multiple screens.
6. Loops and Iterations
- Process multiple records one at a time.
- Example: Assign multiple leads from a campaign list in a single flow run.
7. Debugging and Error Handling
- Use the Debug tool to simulate inputs.
- Add fault paths to handle errors gracefully (e.g., show a message if record creation fails).
4. Step-by-Step Guide: Creating a Salesforce Screen Flow
- Start a New Screen Flow
- Go to Setup → Flows → New Flow → Screen Flow.
- Add a Screen for User Input
- Drag the Screen element onto the canvas.
- Add fields: Text, Picklist, Date, Checkbox.
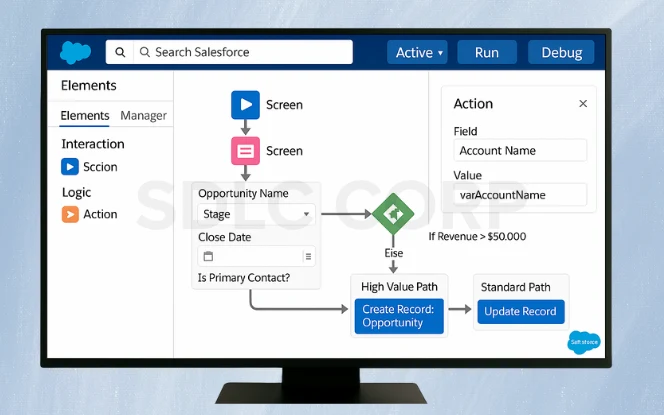
- Introduce Decision Logic
- Insert a Decision element.
- Define conditions (e.g., If Revenue > $50,000 → High Value Path).
- Configure Actions
- Drag Create Records or Update Records elements.
- Map variables to fields.
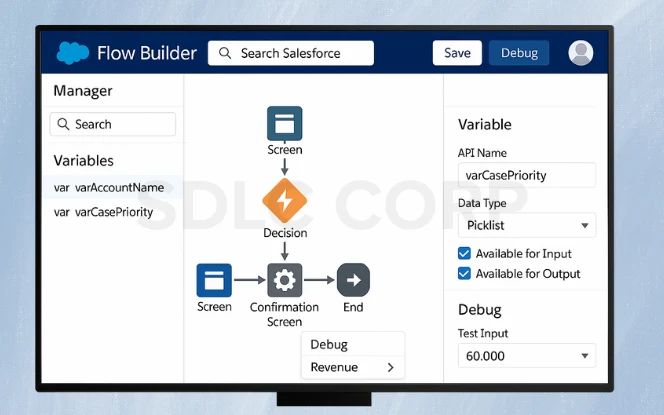
- Define Variables
- Create variables like varAccountName or varCasePriority.
- Store inputs for downstream actions.
- Link Elements with Connectors
- Connect screen → decision → action → confirmation screen.
- Test and Debug
- Run Debug mode.
- Validate routing and field updates.
- Activate and Deploy
- Click Activate.
- Add the flow to a Lightning Page, Utility Bar, or custom button.
5. Case Studies: Screen Flow in Action
Real-world examples demonstrate the power of Screen Flows. From reducing sales errors to speeding support response times, organizations see measurable improvements in efficiency, accuracy, and user adoption through guided automation experiences.
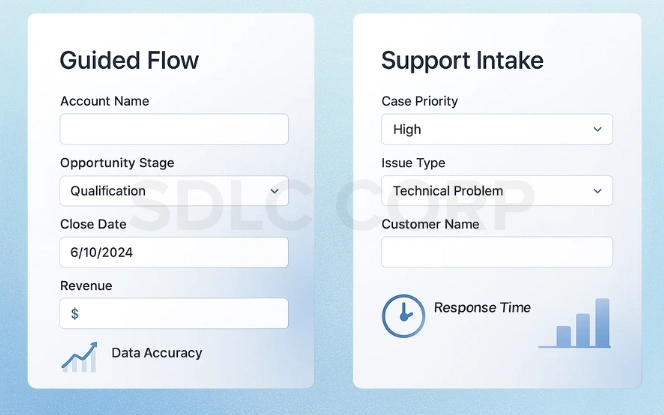
Sales Onboarding
- A SaaS company used Screen Flows to guide new reps through opportunity creation.
- Before: Reps missed required fields, leading to poor pipeline visibility.
- After: A guided Screen Flow ensured all opportunity data was captured, reducing errors by 40%.
Customer Support Intake
- A telecom firm built a Screen Flow for support requests.
- Users filled guided forms.
- Priority cases auto-routed to escalation queues.
- Result: First-response time dropped by 30%.
6. Expert Perspectives
Insights from experts provide valuable lessons for designing effective flows. Their experience highlights best practices, pitfalls to avoid, and strategies to maximize impact, helping admins and developers build smarter Salesforce Screen Flows.
- Salesforce Architect – Priya Deshmukh
“Flows give admins developer-level power without code. The key is structuring logic well—badly designed flows can confuse more than they help.” - Implementation Consultant – James Howard
“Decision logic and fault paths are the lifelines of Screen Flows. They keep user journeys smooth and prevent dead ends.” - Sales Manager – Elena Cruz
“Our reps hated filling forms. After switching to Screen Flows, adoption went up, and CRM data accuracy improved noticeably.”
7. Best Practices for Building Screen Flows
Designing effective Screen Flows requires simplicity, clarity, and testing. By keeping screens user-friendly, validating inputs, and documenting logic, admins ensure smooth user experiences and scalable automation that delivers consistent business value.
- Keep Screens Simple: Too many fields overwhelm users.
- Guide, Don’t Overload: Use tooltips and conditional visibility.
- Validate Early: Catch errors on the same screen before submission.
- Test Across Profiles: Ensure it works for admins, users, and community users.
- Document Logic: Maintain clarity for future updates.
8. Future of Salesforce Screen Flows

The future of Salesforce Screen Flows is shaped by AI, role-based design, system integrations, and mobile optimization:
- AI-Powered Flows – Smarter flows with predictive suggestions and automated next steps.
- Dynamic Layouts – Screens adapt by user role, showing only relevant fields and paths.
- Cross-System Automation – Deeper API links connect Salesforce with ERP, HR, and external apps.
- Mobile-Optimized Flows – Responsive layouts for the Salesforce Mobile App, enabling faster, on-the-go use.
Screen Flows are moving from simple automation to intelligent, adaptive tools that streamline processes across platforms.

Conclusion
Salesforce Screen Flows are an essential tool for automating user interactions within Salesforce. Whether you’re collecting data, automating processes, or guiding users through tasks, Screen Flows make it all easier and more efficient.
By following this guide, you can create effective Screen Flows that not only improve user experience but also streamline business processes. Start building your Salesforce Screen Flow today and explore the endless possibilities they offer for enhancing your Salesforce environment with expert Salesforce consulting services
Related Blogs You Should Explore: