Introduction
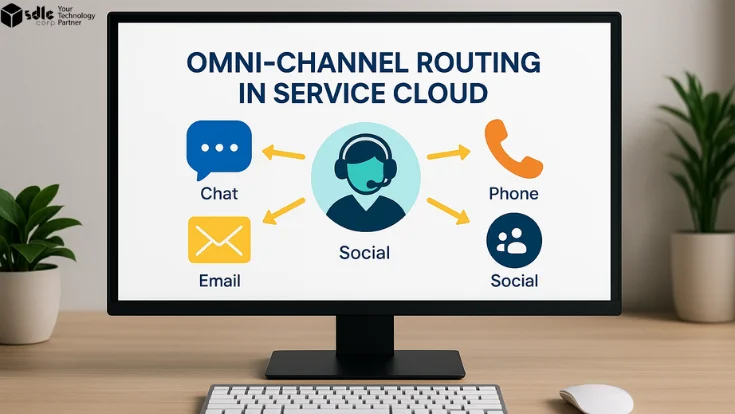
In the world of modern customer service, speed and accuracy can make or break a brand’s reputation. Customers expect to connect through their preferred channels—whether that’s chat, email, phone, or social—and still receive quick, relevant support. Omni‑Channel Routing in Service Cloud ensures every request is automatically assigned to the best available agent, based on skills, workload, and priority.
In this guide, you’ll learn how to set it up step‑by‑step, configure advanced routing logic, apply best practices, and avoid common mistakes so your service team delivers excellence at scale.
When building Lightning Web Components (LWC), each file serves a unique purpose, and together they define how the component works inside Salesforce. Furthermore, understanding these files early ensures smoother development and deployment.
- HTML File: Acts as the template, written in standard HTML5 with additional LWC directives for dynamic rendering.
- JavaScript File (JS): Handles business logic, data binding, and lifecycle hooks for component behavior.
- Meta XML File: Declares visibility settings, defining where the component can appear, such as App Pages or Record Pages.
1. Why Omni‑Channel Routing in Service Cloud Matters
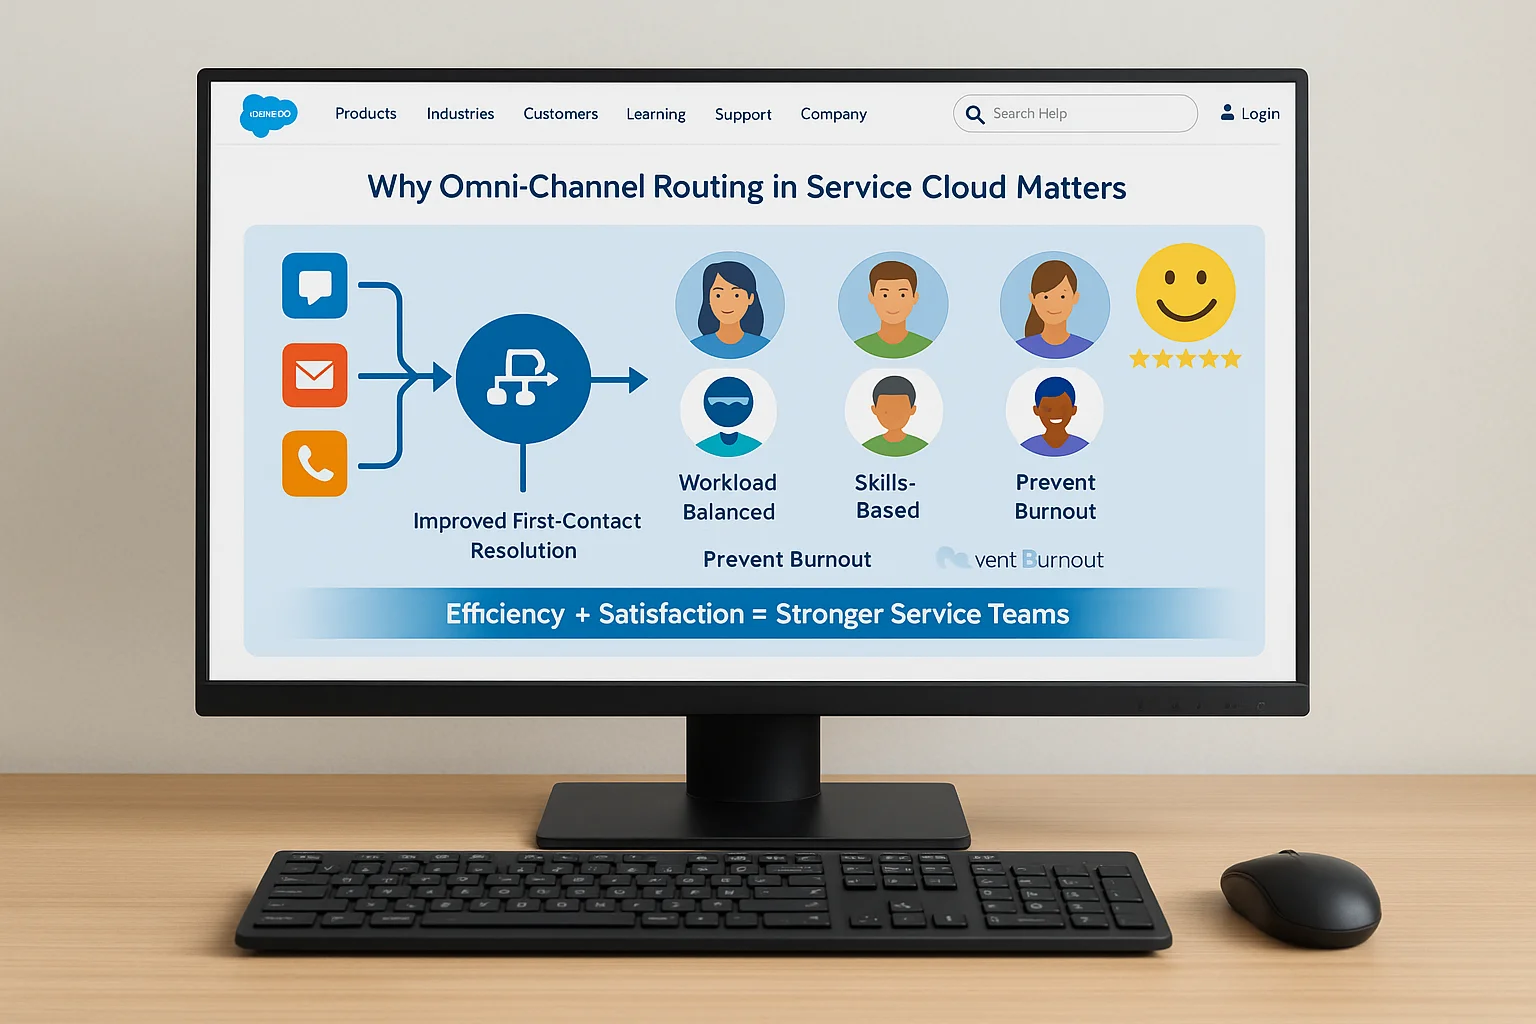
Omni‑Channel Routing in Service Cloud is more than a distribution system—it’s a strategy for maximizing service efficiency and customer satisfaction. By routing work based on predefined logic, businesses can improve first‑contact resolution rates, balance workloads, and prevent agent burnout. When implemented well, it becomes the backbone of a high‑performing support operation.
2. Understanding Salesforce Omni‑Channel Routing Basics
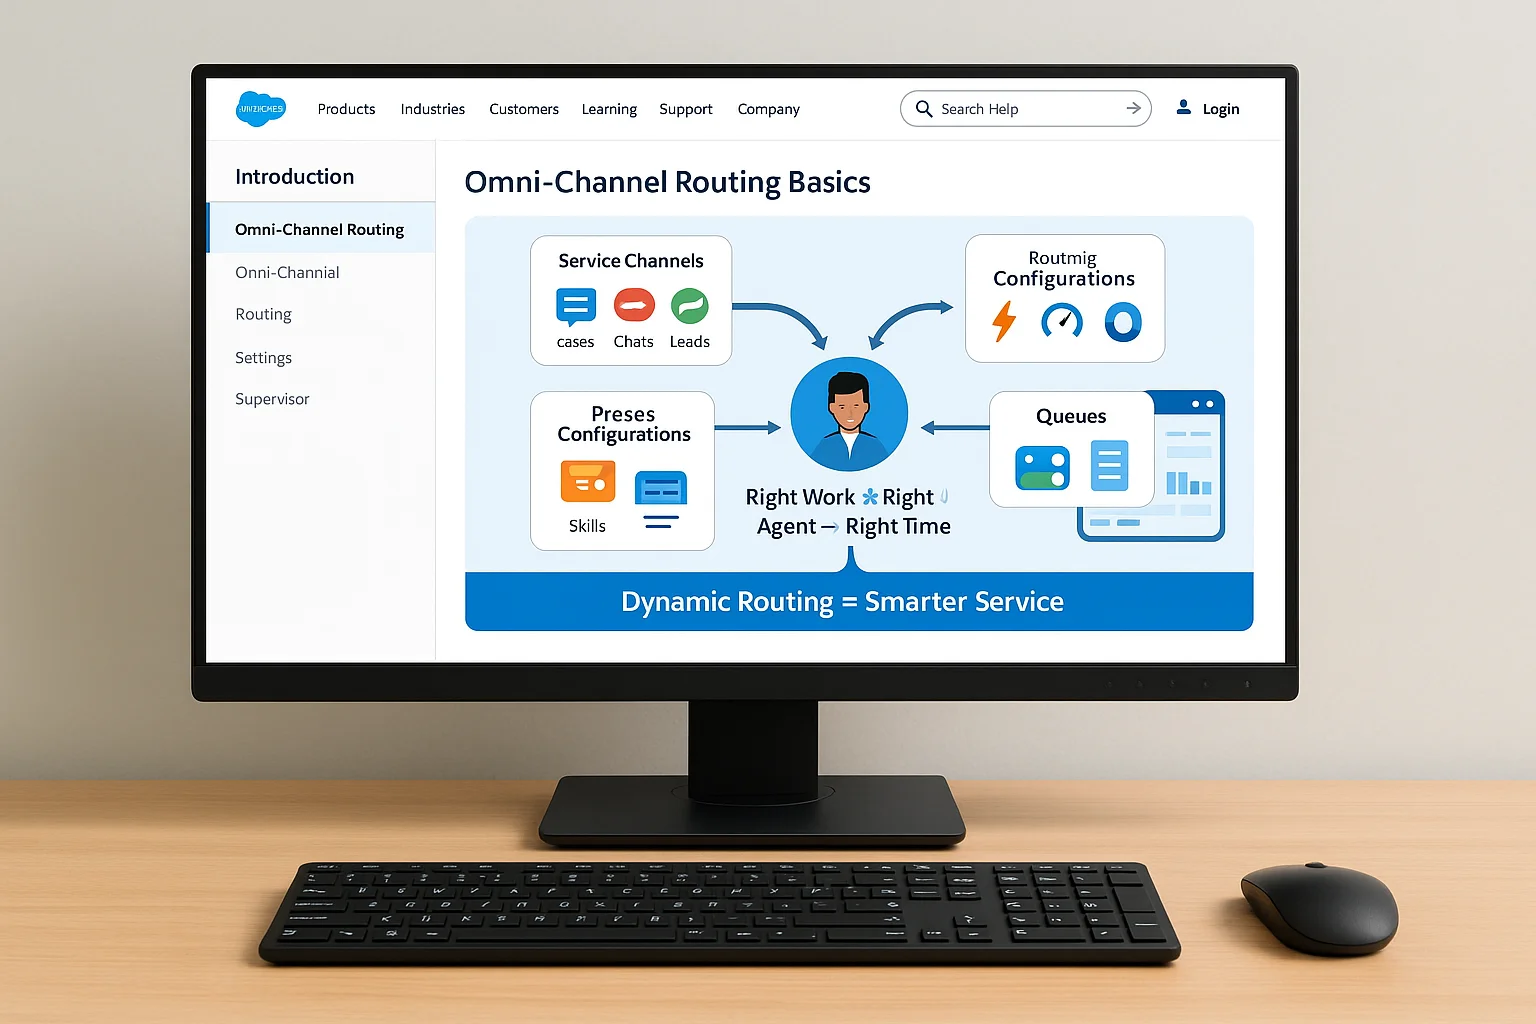
Salesforce Omni‑Channel in Service Cloud enables automatic case and work item assignment based on predefined routing logic. Rather than relying solely on first‑come, first‑served queues, Omni‑Channel evaluates agent capacity, skills, and priorities before routing work. This dynamic approach ensures the right agent receives the right work at the right time.
Key concepts include:
- Service Channels – Define the types of work items Omni‑Channel can route (cases, chats, leads, etc.).
- Routing Configurations – Specify priorities, capacities, and skill requirements for each type of work.
- Presence Configurations – Control which agents are available for routing and on which channels.
- Queues – Hold work items until an agent becomes available to take them.
In addition, Omni‑Channel integrates seamlessly with Omni‑Channel Supervisor, allowing managers to monitor agent workloads in real time.
3. Key Benefits of Omni‑Channel Routing for Service Teams
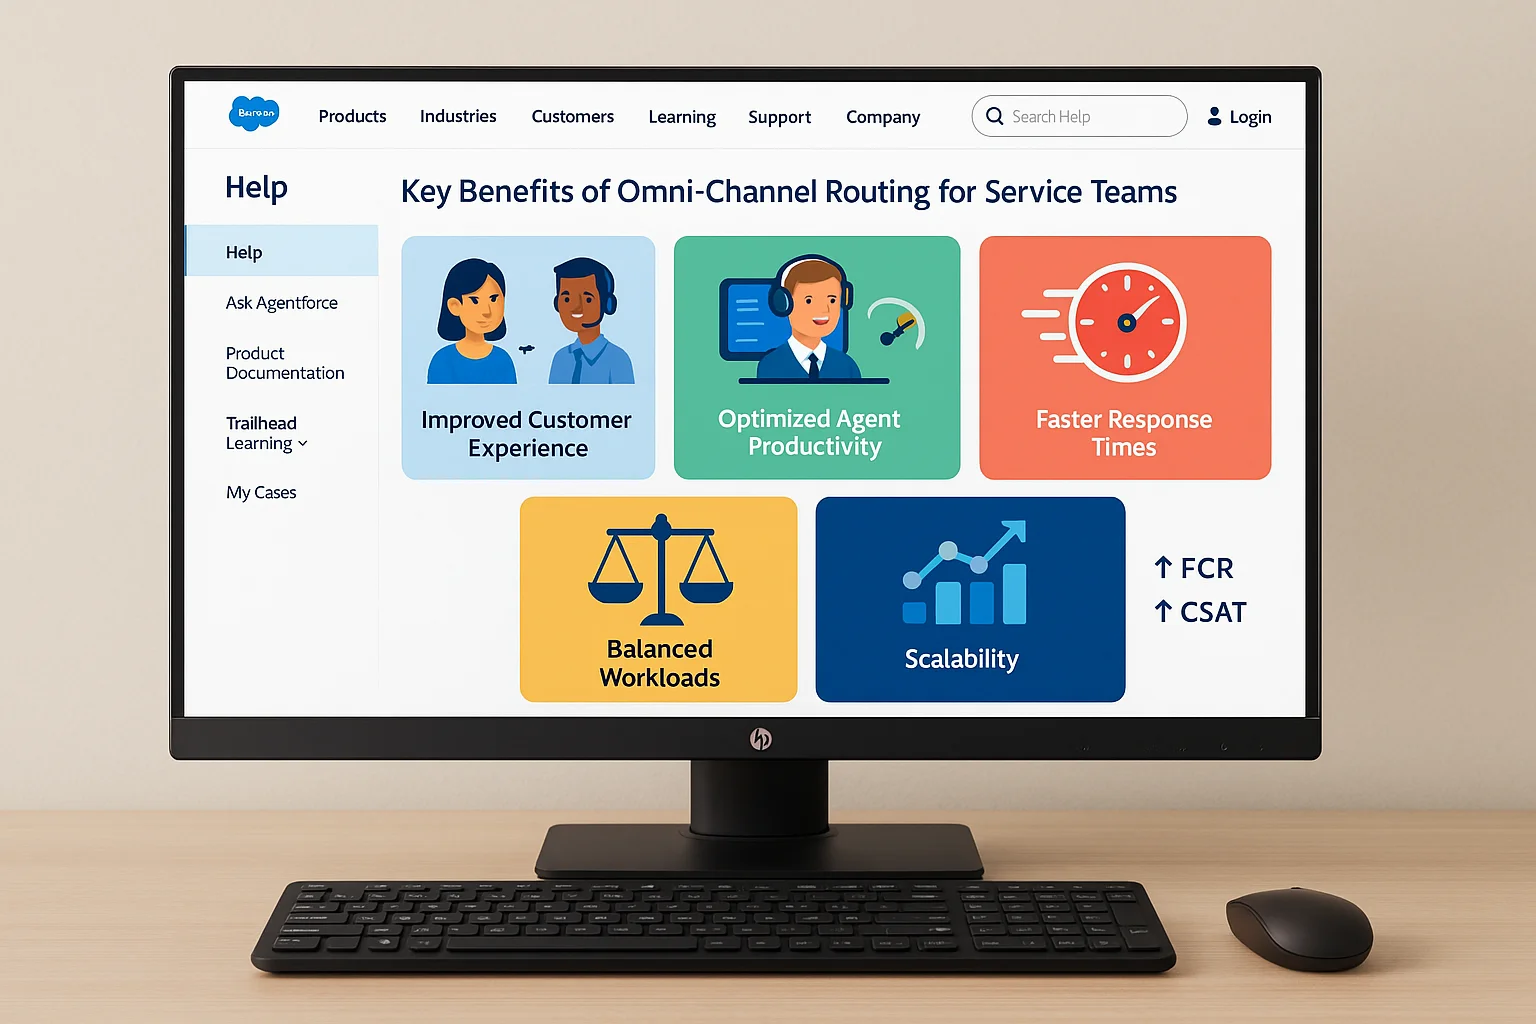
Adopting Omni‑Channel Routing in Service Cloud offers numerous operational and strategic advantages:
- Improved Customer Experience – Customers connect with the best‑suited agent without unnecessary transfers.
- Optimized Agent Productivity – Agents receive work based on skills and availability, preventing overload.
- Faster Response Times – Intelligent routing reduces delays for high‑priority work.
- Balanced Workloads – Ensures no single agent is overwhelmed while others are underutilized.
- Scalability – As new channels are added, routing rules adapt without major process overhauls.
As a result, organizations see measurable gains in service metrics like First Contact Resolution (FCR) and Customer Satisfaction Score (CSAT).
4. Pre‑Setup Checklist for Omni‑Channel in Service Cloud
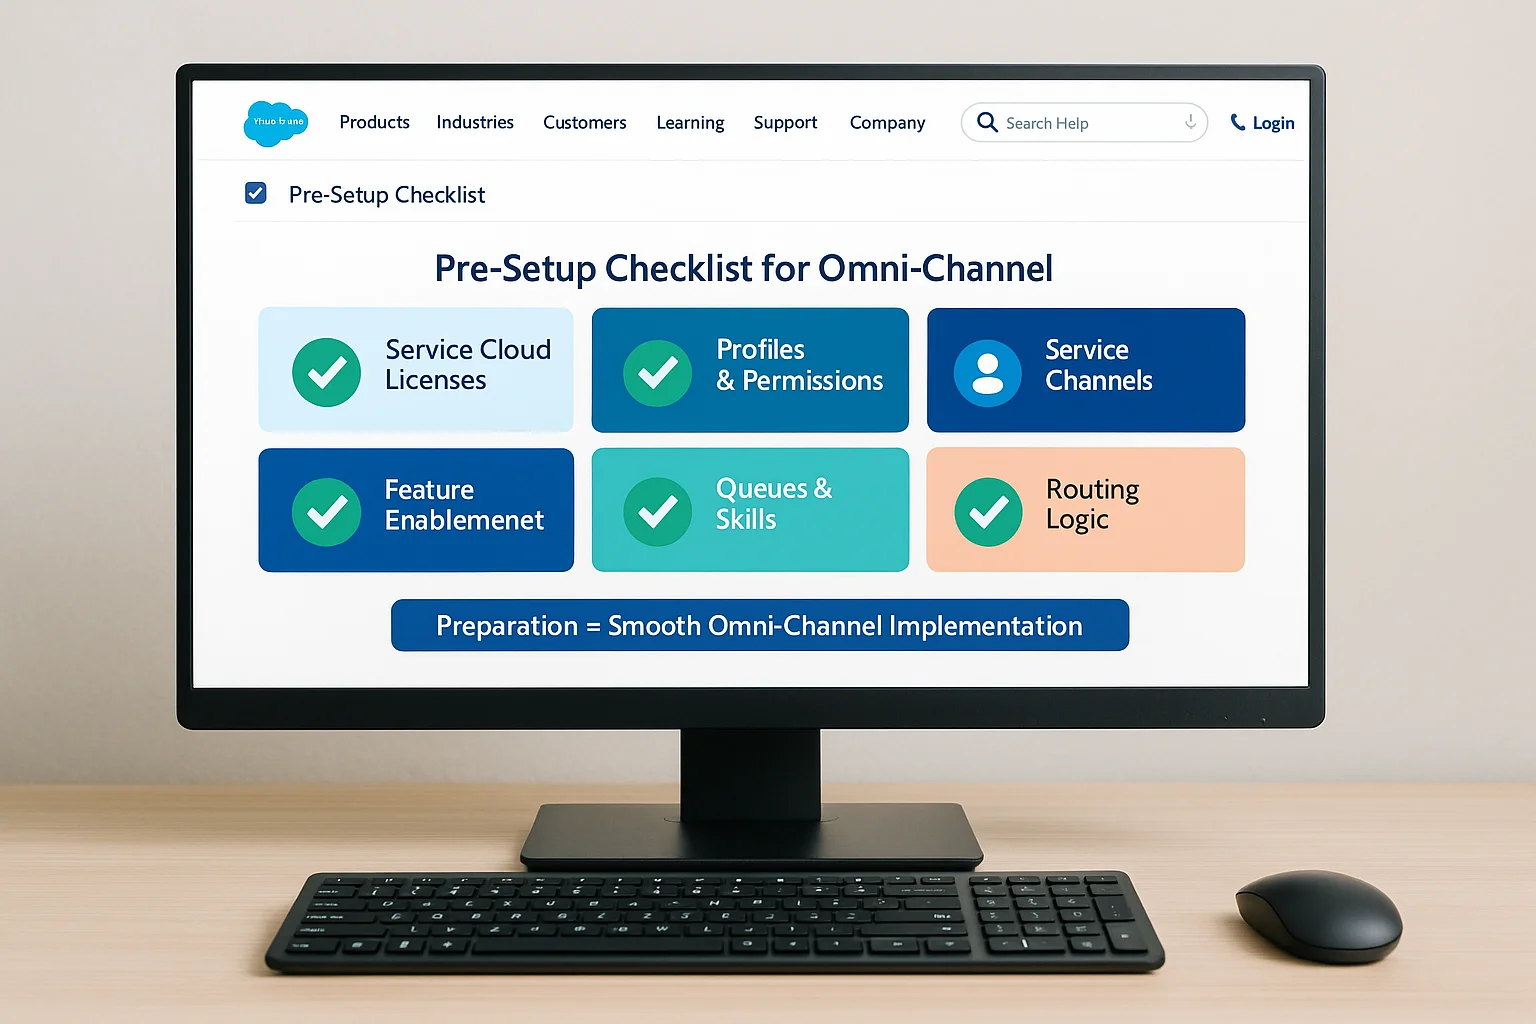
- Service Cloud Licenses – Users have the required licenses.
- Feature Enablement – Omni‑Channel is enabled in Salesforce Setup.
- User Profiles and Permissions – Assign the correct permissions for Omni‑Channel features.
- Defined Service Channels – Identify which work item types you will route.
- Queues and Skills Defined – Determine the skills and queue structures required.
- Routing Logic Drafted – Plan your routing strategy, including priorities and capacity models.
5. Step‑by‑Step Omni‑Channel Routing Setup in Service Cloud
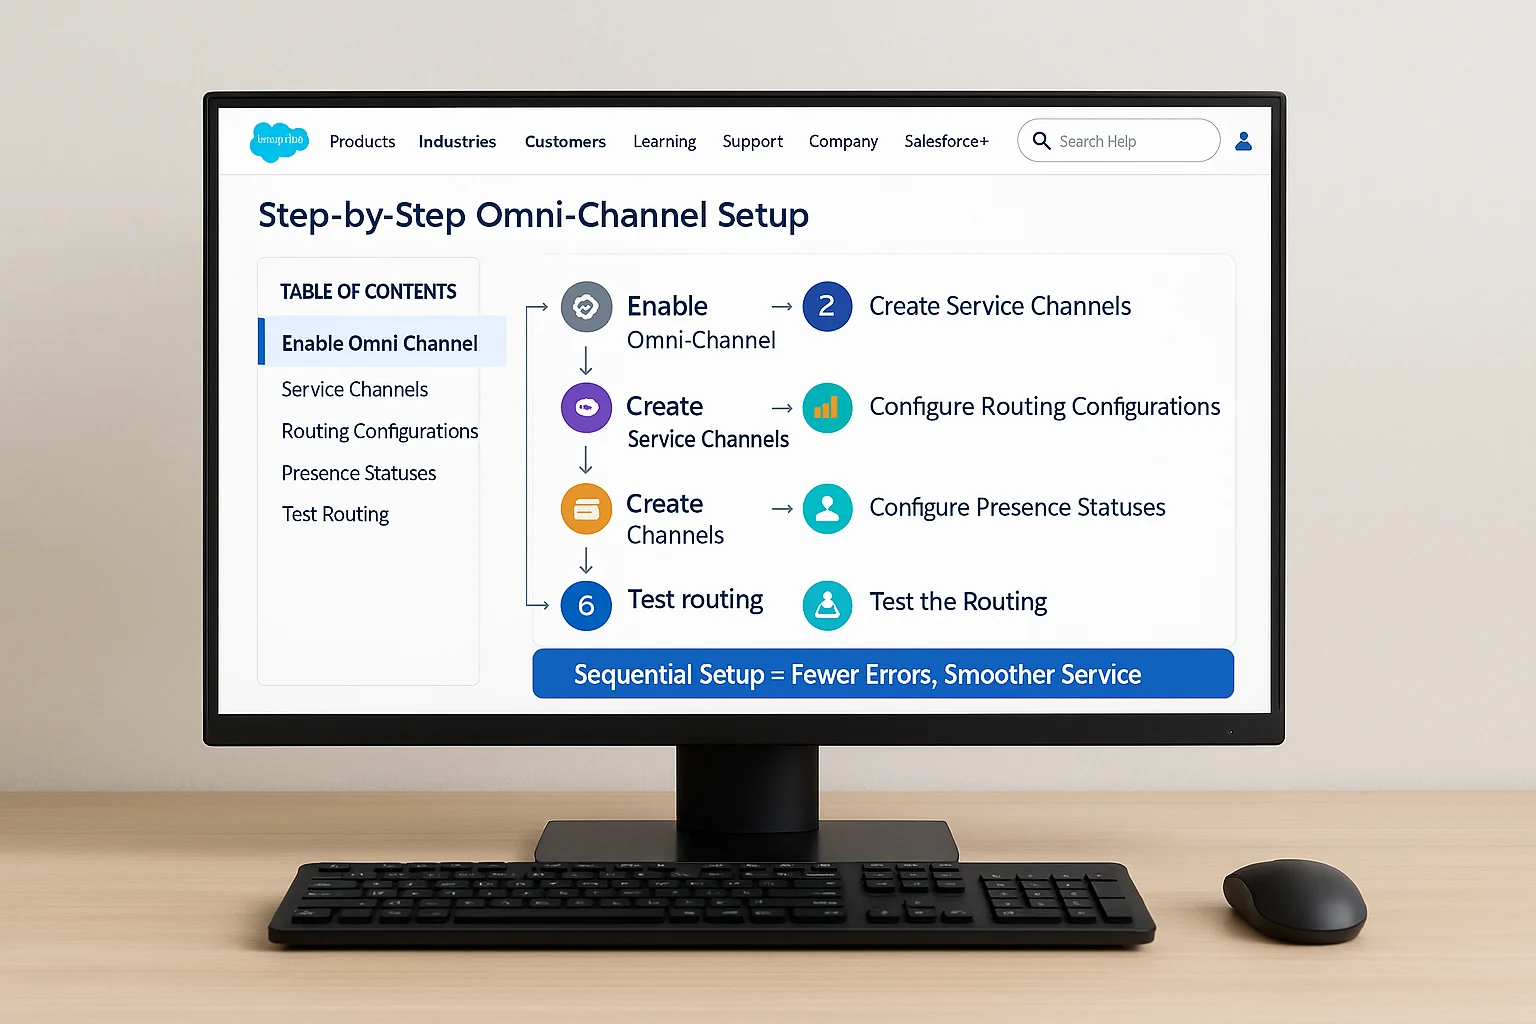
Follow these steps for a basic Omni‑Channel setup:
Step 1: Enable Omni‑Channel
- Navigate to Setup → Search “Omni‑Channel” → Enable.
Step 2: Create Service Channels
- Define channels like “Email Cases” or “Live Chat” and map them to Salesforce objects.
Step 3: Configure Routing Configurations
- Set priorities, work item size, and capacity for each channel.
Step 4: Create Queues and Assign Routing
- Link queues to routing configurations and assign agents.
Step 5: Configure Presence Statuses
- Add statuses like “Available for Chat” or “Available for Cases” and assign them to profiles.
Step 6: Test the Routing
- Use test cases to ensure rules route work as intended.
By moving through each step sequentially, you reduce the risk of misconfigurations that can disrupt live service.
6. Configuring Routing Configurations in Service Cloud Omni‑Channel
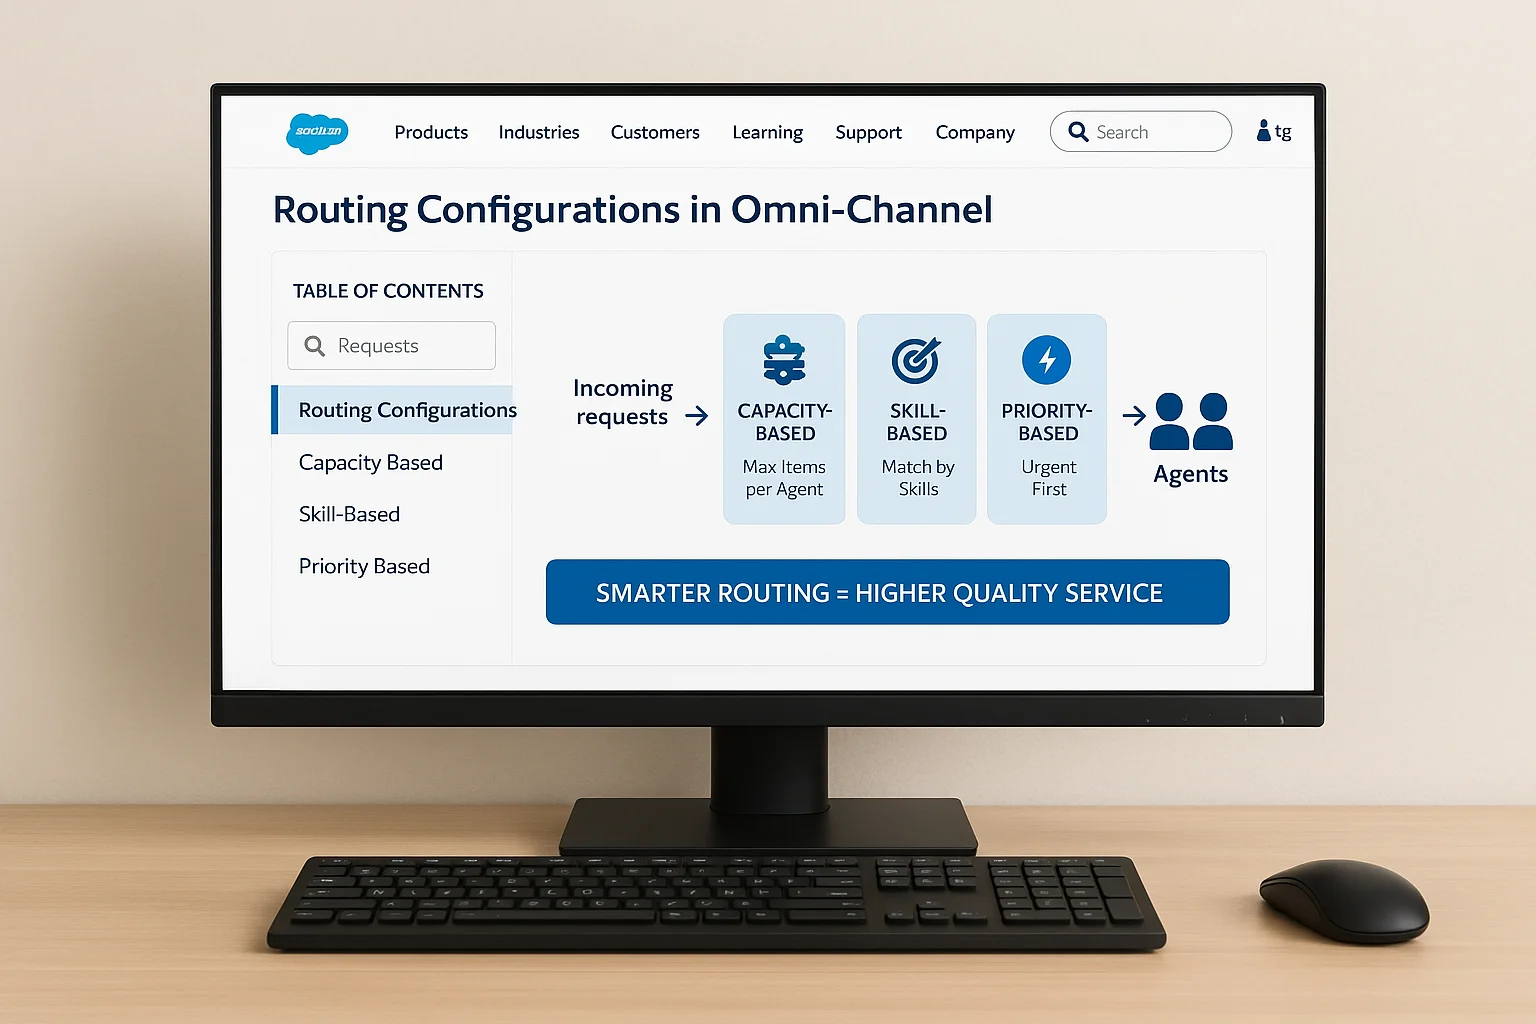
Routing configurations are the backbone of Omni‑Channel logic. They determine how quickly work is assigned and to whom.
Types of routing:
- Capacity‑Based Routing – Limits the number of work items per agent to prevent overload.
- Skill‑Based Routing – Matches work to agents with specific skills (e.g., language proficiency, product expertise).
- Priority‑Based Routing – Ensures urgent work is routed ahead of lower‑priority tasks.
Transitioning from basic queues to these routing methods can significantly improve service quality, particularly in high‑volume environments.
7. Service Channels, Queues, and Presence Status Setup
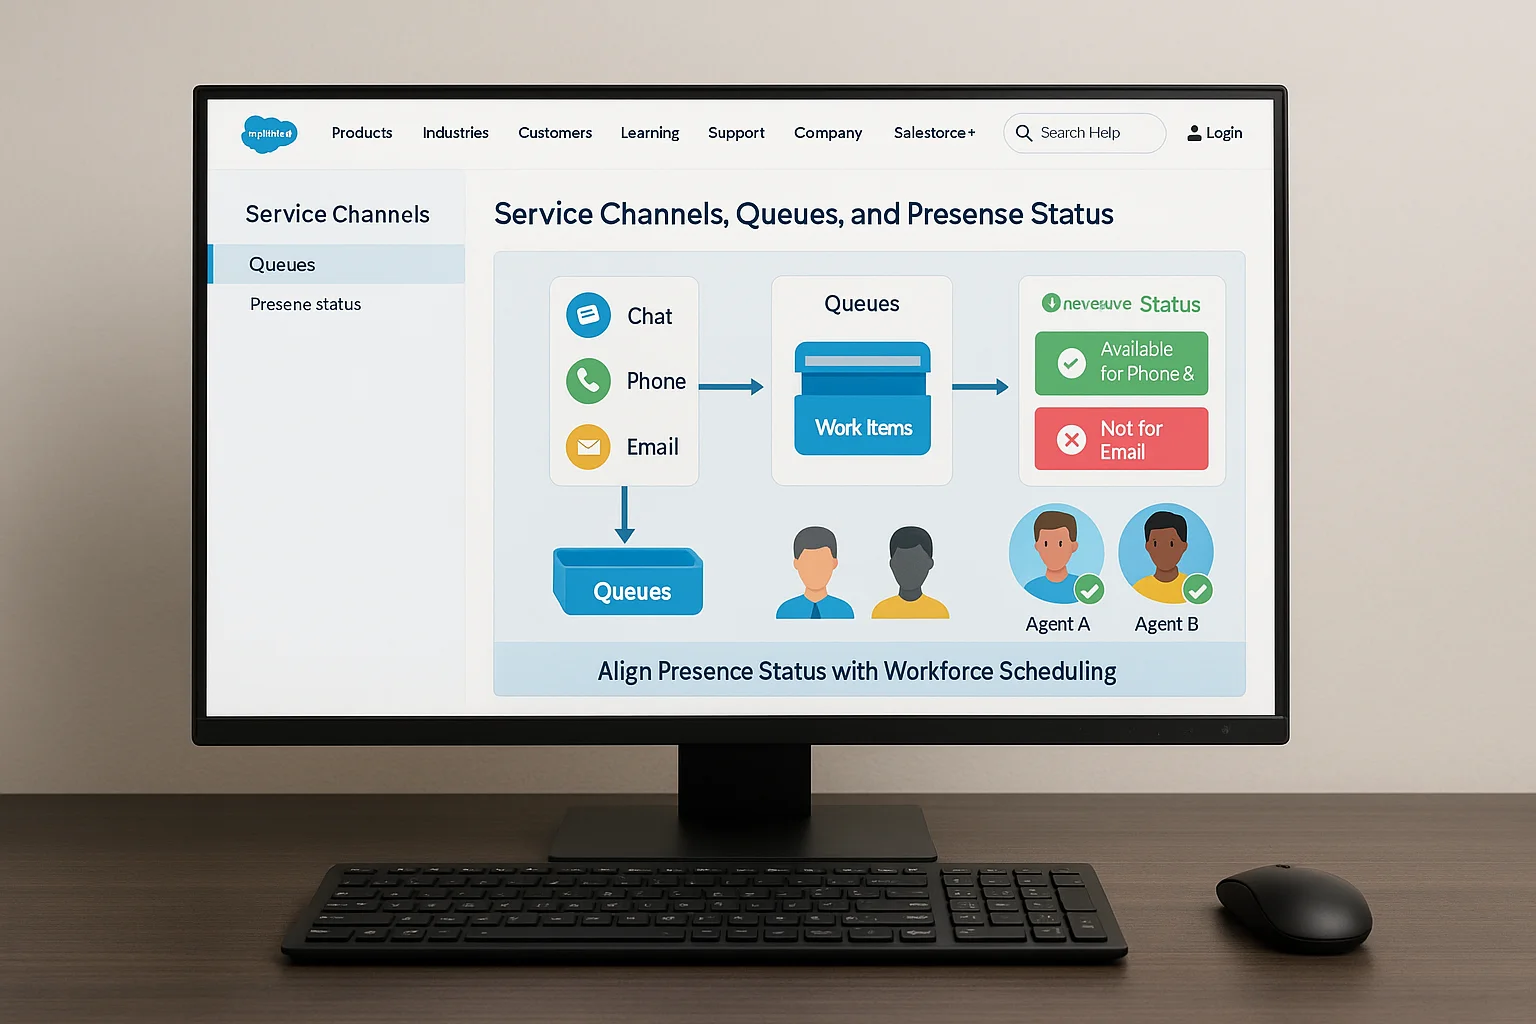
Service Channels translate Salesforce records into work items for routing.
Queues act as holding areas until an agent is available.
Presence Statuses determine which channels an agent can receive work from.
For example, an agent may be “Available for Phone and Chat” but not for email at certain times. This flexibility improves operational efficiency, as agents can focus on their strengths or priority channels during peak periods.
Therefore, it is essential to align presence statuses with your workforce scheduling and routing logic.
8. Best Practices for Omni‑Channel Routing Implementation
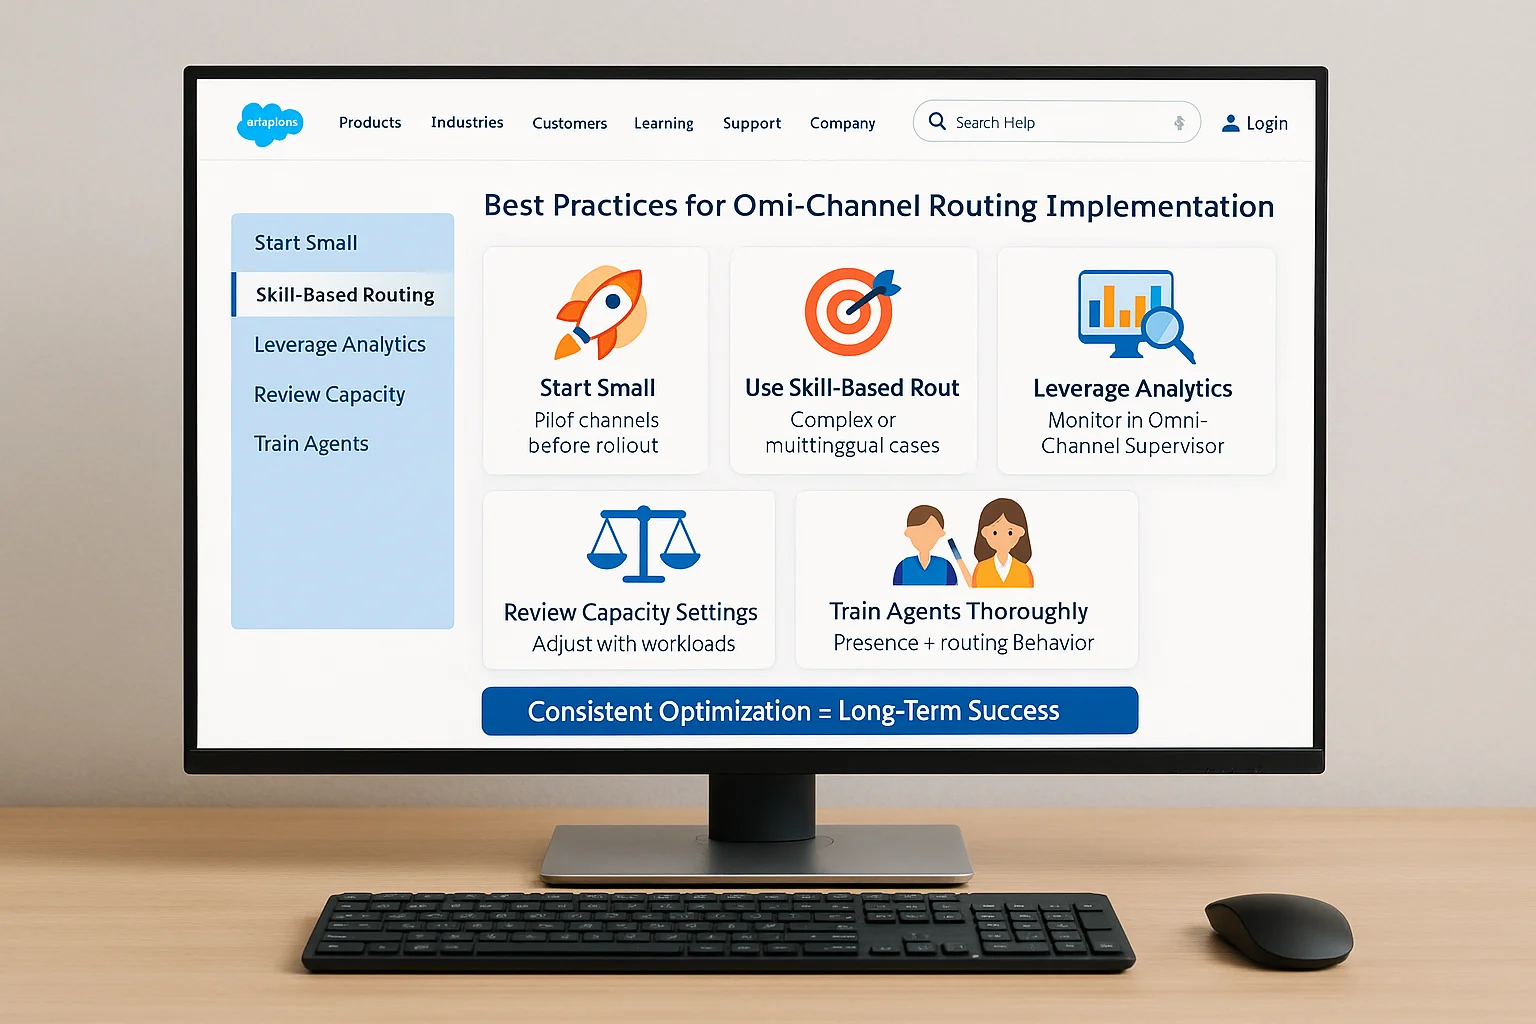
To ensure long‑term success:
- Start Small – Pilot with one or two channels before full rollout.
- Use Skill‑Based Routing – Particularly for complex products or multilingual support.
- Leverage Analytics – Monitor metrics in Omni‑Channel Supervisor to spot bottlenecks.
- Regularly Review Capacity Settings – Adjust as workloads evolve.
- Train Agents Thoroughly – Educate them on presence statuses and routing behavior.
In addition, consider enhancing team coordination by sending real‑time alerts when important cases are routed. Our How to Set Up Salesforce Slack Integration in 2025 guide explains how to connect Salesforce with Slack for instant notifications.
9. Common Mistakes in Omni‑Channel Routing and How to Avoid Them
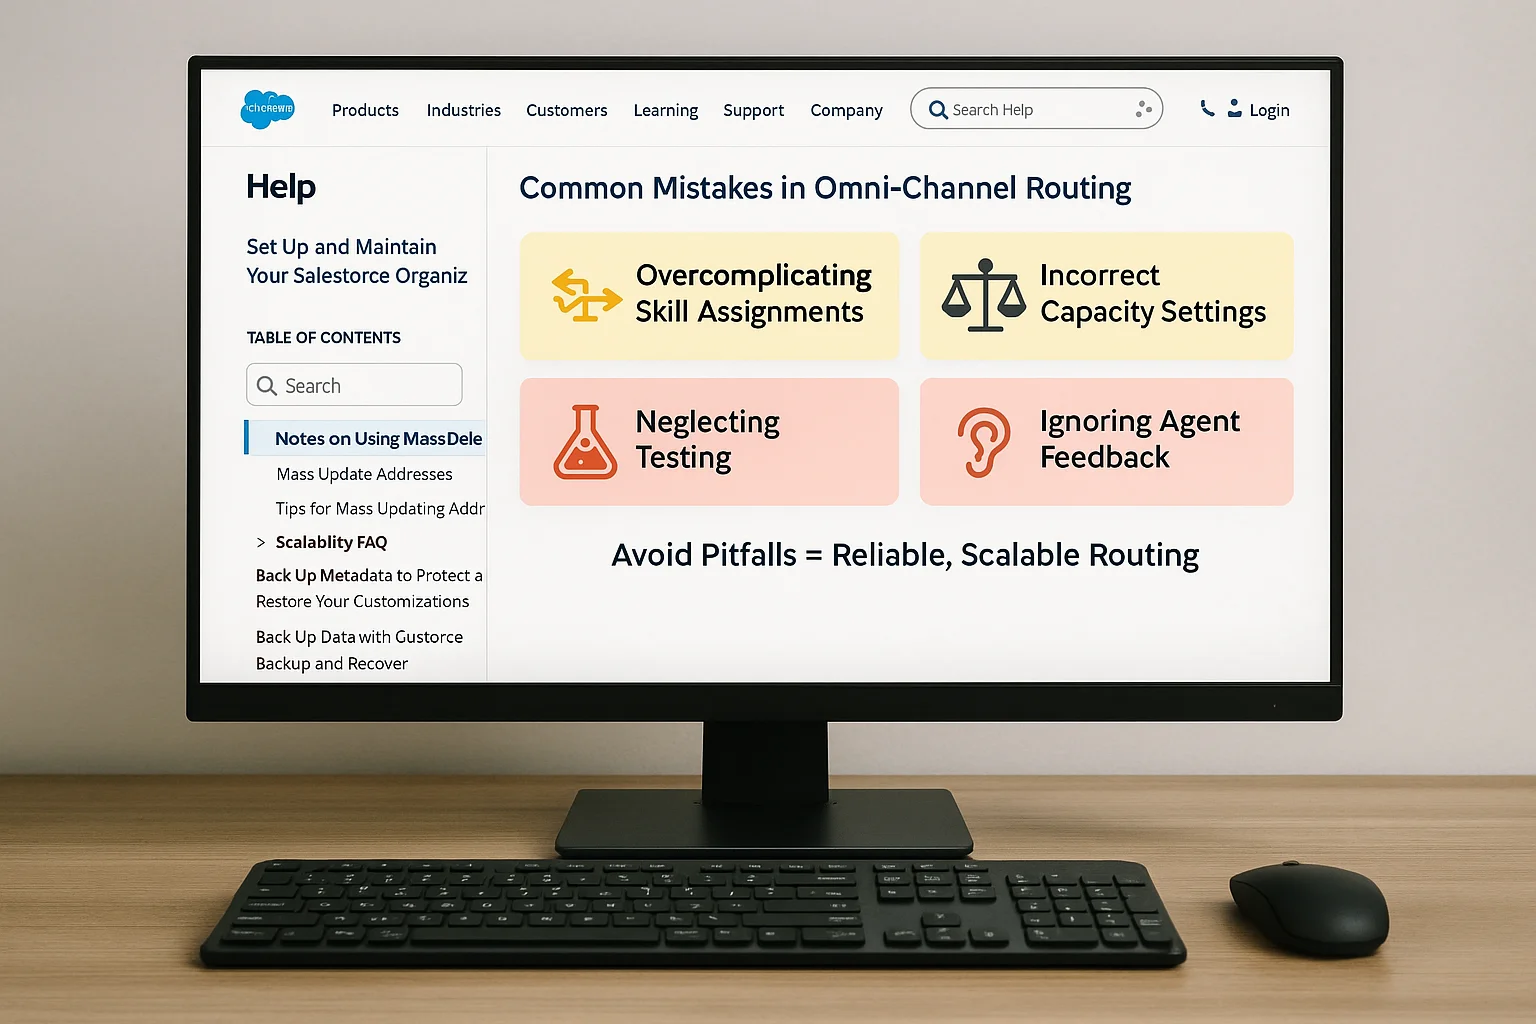
- Overcomplicating Skill Assignments – Too many skills can cause routing delays.
- Incorrect Capacity Settings – Underestimating capacity limits can overwhelm agents.
- Neglecting Testing – Failing to simulate real‑world conditions can result in misrouted work.
- Ignoring Agent Feedback – Frontline input can reveal hidden routing issues.
By avoiding these mistakes, you can maintain both agent satisfaction and customer experience quality.
10. Real‑World Example: VIP Case Routing in Service Cloud Omni‑Channel

Consider a scenario where VIP customer cases must be handled within 15 minutes. Omni‑Channel can be configured to:
- Assign VIP cases the highest priority.
- Match them to senior agents with specific skills.
- Route only when the agent’s capacity allows for immediate attention.
As a result, your VIP customers receive faster resolutions, and your brand reputation strengthens.
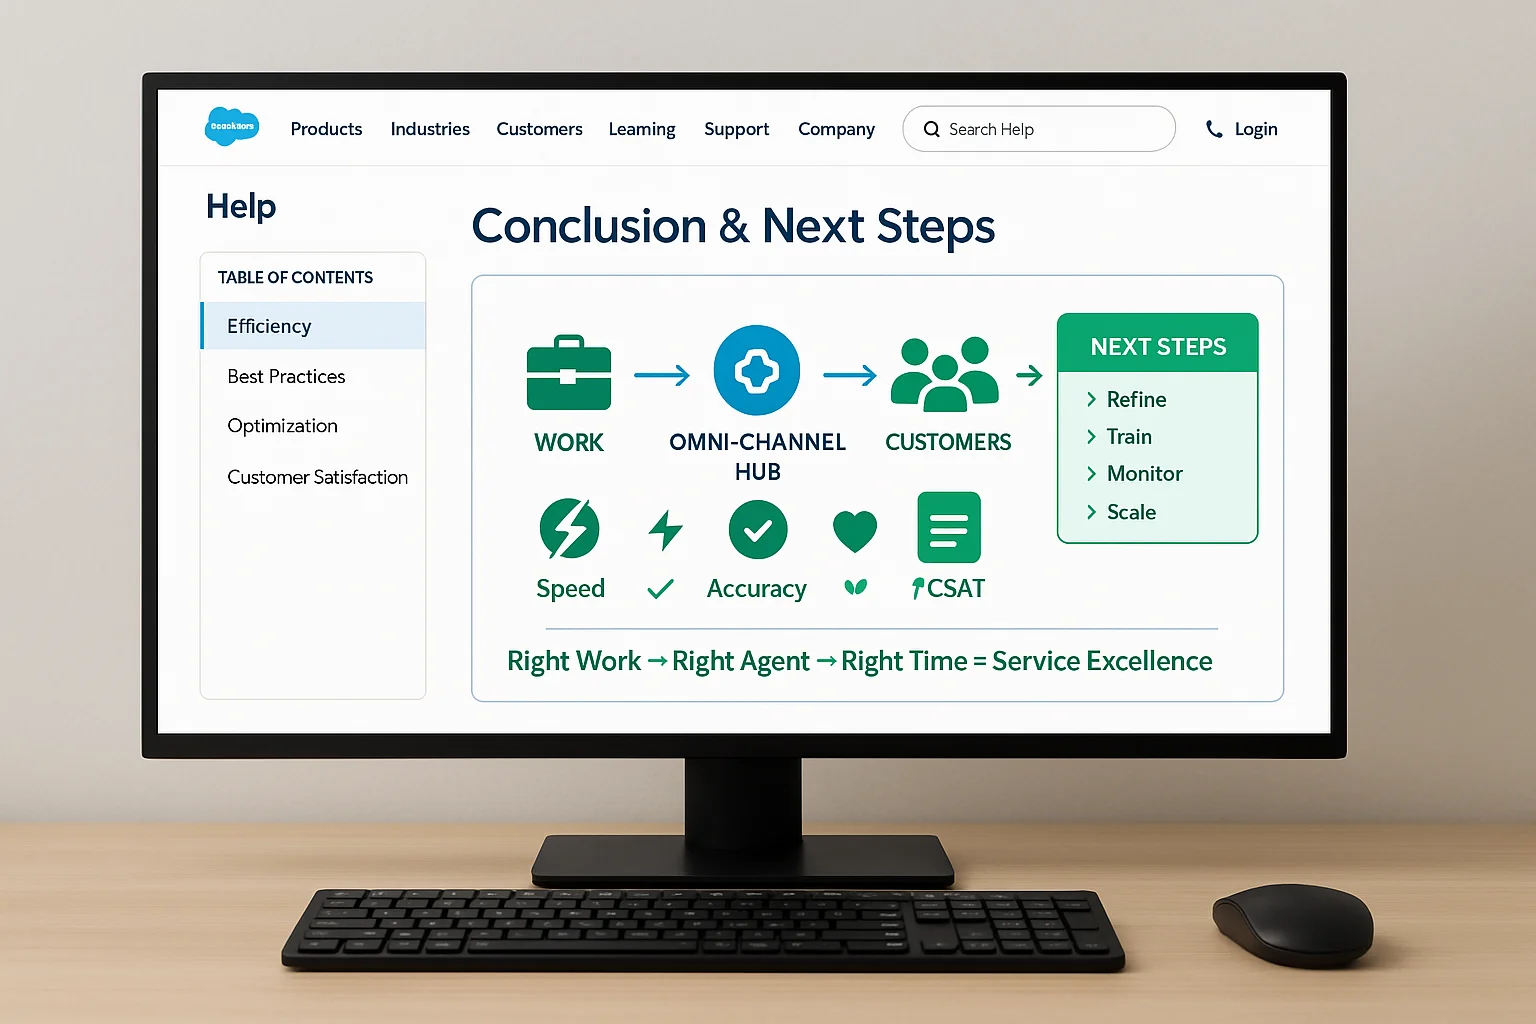
11. Conclusion and Next Steps for Service Cloud Omni‑Channel Routing
Omni‑Channel Routing in Service Cloud transforms service operations by ensuring the right work gets to the right agent at the right time. By following the configuration steps, aligning with best practices, and continuously optimizing, you can unlock higher efficiency and customer satisfaction.
If you’re exploring other Salesforce tools to automate customer journeys beyond case routing, check out our Setting Up Journey Builder: Beginner Guide for a step‑by‑step approach to Marketing Cloud automation.
FAQs
Does Omni‑Channel work with custom objects?
Yes, you can route custom object records by creating corresponding service channels.
Can I use Omni‑Channel without skill‑based routing?
Yes, but skill‑based routing offers more precise assignments for complex service needs.
How do I monitor agent workloads?
Use Omni‑Channel Supervisor to track active work, presence status, and performance metrics in real time.
What happens if no agents are available?
Work items remain in the queue until an eligible agent becomes available.
Can I integrate Omni‑Channel with third‑party tools?
Yes, APIs and integrations can extend routing to external platforms like chatbots or messaging apps.