Introduction: Why Journey Builder Matters
If you’re exploring Salesforce Journey Builder setup, you’re already on the path to delivering highly personalized, automated customer experiences within Salesforce Marketing Cloud (SFMC). In today’s hyper-competitive market, customer engagement can no longer be reactive or one-size-fits-all. Instead, brands must create timely, relevant, and contextual touchpoints across the entire customer lifecycle.
Journey Builder acts as the command center for this experience orchestration. It enables you to design end-to-end customer journeys that adapt in real time based on user behavior, preferences, and data insights. Whether it’s a simple welcome series or a complex, multi-branch lifecycle campaign, Journey Builder empowers marketers to move from “send and hope” to data-driven engagement strategies.
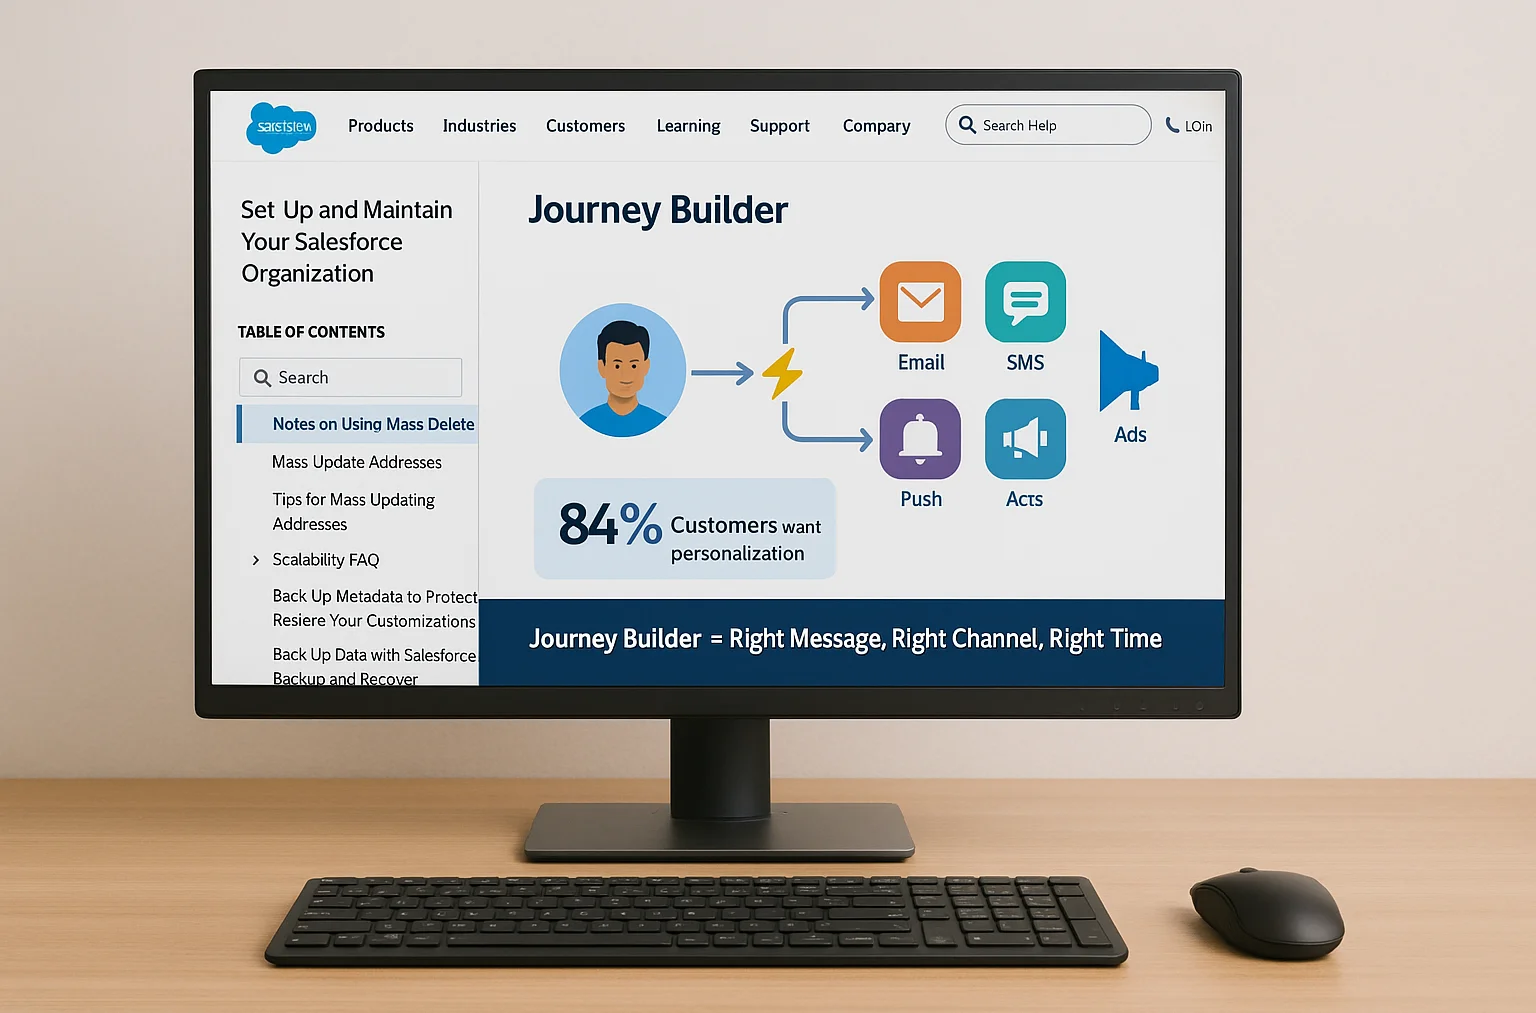
A study by Salesforce found that 84% of customers say being treated like a person, not a number, is key to winning their business. Journey Builder helps you operationalize this by delivering the right message, on the right channel, at the right time — every time.
1. Understanding the Basics
What is Journey Builder?
Journey Builder is a visual, drag-and-drop marketing automation tool within SFMC. It’s designed to help marketers create automated, event-driven campaigns that span multiple channels such as email, SMS, push notifications, ads, and even direct mail integrations.
What makes Journey Builder different from basic automation? Dynamic adaptability. It doesn’t just send pre-scheduled messages — it reacts to what customers do (or don’t do) and routes them through different paths accordingly.
For example:
- If a customer opens your email but doesn’t click, they can be sent a follow-up with a stronger CTA.
- If they click but don’t purchase, they can be shown a retargeting ad.
- If they purchase, they can be added to an upsell journey.
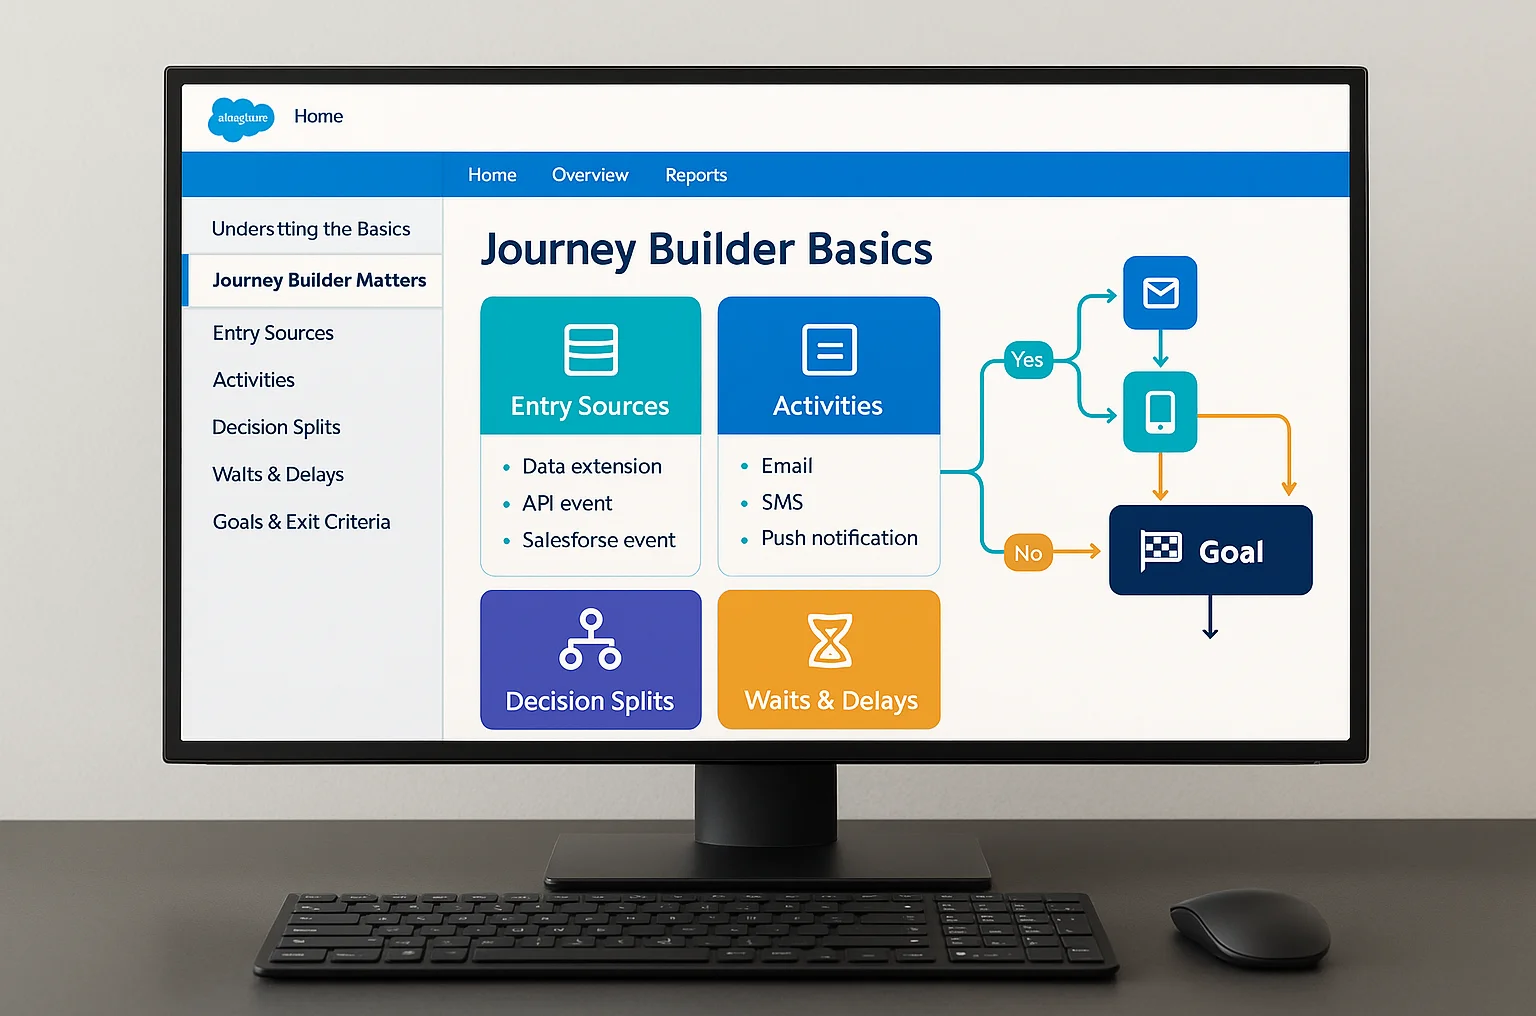
Core Concepts You Must Know
- Entry Sources – The starting point of a journey. Examples:
- Data extension entry (based on imported or synced lists).
- API events (real-time triggers from an external system).
- Salesforce event triggers (case creation, lead conversion, etc.).
- Data extension entry (based on imported or synced lists).
- Activities – Actions the journey performs:
- Email sends
- SMS messages
- Push notifications
- Updates to Salesforce objects
- Email sends
- Decision Splits – Conditional logic that changes the journey path.
- Waits & Delays – Control the timing between steps.
- Goals & Exit Criteria – Define when the journey should end for a customer.
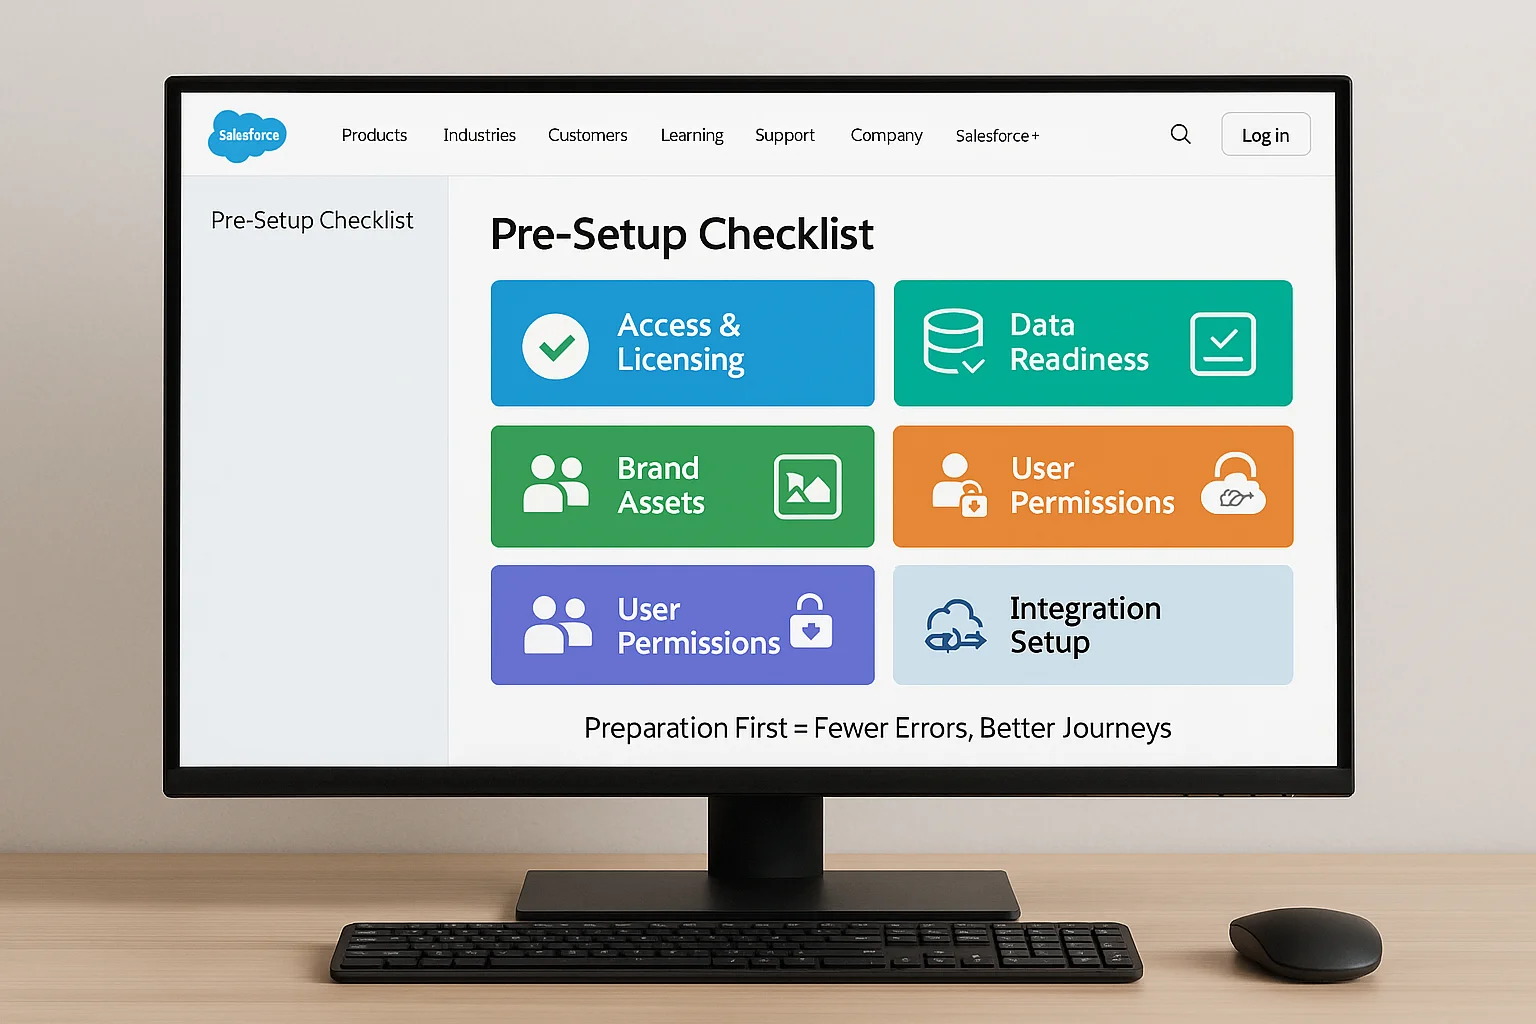
2. Pre-Setup Checklist
- Access & Licensing
- Ensure you have an active SFMC account with Journey Builder enabled.
- Data Readiness
- Verify that your data sources (CRM, data extensions, APIs) are clean and up-to-date.
- Brand Assets
- Email templates, SMS sender IDs, push certificates, and brand images.
- User Permissions
- Make sure the right team members have permissions to edit, activate, and pause journeys.
- Integration Setup
3. Step-by-Step Setup Process
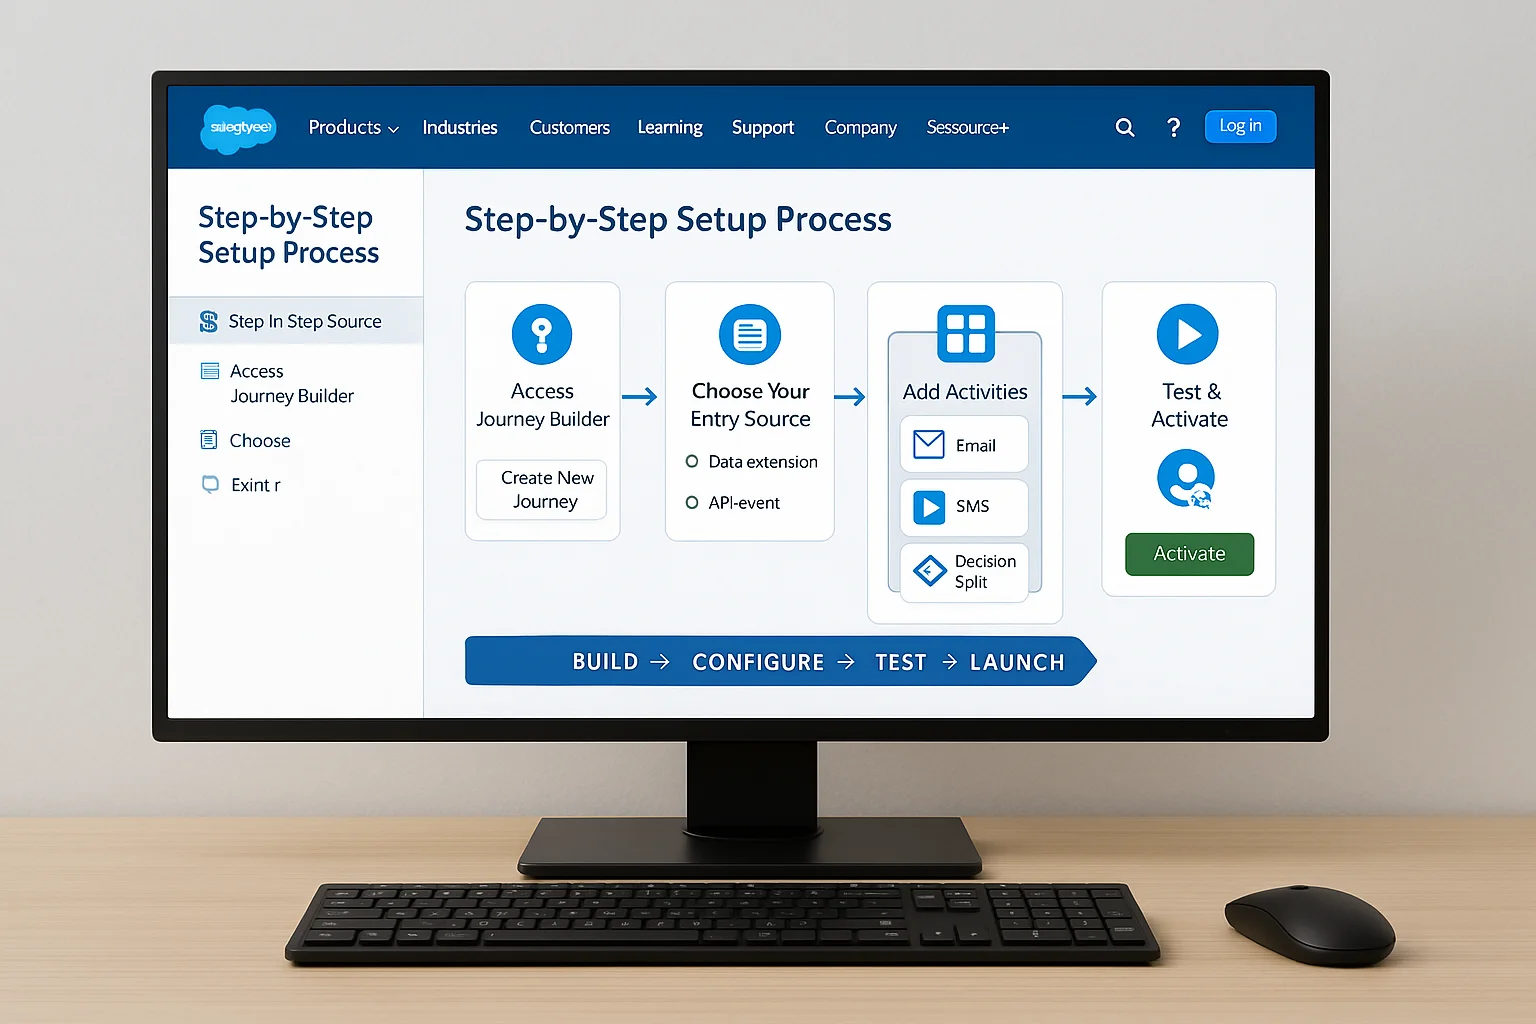
Here’s the beginner-friendly, five-step guide to building your first journey:
Step 1: Access Journey Builder
Log in to SFMC → Go to Journey Builder under the Journey tab. Click “Create New Journey.”
Step 2: Choose Your Entry Source
Decide how customers will enter:
- For a welcome series, choose a data extension of new sign-ups.
- For event-based journeys, use an API entry event.
Step 3: Add Activities
Drag and drop your activities into the canvas:
- Email sends (choose from Content Builder templates).
- SMS sends (integrated via Mobile Studio).
- Decision splits (Yes/No conditions based on engagement).
Step 4: Configure Wait Times & Triggers
- Wait 1 day after a welcome email before sending a follow-up.
- Use engagement splits for personalization.
Step 5: Test & Activate
- Use test audiences to verify paths.
Activate once confident — remember, live changes won’t always apply to people already in progress.
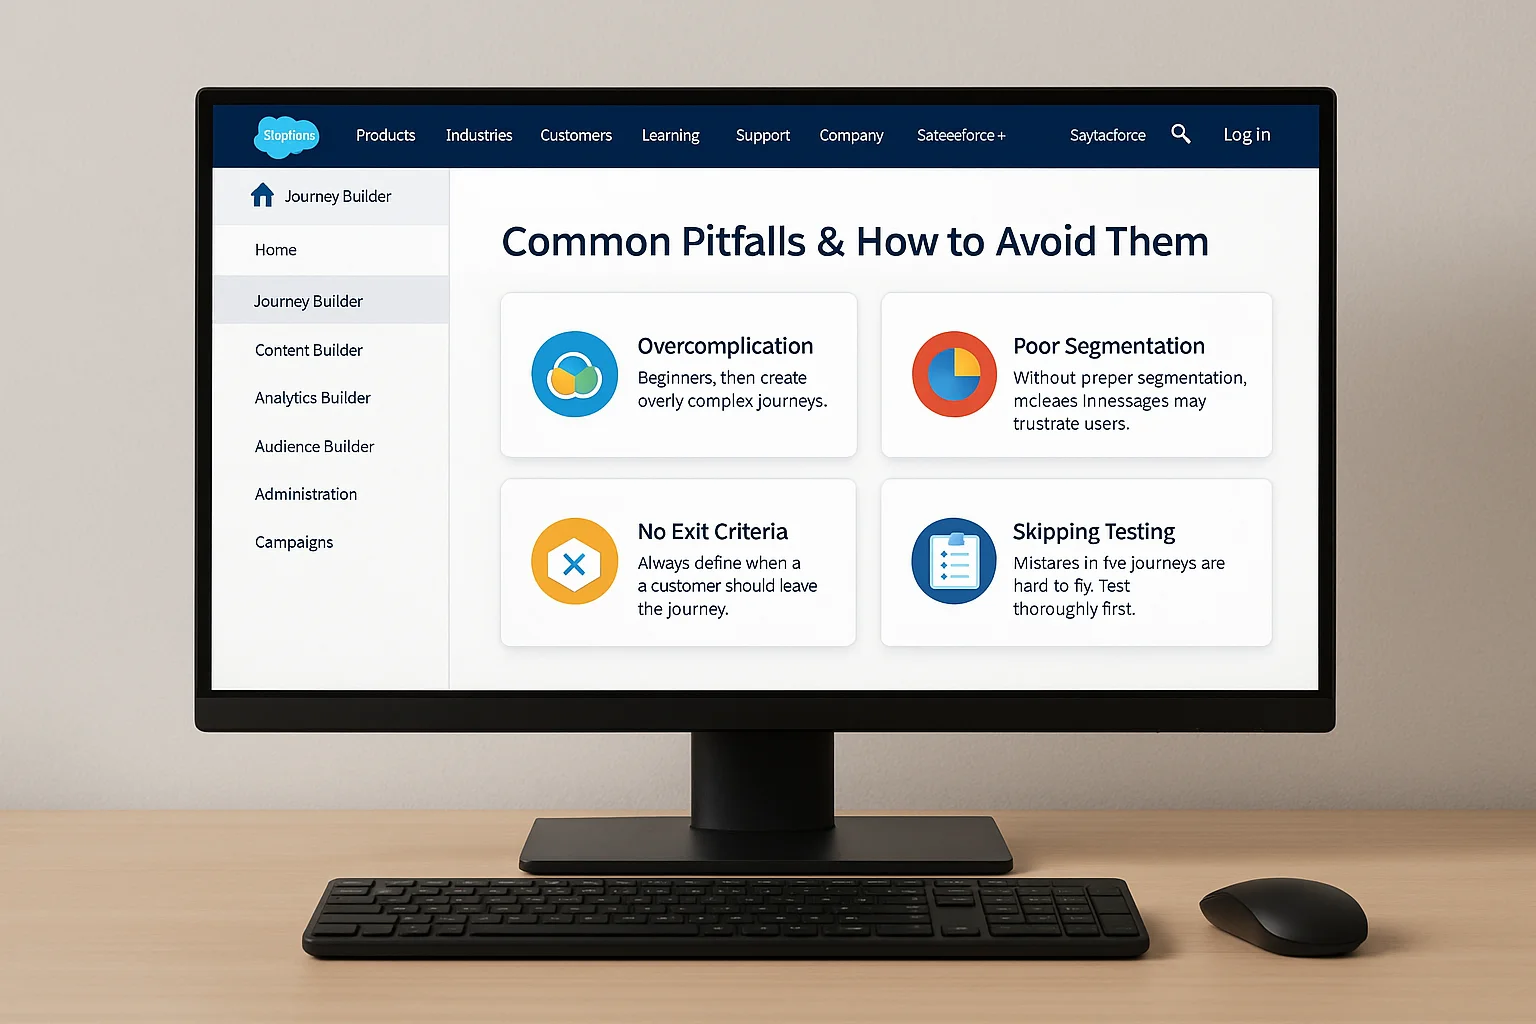
4. Common Pitfalls & How to Avoid Them
- Overcomplication
- Beginners often create overly complex journeys. Start simple.
- Beginners often create overly complex journeys. Start simple.
- Poor Segmentation
- Without proper segmentation, irrelevant messages may frustrate users.
- Without proper segmentation, irrelevant messages may frustrate users.
- No Exit Criteria
- Always define when a customer should leave the journey.
- Always define when a customer should leave the journey.
- Skipping Testing
Mistakes in live journeys are hard to fix. Test thoroughly first.
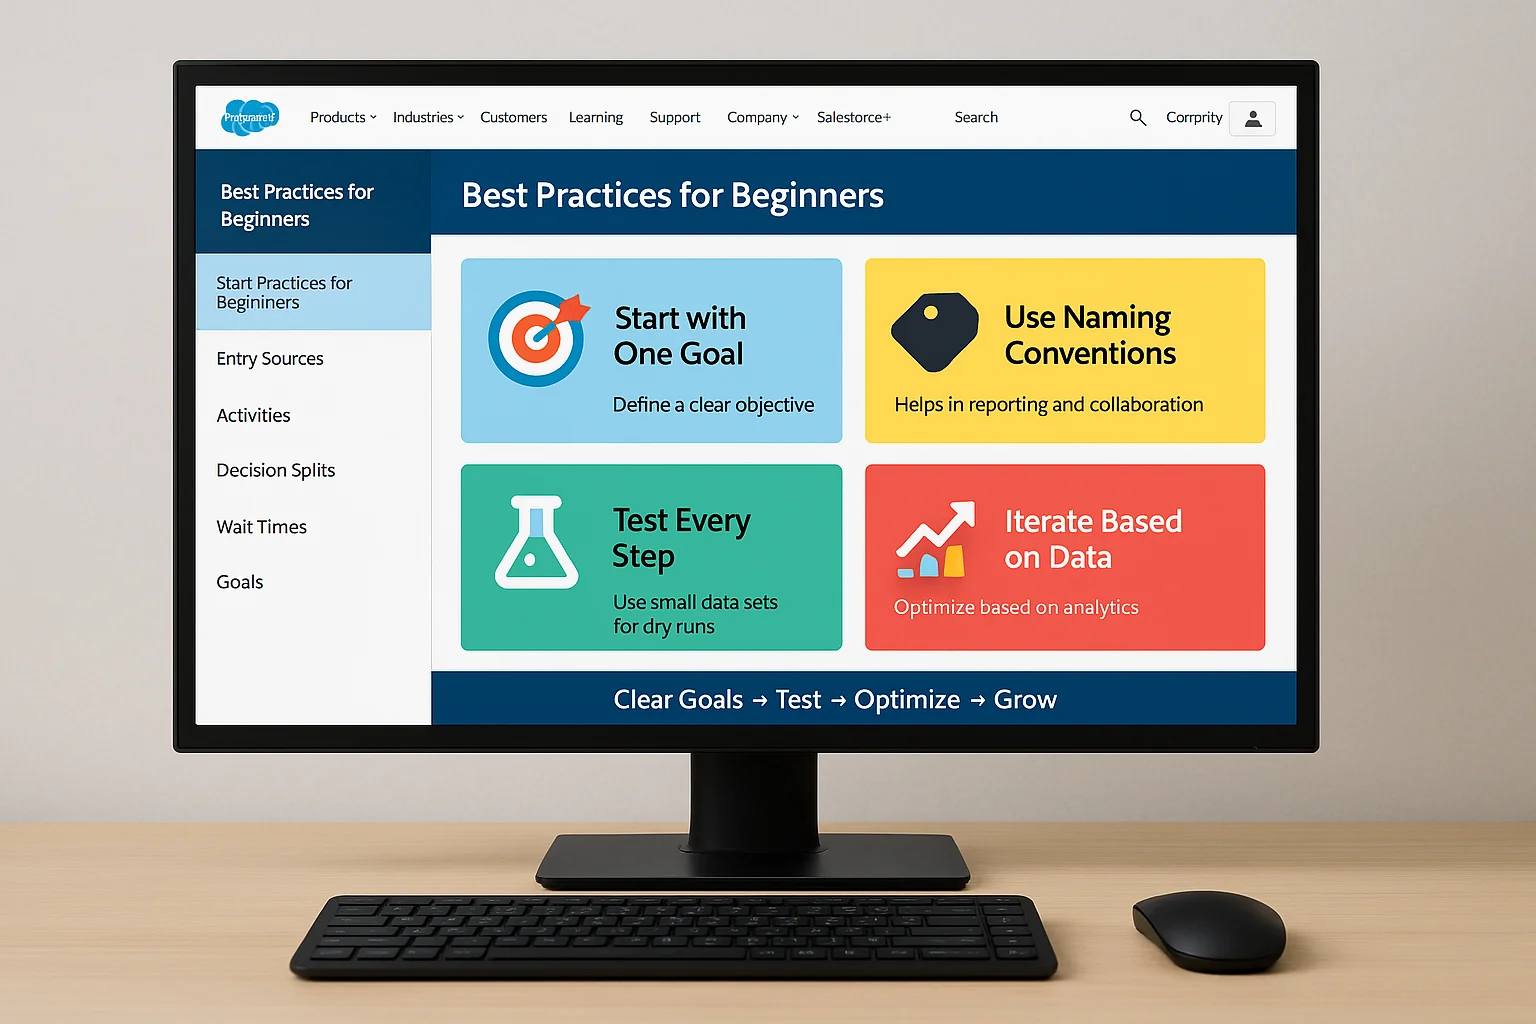
5. Best Practices for Beginners
- Start with One Goal
Define a clear objective for the journey. - Use Naming Conventions
Helps in reporting and collaboration. - Test Every Step
Use small data sets for dry runs. - Iterate Based on Data
Optimize based on analytics — open rates, click-through rates, conversions.
Advanced users sometimes enhance their journeys by integrating real‑time notifications for internal teams. For example, you can connect Salesforce Marketing Cloud with Slack so that when a customer completes a key journey stage, your sales or support team gets an instant alert. Our [How to Set Up Salesforce Slack Integration in 2025] guide shows how to configure this connection for better team responsiveness.
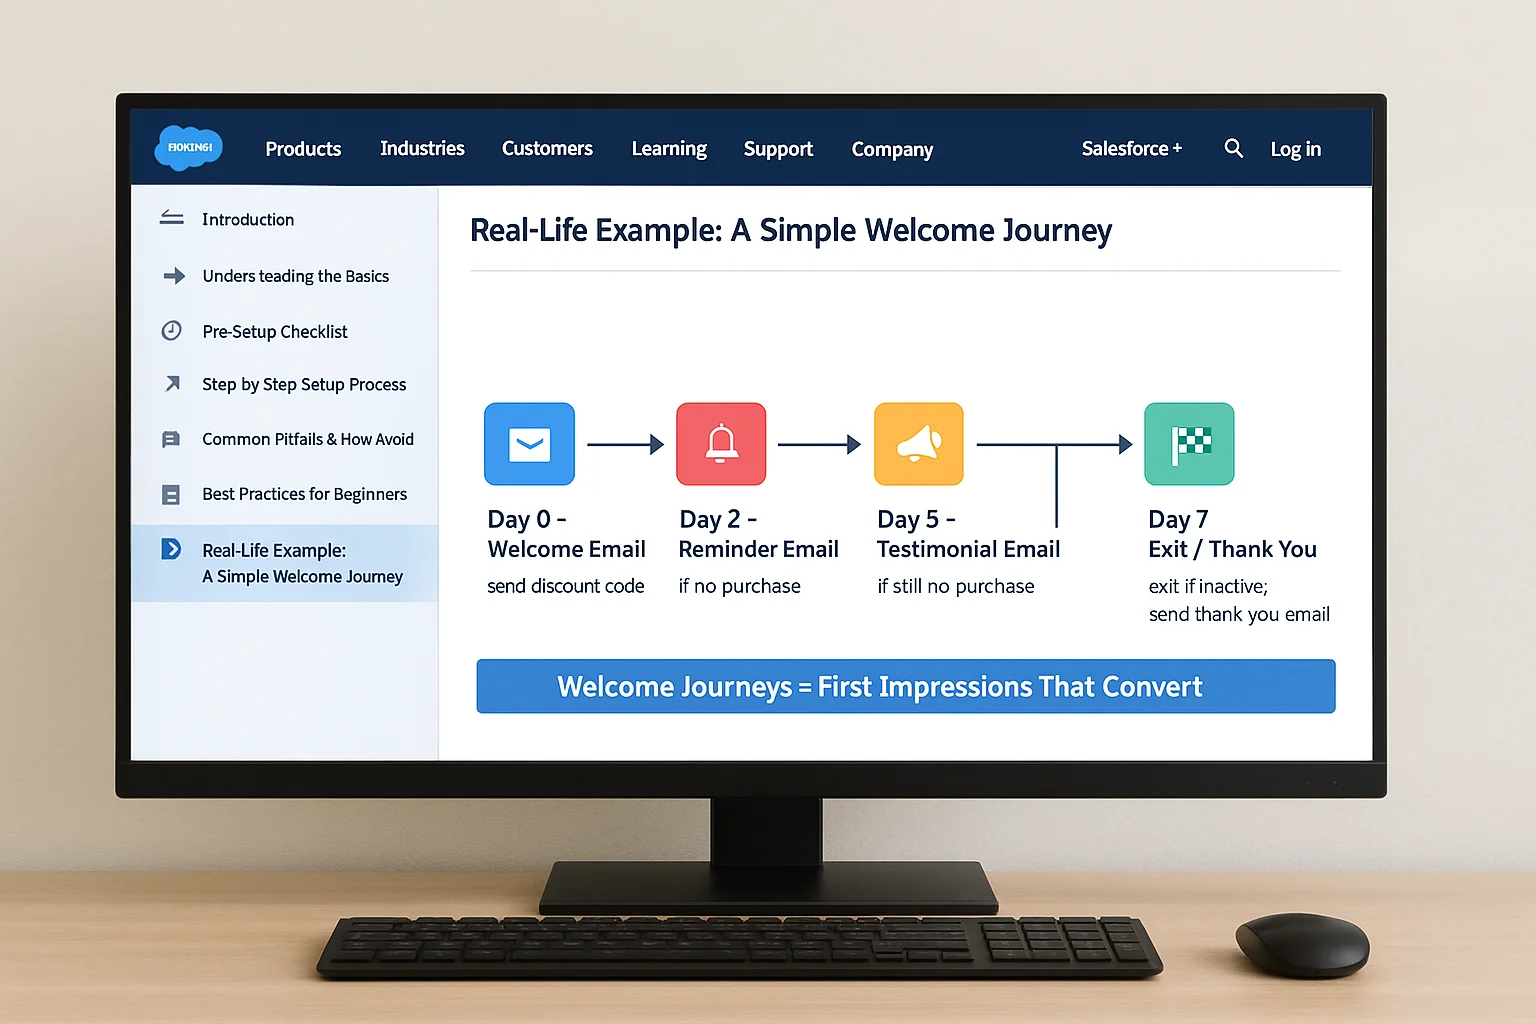
6. Real-Life Example: A Simple Welcome Journey
Scenario: An e-commerce brand wants to welcome new subscribers.
Flow:
- Day 0: Send welcome email with discount code.
- Day 2: If no purchase, send a reminder email.
- Day 5: If still no purchase, send a customer testimonial email.
- Day 7: Exit journey if inactive; if purchased, send thank-you email.

7. Conclusion & Next Steps
Journey Builder is the cornerstone of Salesforce Marketing Cloud automation. When used effectively, it turns fragmented marketing efforts into a seamless, customer-centric experience. The key is to start simple, ensure your data is clean, and evolve your strategies based on measurable results.
FAQs
What’s the difference between Journey Builder and Automation Studio?
Journey Builder focuses on individual, event-triggered automation, while Automation Studio is for bulk, schedule-based automation.
Can I edit a live journey?
Yes, but edits may not affect customers already in progress. Always test before going live.
What’s the easiest first journey to build?
A simple welcome series — easy to measure and quick to set up.
How can I connect Journey Builder to my CRM?
Use Marketing Cloud Connect for real-time sync between Salesforce CRM and SFMC.
How do I track journey performance?
Use the Analytics Dashboard to monitor engagement and conversion metrics.