Introduction

1. Why Use Salesforce Approval Processes?
A Salesforce Approval Process is a workflow automation tool that routes records through one or more approvers based on set criteria. It supports both standard objects (like Opportunities, Cases) and custom objects (like Expense_Request__c, Leave_Request__c).
Key benefits:- Efficiency – Cuts down on manual email follow-ups and routes records automatically.
- Consistency – Enforces standardized decision-making criteria.
- Auditability – Tracks every action, approver, and timestamp.
- Compliance – Ensures policies and thresholds are met.
- Scalability – Handles simple to multi-step, parallel, and conditional approvals.
2. Planning & Prerequisites
Before building an approval process in Salesforce, it’s important to set up the essentials. Proper planning ensures the process runs smoothly and meets business goals.
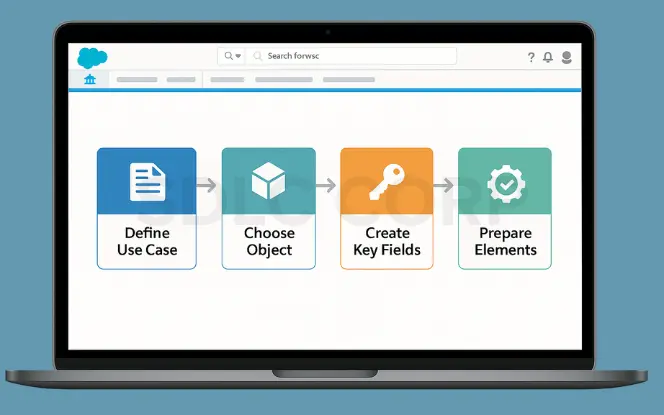
1. Define the Use Case
Clearly outline when and why the approval is needed.
Example: Approvals for Opportunity discounts over $100K.
2. Choose the Right Object
Decide if you’re using a:
- Standard Object (e.g., Opportunity, Case)
- Custom Object (e.g., Leave_Request__c)
3. Create Key Fields
Add custom fields for tracking and assignment:
- Approval Status (Picklist: Draft, Pending, Approved, Rejected, Recalled)
- Approver Lookup Fields (e.g., Manager__c, Finance_Head__c)
4. Prepare Supporting Elements
Make sure the following are ready:
- Email Templates for approval alerts
- Validation Rules to prevent unauthorized changes
- Page Layout Updates to show approval fields
Flow or Process Builder (if pre-checks are needed)
3. Step‑by‑Step Setup of Approval Process in Salesforce
Setting up an approval process in Salesforce involves a series of steps to define when a record should be routed, who approves it, and what actions should occur at each stage. Follow these steps to create a smooth and compliant approval workflow.
1. Define Entry Criteria
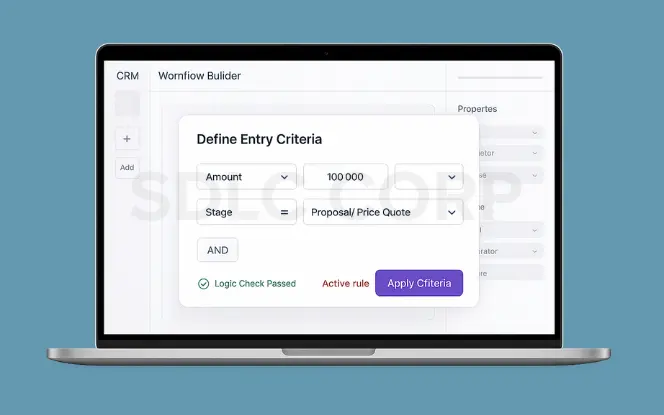
Decide when a record should enter the approval process.
Example: Amount > 100000 AND Stage = “Proposal/Price Quote”
Only records meeting this condition will trigger the process.
2. Set Initial Submission Actions
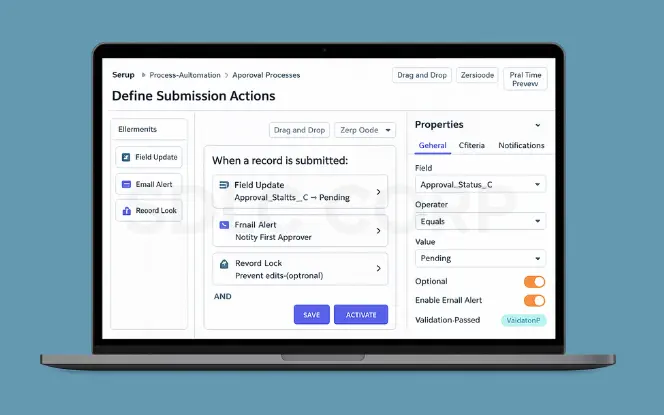
When a record is submitted:
- Update
Approval_Status__cto Pending - Notify the first approver via email alert
Lock the record to prevent edits (optional)kk
3. Defining Approval Steps
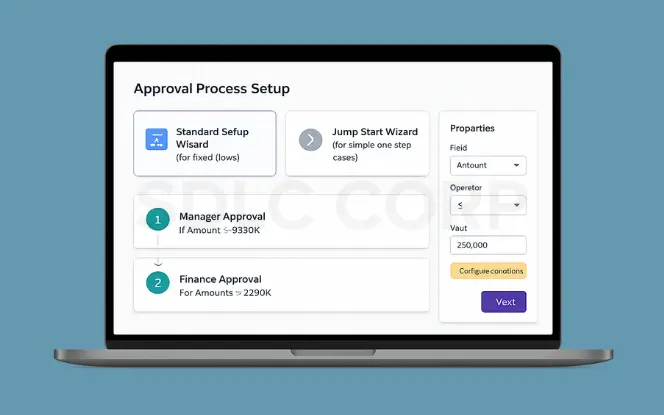
Use Standard Setup Wizard for fixed flows; Jump Start Wizard for simple one‑step cases. For complex logic, use sequential or parallel steps:
- Step 1: Manager approval if amount ≤ $250K, else goes to Step 2
- Step 2: Finance approval for amounts > $250K
4 Configure Actions for Approval & Rejection
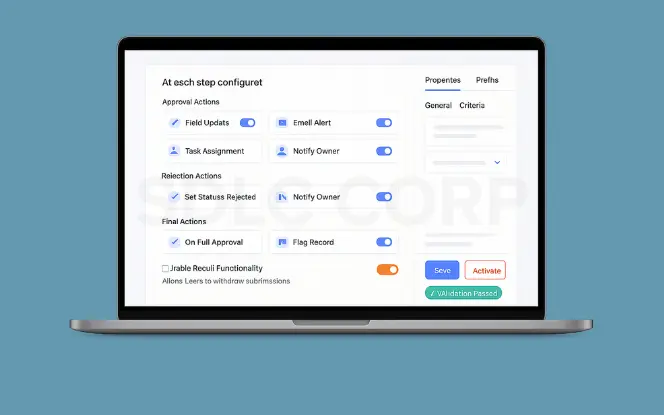
At each step configure:
- Approval Actions (field updates, email, task)
- Rejection Actions (set status, notify owner)
- Final Actions:
- On full approval: set status = Approved, send notification, unlock record
- On final rejection: set status = Rejected, flag record
Ensure recall functionality is enabled if users may withdraw submissions.
5. Test and Activate
Always test in Sandbox before production:
- Submit a test record
- Approve and reject paths
- Verify email alerts, escalations, and delegated approvals
After testing, activate the process in production.
4. Advanced Configuration
Multi‑Step & Parallel Approvals
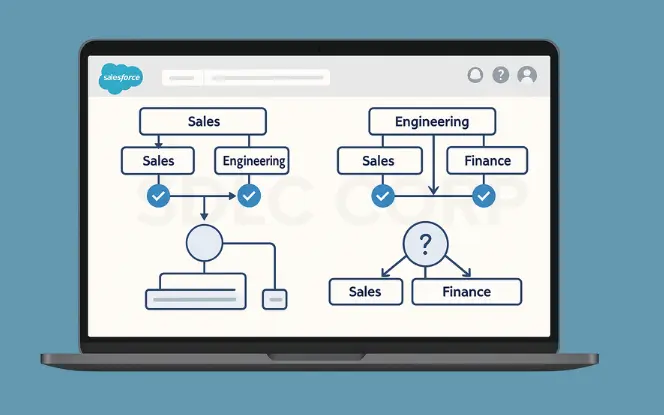
Use multi‑step or parallel approvals to allow different departments (e.g., Sales, Engineering, Finance) to review records:
- Sequential approvals: Each step occurs after the previous one is approved.
- Parallel approvals: Multiple teams approve simultaneously to save time.
- Conditional branching: Route approvals based on criteria like deal size or region.
Delegated Approvers & Escalation Rules

Ensure no approval request gets stuck by configuring fallback logic:
- Delegated Approvers: Assign a backup approver if the primary is unavailable.
- Escalation Rules: Use time‑based logic or flows to auto‑reassign requests after X hours/days.
Flow / Process Builder Integration
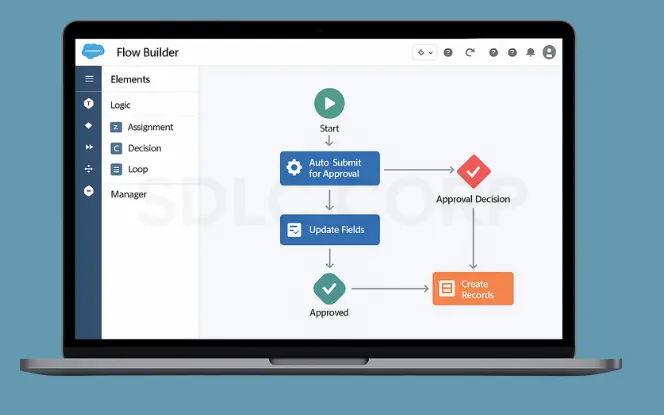
Integrate Flow or Process Builder to automate tasks before and after approval:
- Pre‑approval: Auto‑submit for approval or update fields (e.g., update Discount__c if > 40% before submission).
- Post‑approval: Trigger follow‑up actions like creating tasks, sending emails, or dispatching outbound messages.
This advanced setup ensures your Salesforce Approval Process is robust, scalable, and aligned with complex enterprise requirements.
5. Security & Permissions
Field‑Level Security (FLS)
- Make sure approvers can view all required fields to make informed decisions.
- Grant Read access to critical fields like Amount, Status, and Comments.
- Restrict sensitive fields to only the necessary profiles or permission sets.
Sharing Rules
- Set up sharing rules so that approvers can access submitted records.
- Open access for managers, finance teams, or other approvers.
- Use role hierarchy and sharing rules to maintain visibility without overexposure
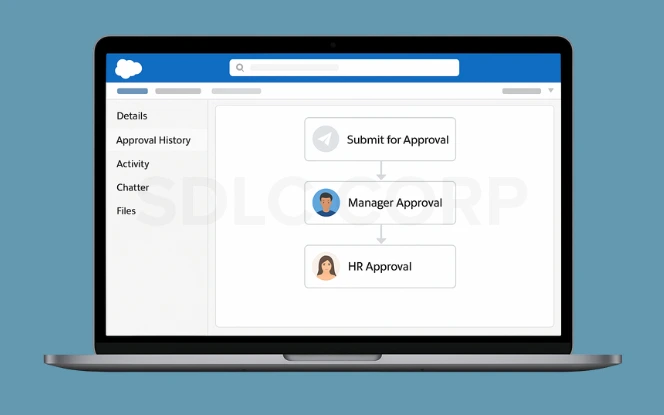
Approval History & Transparency
- Add the Approval History related list to the page layout.
- Displays submission dates, approvers, and decision outcomes.
- Increases auditability and transparency for compliance reporting.
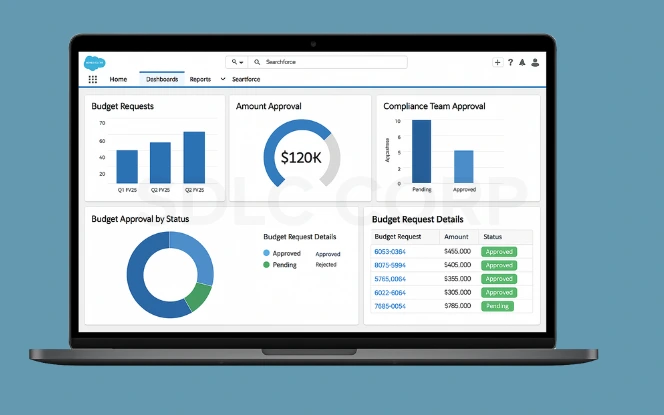
6. Monitoring, Reporting & Troubleshooting
Monitoring Your Salesforce Approval Process
By actively tracking approvals, you can identify bottlenecks, reduce delays, and maintain complete transparency across your business workflows. Reporting and troubleshooting help you identify bottlenecks and fix issues proactively.
Approval History & Dashboards
Use Approval History and Dashboards to track performance:
- Approval History Related List
- Add it to record layouts to track submission date, approvers, and actions.
- Helps identify where approvals are delayed.
- Reports for Insights
Build reports to monitor:
- Pending approvals by user
- Average time to approval
- Volume of approvals by stage
- Dashboards for Management
Create dashboards with widgets to:
- Visualize bottlenecks
- Track high‑value pending approvals
- Monitor overall approval efficiency
7. Common Issues & Fixes
Use the table below to troubleshoot frequent approval process issues:
| Problem | Solution |
| Approval not triggered | Review entry criteria and submit permissions |
| No notification email | Check email template is active, and alerts enabled |
| Approver is unavailable | Set delegated approver or escalation logic |
| Status field not updated | Verify field update actions in the workflow |
8. Use Cases & Examples
a) Sales – High Value Deal Approval
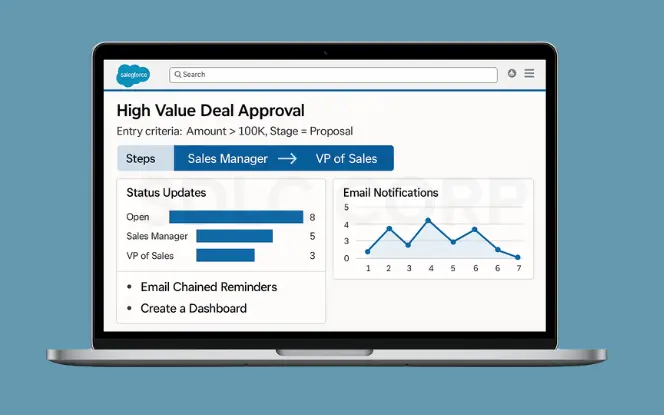
Stage = Proposal Steps: Sales Manager → VP of Sales
Actions: Status updates, email notifications, email chained reminders.
b) HR – Leave or Expense Approval
Custom object Leave_Request__c
Entry: Request length > 5 days → Manager review; > 10 days → HR
Approver dynamic from lookup field Manager__c
Multi-step serial depending on duration.
c) Finance – Budget Approval
Budget_Request__c
Entry: Amount > 50K
Parallel approval by Finance Manager and Compliance Team (queue-based).
| Object | Criteria | Approver(s) |
| Opportunity | Amount > 100K | Manager → VP Sales |
| Expense_Request__c | Amount > 5K | Manager → Finance Director |
| Leave_Request__c | Days > 5 | Manager only |

Conclusion
A well-structured Salesforce Approval Process drives faster decisions, consistent policy enforcement, and complete transparency. With clear entry criteria, logical steps, and strong monitoring, approvals flow smoothly, compliance improves, and bottlenecks disappear. This frees teams from paperwork, accelerates growth, and ensures every decision is timely, fair, and aligned with business goals.
FAQ's
Q1: Can I create multiple approval processes on one object?
Yes. You can create multiple approval processes for the same object by using distinct entry criteria. This ensures that each process handles different scenarios without overlapping approvals.
Q2: What happens if an approver is unavailable?
Use delegated approvers or escalation rules. Salesforce can automatically reassign pending approvals after a defined period to avoid delays and maintain business continuity.
Q3: Can users recall their submission?
Yes. Enable the Recall Approval Request option in the approval process settings. This allows record owners to withdraw and resubmit requests if changes are needed before final approval.
Q4: Can approval steps be conditional?
Absolutely. Salesforce allows step‑specific criteria, such as deal size, record type, or region, to determine which approvers are required for each stage.
Q5: Does it work with custom objects?
Yes. Approval processes fully support both standard objects (like Opportunity or Case) and custom objects created for your specific business workflows.
Q6: How can I integrate Flows into approval logic?
Use Flow Builder to:
- Auto‑submit records meeting specific conditions
- Pre‑process data before routing approvals
- Trigger post‑approval actions like tasks, notifications, or outbound messages. This makes your approval process dynamic and fully automated.
Q7: How can I track and report on approval progress?
Use the Approval History related list and custom reports to monitor progress:
- Track pending approvals, average approval time, and rejection reasons
- Build dashboards to visualize bottlenecks and efficiency metrics
- Combine reporting with time-based reminders for proactive follow‑ups