Introduction
Salesforce is consolidating automation into Flow. This section clarifies the change, why it matters now, and how the checklist helps you migrate safely with speed, quality, and control.
Salesforce is retiring Workflow Rules and Process Builder in favor of Flow, the unified engine for declarative automation. The change simplifies the stack and improves reliability when you design with intent. Flow offers richer logic, before-save performance benefits, better fault paths, and reusable subflows.
This guide gives you a practical checklist with examples, governance tips, and links to official resources so you can move with confidence today. For expert help in planning and executing migrations, explore our Salesforce Consulting Services.
1. Why Migrating to Flow Matters
Moving early reduces risk, boosts performance, and avoids end of support surprises. Here you learn the timeline context, Flow advantages, and the hidden costs of delaying migration plans.
Salesforce is focusing innovation on Flow and has announced the retirement of Workflow Rules and Process Builder. Community updates point to an end of support horizon in 2025, so plan a structured cutover. Before save flows handle same record updates with better speed, while after save flows centralize related actions. These patterns deliver cleaner save order and fewer edge case bugs. Flow is now the recommended standard for new automation.
Key Concepts and Definitions
Map each legacy rule to the right Flow type before you build. These concise definitions will help you choose record triggered, screen, scheduled, and subflow patterns with confidence.
Record triggered flow runs when a record is created, updated, or deleted. Use before save for simple field updates and use after save for notifications and related writes. Screen flow collects input with guided screens and can run from buttons or utility items. Scheduled flow runs on a timetable and replaces time based workflow behavior using scheduled paths. Subflow packages reusable logic and is called from parent flows. Together they replace Workflow Rules and Process Builder as the strategic approach for admin led automation.
2. Step by step migration checklist
Work step by step to avoid outages. Inventory what exists, convert what you can, rebuild what you must, then test, cut over, and monitor. This sequence keeps risk low and momentum high.
Step 1. Inventory Rules and Processes
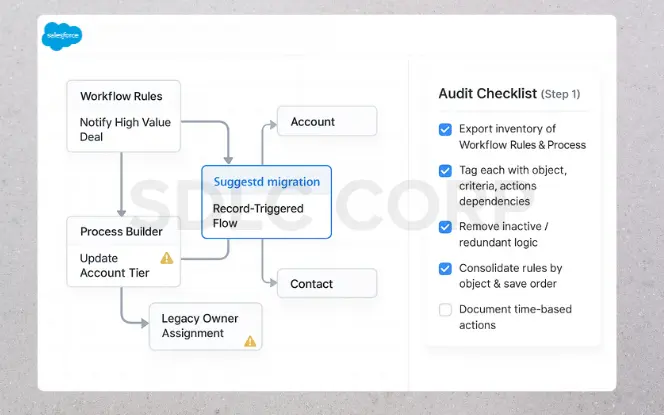
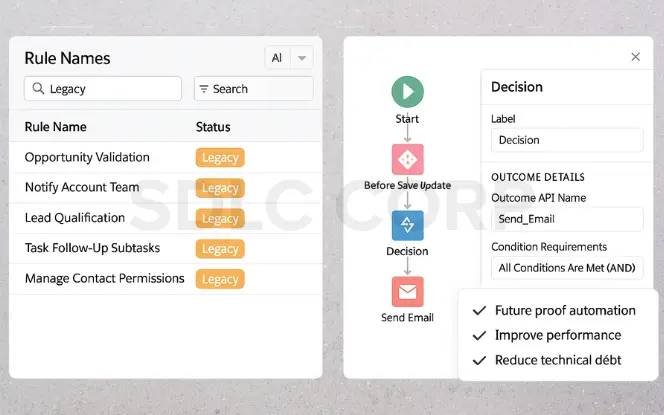
Start with an audit. Export your Workflow Rules and Process Builder processes, then tag each with object, criteria, actions, and dependencies. Prune obsolete logic. Identify overlaps where several rules touch the same object and event. Decide between one record triggered flow with decisions or several small flows. Document time based actions and save order assumptions so your design preserves outcomes.
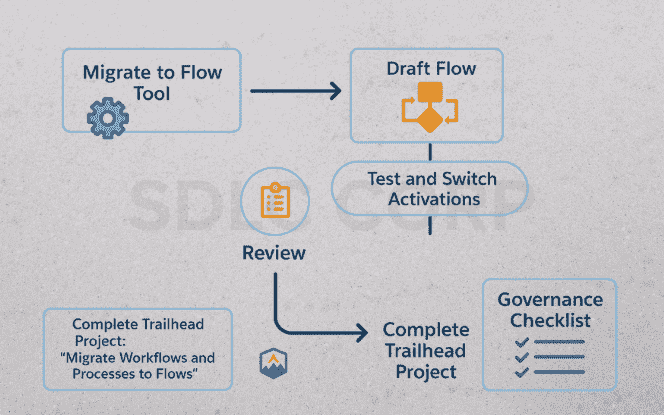
Step 2. Choose the Migration Path
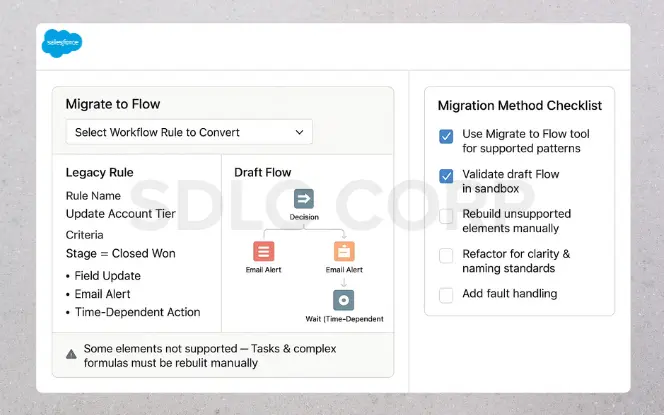
Open Setup and search for Migrate to Flow. The tool converts eligible Workflow Rules and many Process Builder actions into draft flows. It supports field updates, email alerts, outbound messages, and many time based actions. Tasks and some complex criteria do not convert, so plan manual rebuilds. Treat the generated flow as a first draft. Align names, fix edge cases, and add fault handling before activation. Trailhead and Admin resources walk through Switch Activations and testing.
Step 3. Rebuild Unsupported Logic
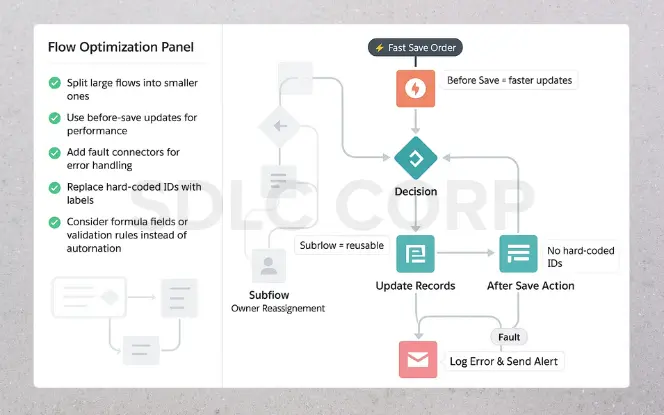
Where conversion is not available, rebuild manually. Replace long criteria with decision nodes that use formulas and context variables. Use a before save flow for fast field updates. Use an after save flow for tasks, emails, and related record work. Replace hard coded IDs with custom labels or metadata. When logic is shared, create a subflow and reference it from parent flows. Keep each flow small and single purpose to simplify testing and change control.
Step 4. Test in a sandbox
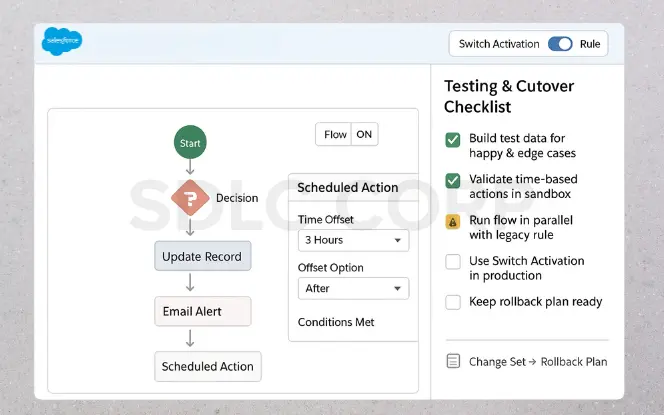
Unit test each path. Create records that hit every decision branch and scheduled path. Validate before save behavior with multiple updates in one transaction and confirm that formulas compute as expected. Use Flow Debug and the test builder to run variations. When risk is high, run the new flow in parallel with the legacy rule in a lower environment to compare outputs. Use Switch Activations during production cutover.
Step 5. Cut Over and Monitor
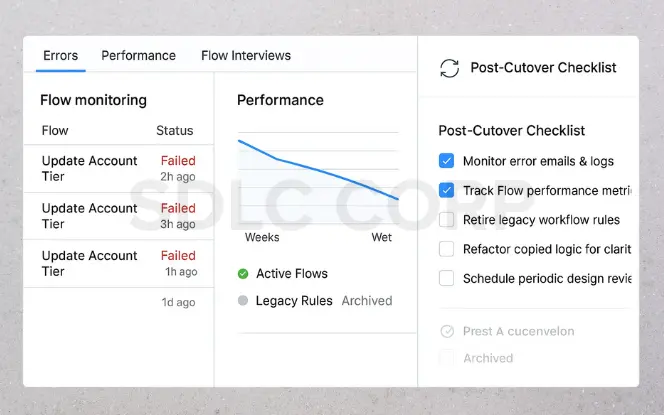
After go live, monitor error emails, Flow interviews, and platform logs. Communicate early fixes to keep user trust. Archive deactivated Workflow Rules to prevent accidental reactivation. Add lightweight logging and alerts on fault connectors so issues are visible without digging. This turns a migration sprint into steady automation hygiene.
3. Industry Applications and Patterns
Apply proven patterns for sales, service, and finance. Each mini case shows the legacy rule, the Flow replacement, and the concrete benefit so you can model the design in your org today.
Sales Operations
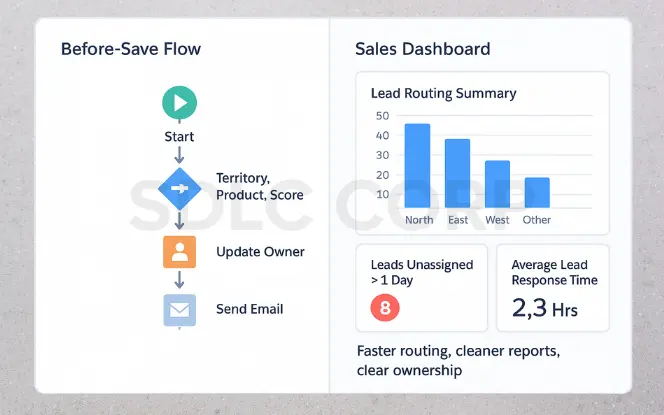
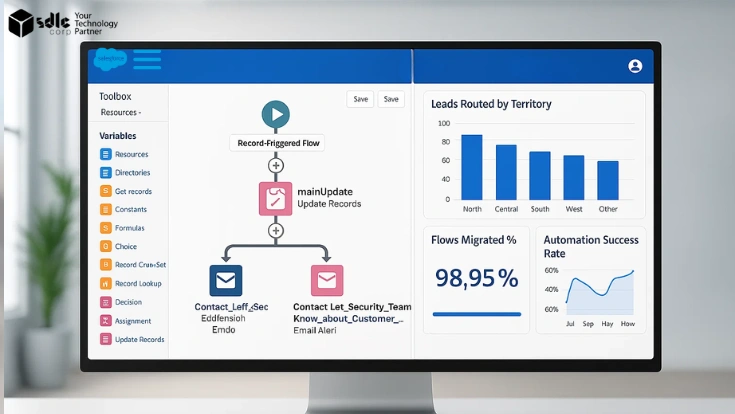
Replace multiple lead assignment rules with one before save flow that sets owner by territory, product interest, and score. Add a scheduled path to email a summary when new leads sit untouched for a day. Results include faster routing, cleaner reports, and clear ownership.
Customer Service
Move case escalation rules into one after save flow with decision nodes for product, priority, and SLA. Post to a team channel, set a task, and send a custom notification when targets are missed. Screen flows can collect missing details at status changes. You gain reliability, fewer handoffs, and better time to resolution.
Finance and billing
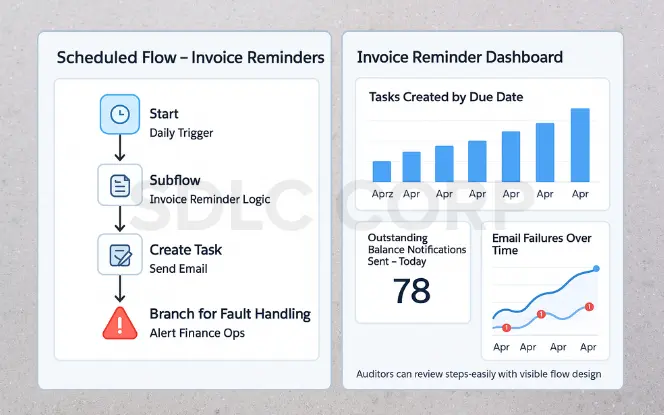
Convert invoice reminder workflows into a scheduled flow that runs each morning and calls a subflow to create tasks or emails based on due date and balance. Add fault handling to catch email failures and alert finance ops. Auditors can review the design easily because the steps are visible
Mistakes to Avoid
Avoid five common traps that slow teams down. Know what the migration tool cannot convert, keep flows small, add fault paths, standardize names, and retire clutter instead of moving it.
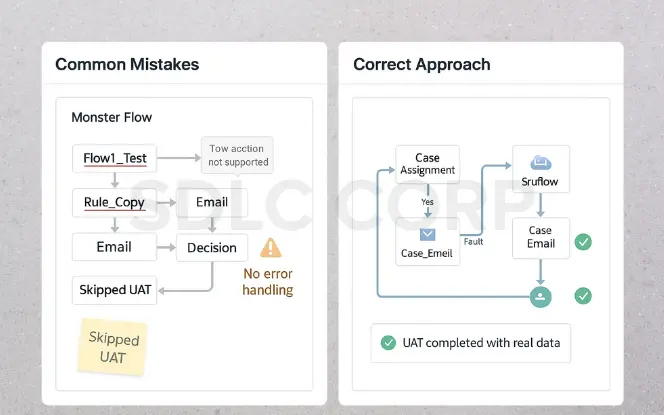
Unsupported expectations are the first trap. The migration tool does not convert every pattern. Tasks and some cross object criteria require manual rebuilds, so plan for them. The second trap is the monster flow. Split complex logic into smaller flows and reuse subflows. The third trap is ignoring fault paths. Add fault connectors and alerts on every action that can fail to speed up triage. The fourth trap is poor naming. Adopt a simple pattern like Object Action Context and describe entry conditions in the description so reviewers see the intent and entry criteria.
4. Best Practices and Pro Tips that Scale
Adopt habits that make flows fast, readable, and safe. Use before save where possible, reuse subflows, document intent, and set a review cadence so designs stay healthy as your org grows.
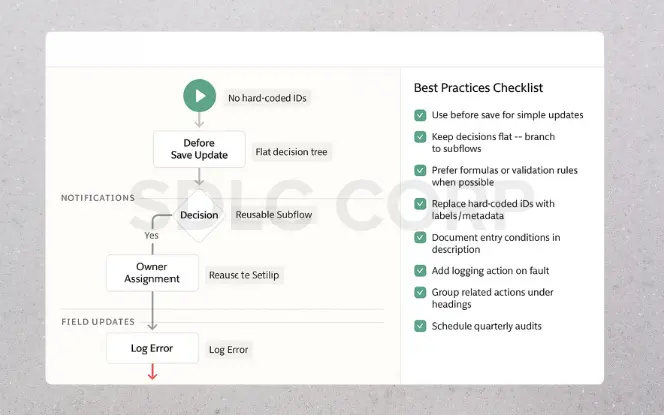
Use before save for simple updates and use after save for related actions. Prefer formulas or validation rules when they fit. Replace hard coded IDs with labels or metadata. Document entry conditions and intended outcomes in the flow description. Add a small logging action on fault for quick traces. Group related actions under clearly named headings. Set a quarterly audit to merge or retire flows. Release notes state that before save updates are faster and can reduce CPU time.
5. Tools, frameworks, and Resources
Use the built in Migrate to Flow tool plus Trailhead training and a light governance checklist. Standardize naming, reviews, and testing to scale consistent results across teams.
Start with the Migrate to Flow tool in Setup. It converts eligible Workflow Rules and many Process Builder actions into draft flows with a Test and Switch Activations path. Review the official considerations to check supported actions. Complete the Trailhead project Migrate Workflows and Processes to Flows for guided practice. Keep a simple governance checklist for naming, test data, and peer review. These basics raise quality.
Conclusion
Salesforce has made it clear: Workflow Rules and Process Builder are retiring. This means migration isn’t optional it’s a necessary step for every org. By moving now, you avoid last-minute issues and ensure your automation keeps running smoothly.
Flow is more than just a replacement. It’s a centralized automation tool that delivers better performance, greater flexibility, and long-term scalability. With features like bulk operations, before save updates, and scheduled paths, Flow gives admins and developers a single platform to handle both simple and complex processes.
The earlier you start migrating, the easier the transition will be. Build an inventory, migrate simple rules first, and refine your approach as you go. By acting now, you’ll future proof your Salesforce org and give your team a stronger automation foundation for the years ahead.
Related Blogs You Should Explore:
FAQ'S
When Should We Finish Migrating?
Salesforce has announced retirement and is focusing development on Flow. Many partners reference a 2025 horizon, so plan to complete before that window.
What Does The Migrate To Flow Tool Convert Automatically?
Field updates, email alerts, outbound messages, and many time based actions are supported. You still need to test and refactor the output.
What Needs A Manual Rebuild?
Tasks and complex criteria formulas are frequent exceptions. Community examples show how to handle these with after save flows and decision nodes.
Should We Combine Multiple Rules Into A Single Flow?
Only if the logic belongs together. Many teams prefer several small flows that are easier to read and test.
Are Before Save Flows Really Faster?
Salesforce release notes explain that before save updates are faster and can reduce CPU time compared to legacy patterns.
How Do We Cut Over Without Risk?
Use sandbox testing, run limited parallel checks where needed, then use Switch Activations to turn off the legacy rule as you activate the new flow.