

Introduction
If you’ve ever entered data in Salesforce, you’ve probably faced the “too many choices” problem. Maybe you tried to link a contact to an account and had to scroll through hundreds of irrelevant options. Or maybe a sales rep accidentally connected an opportunity to the wrong customer.
These little errors may not seem like a big deal at first, but over time they lead to:
- Confusing reports
- Poor forecasting
- Duplicate or “dirty” data that no one trusts
That’s where lookup filters in Salesforce come in.
Lookup filters act like smart rules that narrow down which records appear when users search in a lookup field. They make Salesforce more intuitive, accurate, and efficient by showing only valid options.
1. What Are Lookup Filters in Salesforce?
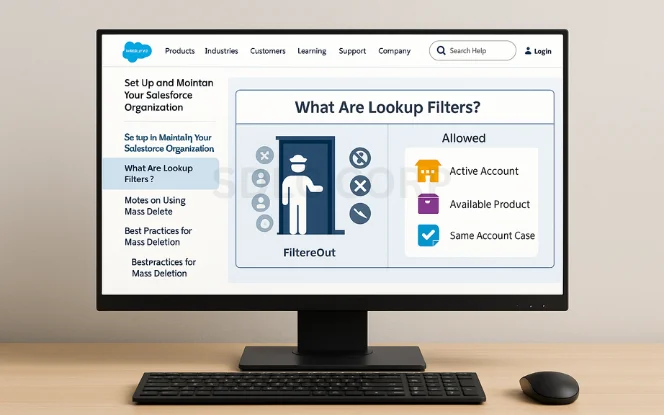
A lookup filter controls which records appear in a lookup field based on conditions you define.
Think of it as a bouncer at a nightclub. Instead of letting everyone in, the bouncer checks IDs and only admits people who fit the rules. In Salesforce, those rules might be:
- Only show Active Accounts when linking a contact
- Only display Products marked Available when creating an opportunity
- Only allow Cases from the same Account when attaching to a Contact
Without filters, users get overwhelmed with irrelevant data. With filters, they see only what’s appropriate.
2. Why Lookup Filters Matter
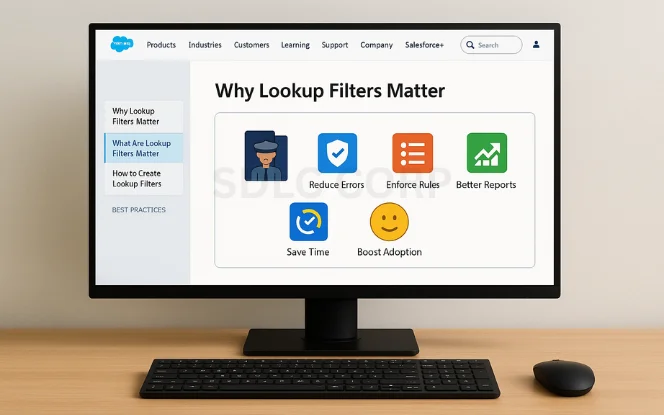
Data accuracy is one of Salesforce’s biggest challenges. A cluttered or error-filled org reduces trust and adoption. Lookup filters help by:
- Reducing Errors: Prevents users from linking records incorrectly.
- Saving Time: Cuts down the list of choices, so users find the right record faster.
- Enforcing Rules: Keeps data in line with business processes (e.g., territory restrictions).
- Improving Reports: Cleaner data = more reliable dashboards.
- Boosting Adoption: Users are happier when Salesforce feels smart, not clunky.
3. Lookup Filters vs. Validation Rules
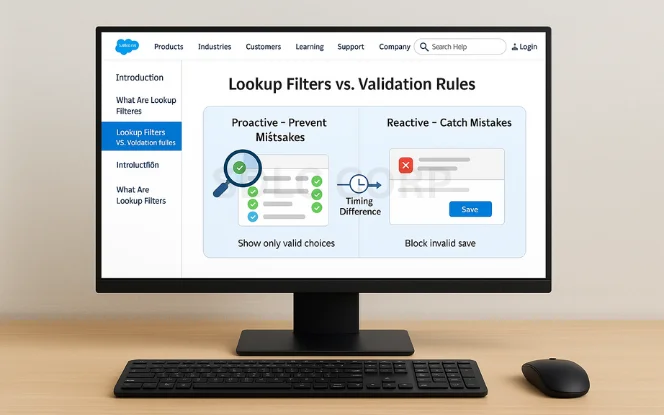
Many admins ask: “Why not just use validation rules?”
At first glance, lookup filters and validation rules might seem similar, since both are designed to improve data quality in Salesforce. But the way they work is very different.
- Lookup Filters: Prevent mistakes by only showing valid options before users choose.
A lookup filter acts proactively by controlling what users can see in a lookup field before they make a choice. In other words, it prevents errors from happening in the first place. For example, when creating a contact, a lookup filter might only display active accounts, so users can’t accidentally link it to an inactive one.
- Validation Rules: Catch mistakes after users enter data.
A validation rule, on the other hand, is reactive. It waits until after a user enters data and then checks whether the information meets your conditions. If it doesn’t, the user gets an error message and has to fix their entry before saving. For example, a validation rule might block the save if someone tries to connect a contact to an inactive account.
The key difference is timing: lookup filters guide users during the selection process, while validation rules correct mistakes after the fact. In practice, many admins use both—lookup filters to steer users in the right direction from the start, and validation rules as a safety net in case something slips through.
Both are useful, but lookup filters feel smoother because they guide users proactively instead of blocking them later.
4. Types of Lookup Filters in Salesforce
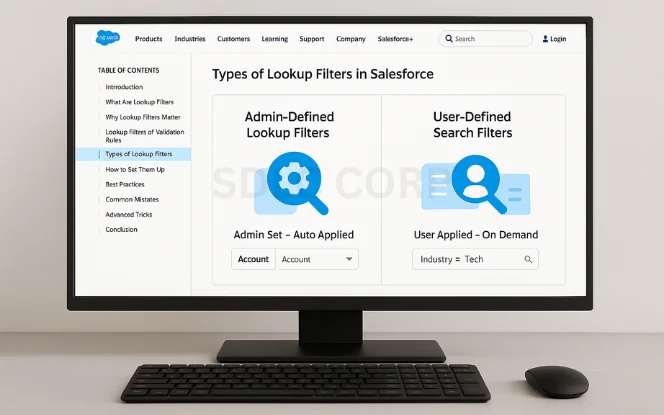
- Admin-Defined Lookup Filters
- Set by admins in Object Manager.
- Automatically enforced whenever users interact with the field.
- Example: Contacts can only be linked to Accounts where Status = Active.
- User-Defined Search Filters
- Users apply filters manually when searching.
- Example: A rep filtering accounts by “Industry = Tech” while searching.
5. Step-by-Step Tutorial: Setting Up a Lookup Filter
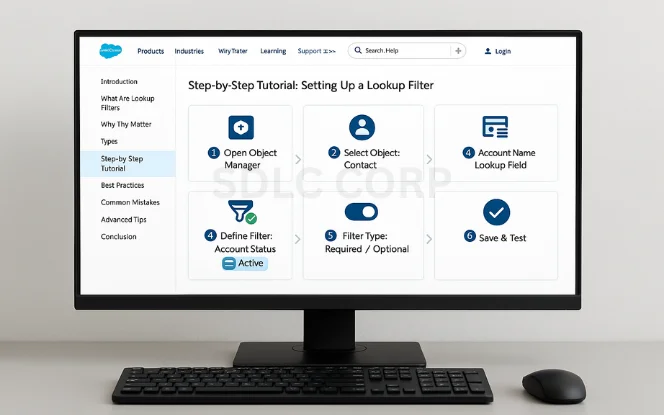
Let’s walk through a common scenario: limiting Contacts so they can only be linked to Active Accounts.
Step 1: Open Object Manager
- Go to Setup → Object Manager.
Step 2: Select the Object
- Choose Contact (since that’s where you’ll add the filter).
Step 3: Find the Lookup Field
- Go to Fields & Relationships.
- Select the Account Name lookup field.
Step 4: Define the Filter
- Scroll to Lookup Filter → Edit.
- Enter filter criteria:
- Field: Account → Status
- Operator: Equals
- Value: Active
Step 5: Set Filter Type
- Required: Users can’t bypass it.
- Optional: Users see a warning but can override.
Step 6: Save & Test
- Save the filter.
- Test by creating a new Contact.
You should only see Accounts with Status = Active.
6. Other Common Scenarios
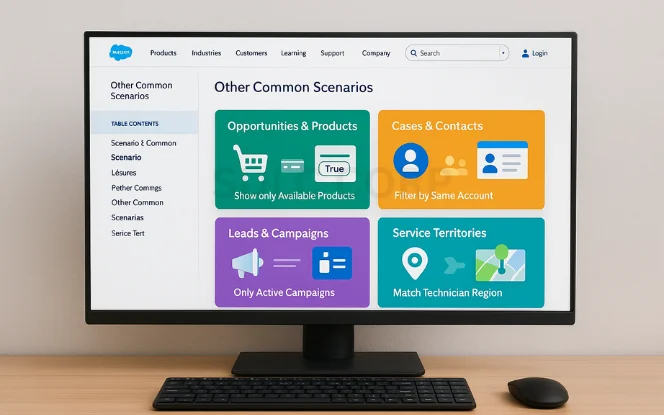
Scenario 1: Opportunities and Products
- Requirement: Show only Products with “Available = True” when adding to Opportunities.
- Solution: Add a lookup filter on the Opportunity Product lookup field.
Scenario 2: Cases and Contacts
- Requirement: When linking a Case to a Contact, show only Contacts from the same Account.
- Solution: Filter Contacts where AccountId = Case.AccountId.
Scenario 3: Leads and Campaigns
- Requirement: Ensure reps only attach Leads to Active Campaigns.
- Solution: Lookup filter on Campaign lookup where Status = Active.
Scenario 4: Service Territories
- Requirement: Assign Work Orders only to Technicians in the same region.
- Solution: Filter Users based on Region = Work Order Region.
These examples show how lookup filters solve real business challenges across departments.
7. Required vs Optional Lookup Filters
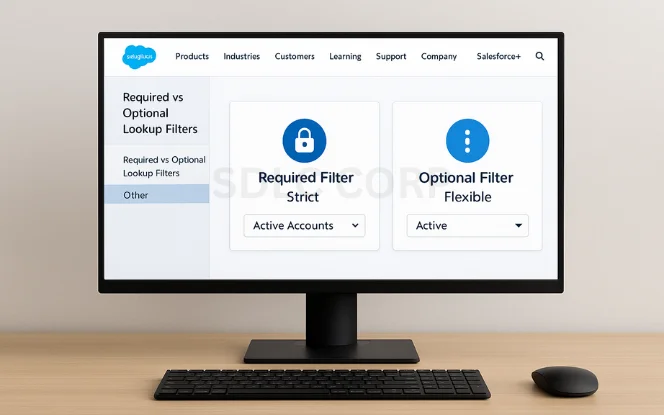
When you create a lookup filter in Salesforce, you have two choices: make it required or optional.
Required lookup filter : is strict—it enforces your rule without exceptions. If you say that a contact can only be linked to accounts with the status “Active,” then users won’t see or be able to select any account marked otherwise. This is the best option when compliance or business-critical accuracy is on the line, such as GDPR requirements or preventing inactive customers from being added to new opportunities.
An optional lookup filter : acts more like a suggestion. It will still guide users by showing the most relevant records first, but if they need to override it, they can. This flexibility can be useful in situations where exceptions occasionally occur, like linking a case to an inactive account for reference. However, the trade-off is that optional filters leave more room for user error compared to required ones.
The key is knowing when to use each type. If data accuracy is absolutely essential, required filters are the safest choice. If you want to help users without boxing them in, optional filters strike a nice balance.
8. Advanced Tips for Lookup Filters
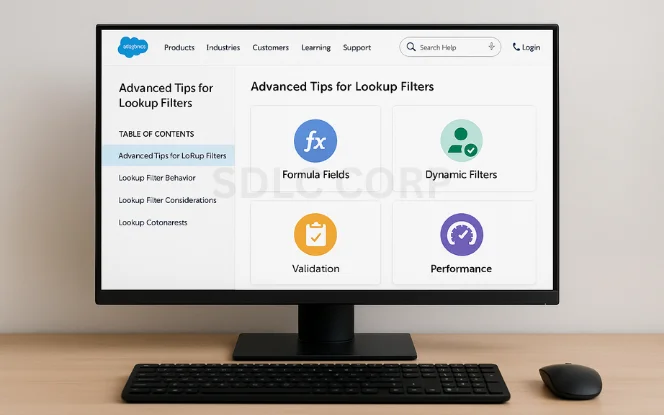
1. Use Formula Fields in Filters
- Example: Show Accounts only if Today() – LastActivityDate < 365 (active within a year).
2. Dynamic User-Based Filters
- Example: Only show Accounts where Region = User.Region.
3. Combine with Validation Rules
- Validation rules act as a safety net if someone bypasses filters.
4. Monitor Performance
- Too many conditions can slow down lookups. Keep filters simple.
9. Best Practices
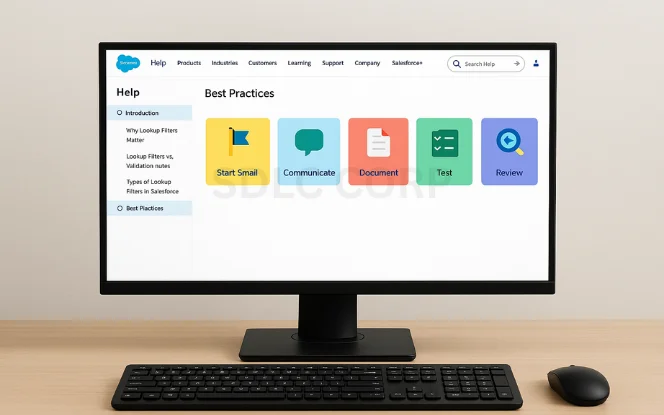
- Start Small – Add filters to the most error-prone fields first.
- Communicate Changes – Let users know why the lookup behaves differently.
- Document Filters – Keep a record of why each filter exists.
- Test Thoroughly – Use sandbox environments before going live.
- Review Regularly – Business rules change, so revisit filters quarterly.
10. Common Mistakes to Avoid
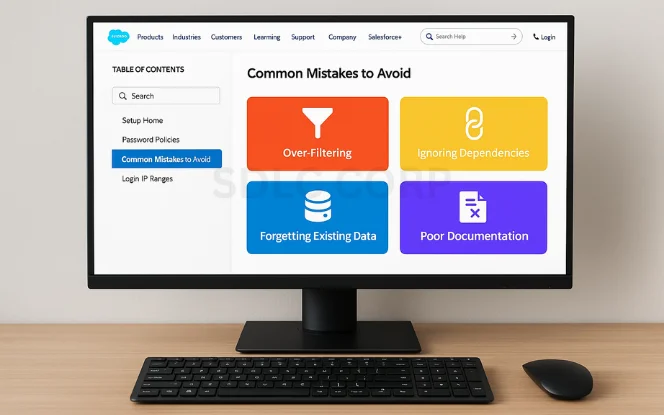
- Over-filtering: Users can’t find what they need.
- Ignoring dependencies: Filters can block workflows.
- Forgetting existing data: Filters don’t fix old errors.
- Poor documentation: Future admins delete filters by accident.
11. Real-World Case Study
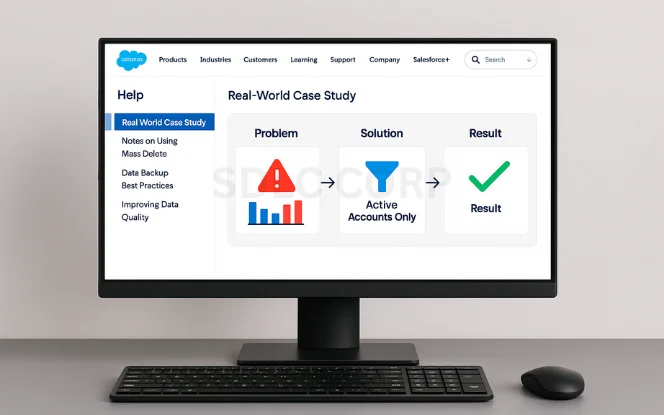
A SaaS company had a big problem: sales reps kept linking new opportunities to old “inactive” accounts. Reports showed inflated pipelines and managers wasted time cleaning data.
Solution: The admin created a lookup filter on the Opportunity → Account field to show only Accounts with Status = Active.
Result: Within a month, reports became accurate, pipeline forecasting improved, and reps stopped wasting time on dead accounts.
Conclusion
Lookup filters in Salesforce may seem like a small feature, but they’re incredibly powerful for keeping data accurate, enforcing rules, and improving user experience.
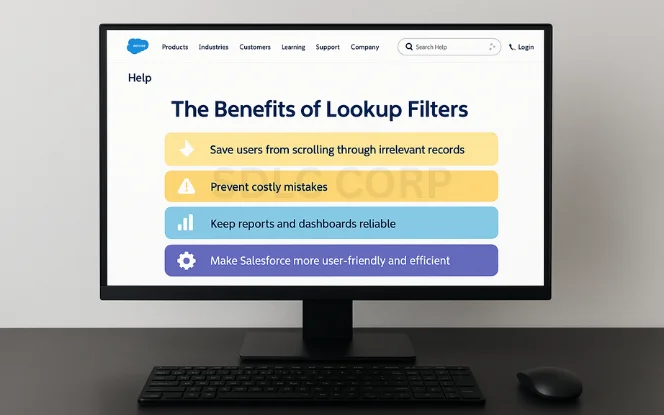
By setting them up thoughtfully, you:
- Save users from scrolling through irrelevant records
- Prevent costly mistakes
- Keep reports and dashboards reliable
- Make Salesforce more user-friendly and efficient
Start with one or two high-impact fields, roll them out, and watch how much smoother your org runs.
Your future self—and your sales team—will thank you.
Related Blogs You Should Explore:
FAQs
Can users override lookup filters?
Yes—if set as optional. Required filters cannot be bypassed.
Do lookup filters apply to old records?
No, they only apply when creating or editing new records.
Do lookup filters affect performance?
Not usually, unless they’re overly complex.
Can I apply multiple conditions?
Yes, you can use AND/OR logic for compound filters.
What objects support lookup filters?
Most standard and custom objects with lookup fields.


