WordPress powers over 43% of the websites on the internet, making it the most popular content management system. However, its popularity also makes it a target for hackers and malware. To protect your WordPress site, a robust security plugin like Wordfence Security is essential.
In this comprehensive guide, we’ll walk you through the process of installing and configuring Wordfence Security to safeguard your website. Whether you’re a beginner or have some experience, this step-by-step guide will ensure your site is secure from potential threats.
What is Wordfence Security?
Wordfence Security is a powerful WordPress plugin designed to protect your website from malware, brute force attacks, and other online threats. It comes with features like:
- Firewall Protection: Blocks malicious traffic before it reaches your site.
- Malware Scanner: Detects and removes malicious files.
- Login Security: Adds two-factor authentication and reCAPTCHA.
- Real-Time Threat Defense Feed: Updates the plugin with the latest threat signatures.
Ready to secure your WordPress site?
Click here to start your journey with Wordfence and protect your digital space today!

Why Should You Use Wordfence Security?
With the increasing number of cyberattacks targeting WordPress sites, implementing Wordfence can:
- Prevent Data Breaches: Stops unauthorized access to your website.
- Boost Performance: Filters out bad traffic, reducing server load.
- Peace of Mind: Regular scans and monitoring ensure your website remains clean and operational.
Step 1: Installing Wordfence Security Plugin
Installing Wordfence is straightforward and doesn’t require technical expertise. Follow these steps:
1.1 Login to Your WordPress Dashboard
- Navigate to your WordPress admin area by typing yourdomain.com/wp-admin.
1.2 Navigate to Plugins
- In the left-hand menu, click on Plugins and then select Add New.
1.3 Search for Wordfence
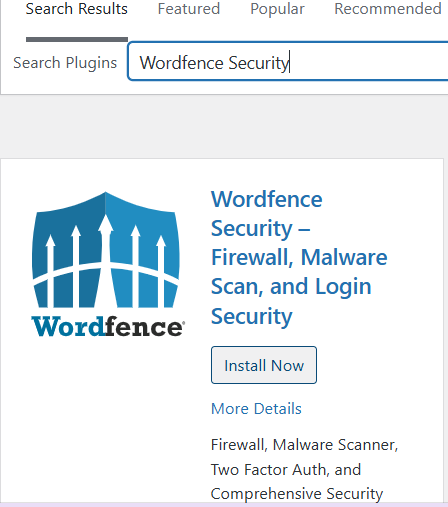
- In the search bar, type Wordfence Security.
- Locate the plugin developed by Wordfence.
1.4 Install and Activate
- Click on Install Now and then Activate once the installation is complete.
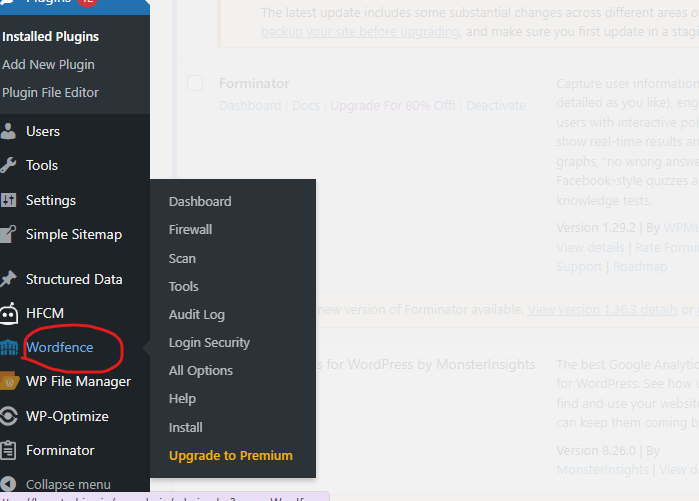
You’ll see a new Wordfence menu in your WordPress dashboard.
Step 2: Setting Up Wordfence Security
Once installed, you need to configure Wordfence to maximize its effectiveness. Here’s how:
2.1 Initial Configuration
- Go to the Wordfence tab in your dashboard.
- You’ll be prompted to enter your email address for alerts and agree to the terms of service. Enter the details and click Continue.
2.2 Wordfence Dashboard Overview
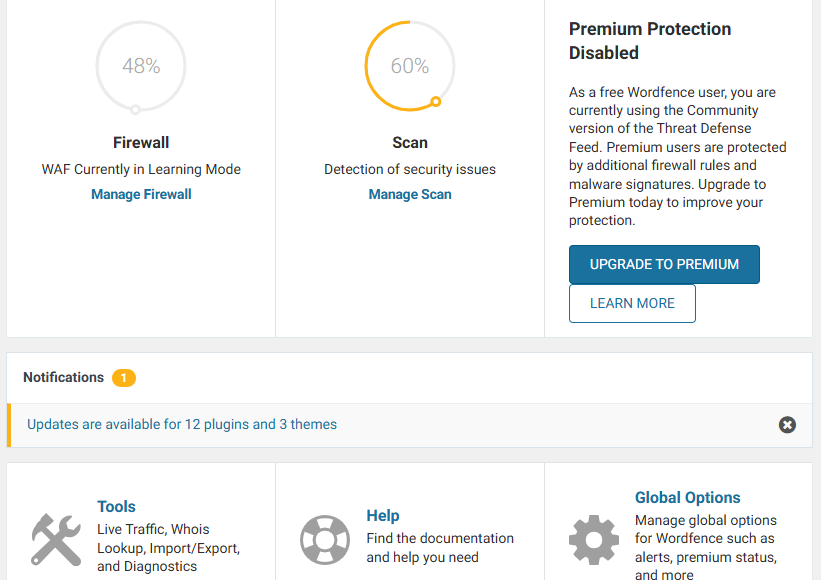
The dashboard displays an overview of your site’s security, including:
- Security alerts.
- Firewall status.
- Recent scan results.
Step 3: Configuring Wordfence Firewall
The firewall is a core feature that protects your site by blocking malicious traffic.
3.1 Enable Extended Protection
- Navigate to Wordfence > Firewall.
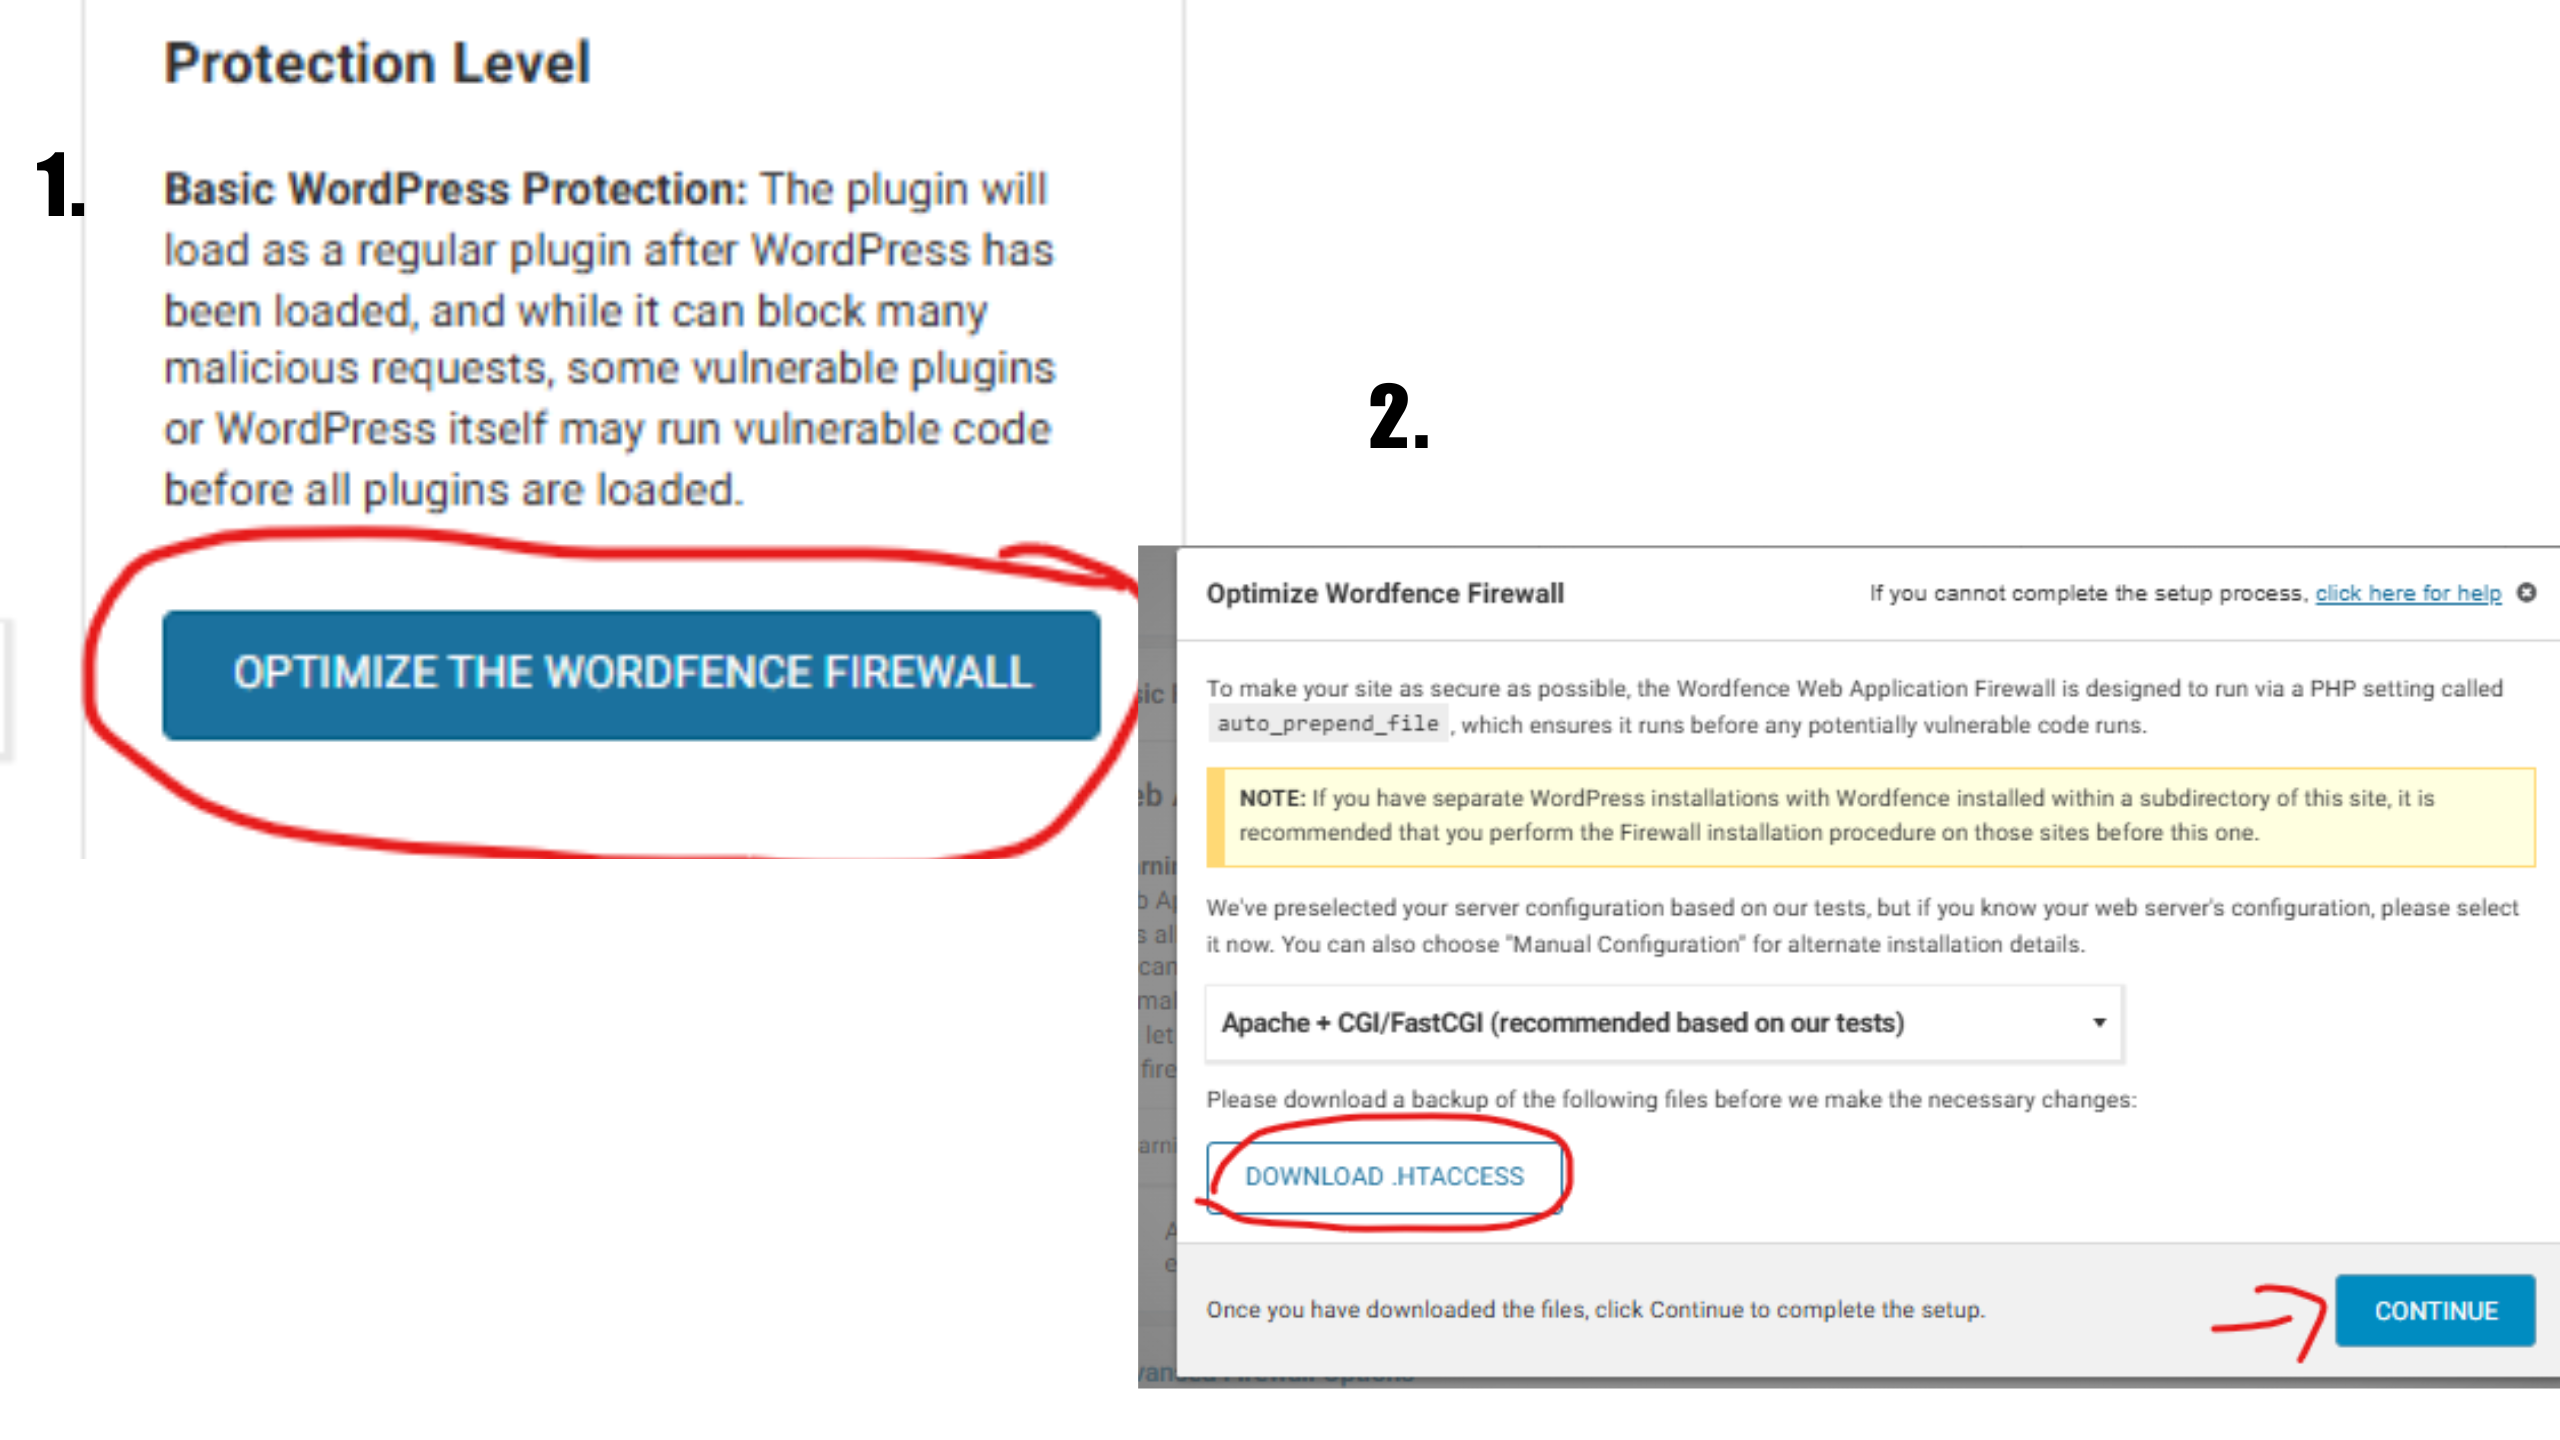
- Switch the firewall mode to Extended Protection for maximum security.

- Follow the instructions to download and upload the htaccess file for server-level protection.
3.2 Adjust Firewall Rules
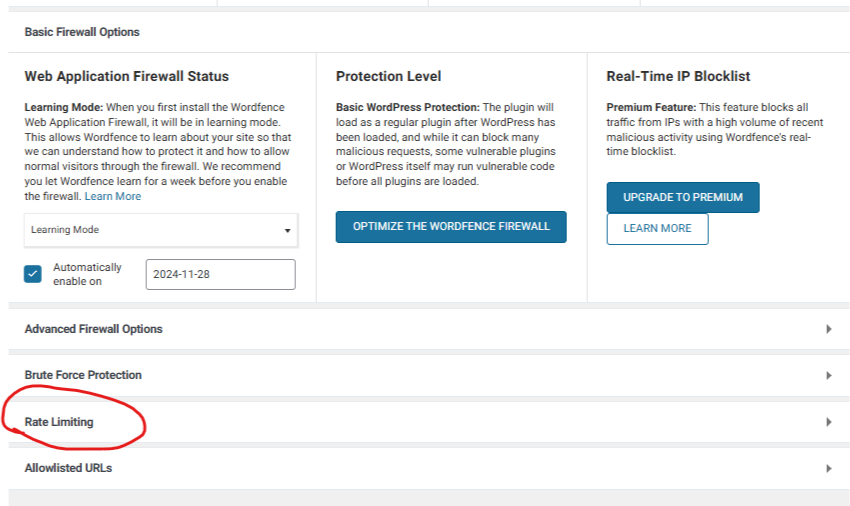
- Under the Firewall Options, configure the following:
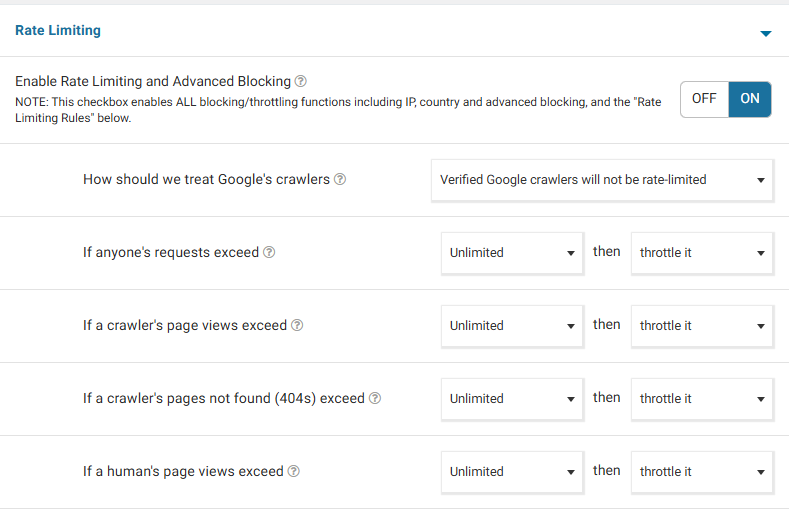
- Rate Limiting: Limit login attempts to prevent brute force attacks.
- Blocking: Block specific IPs or countries if necessary.
Step 4: Running a Malware Scan
The malware scanner is your tool for identifying threats on your site.
4.1 Start a Scan
- Go to Wordfence > Scan.
- Click Start New Scan.
4.2 Review Results
- The scan will detect:
- Malicious files.
- Outdated plugins or themes.
- Security vulnerabilities.
4.3 Fix Issues
- Wordfence provides recommendations to fix any issues found. These may include:
- Deleting suspicious files.
- Updating outdated software.

Step 5: Enhancing Login Security
Prevent unauthorized access by enabling Wordfence’s login security features.
5.1 Enable Two-Factor Authentication (2FA)
- Navigate to Wordfence > Login Security.
- Follow the steps to set up 2FA using an authentication app like Google Authenticator.
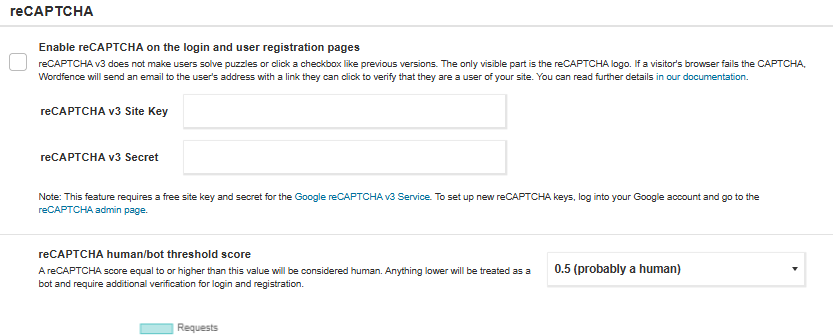
5.2 Add reCAPTCHA
- Protect your login page from bots by enabling Google reCAPTCHA.
Get the ultimate protection for your WordPress site!
Click here to learn how to set up Wordfence with our easy-to-follow guide.

Step 6: Setting Up Alerts and Notifications
Stay informed about your website’s security status by configuring alerts.
6.1 Configure Email Alerts
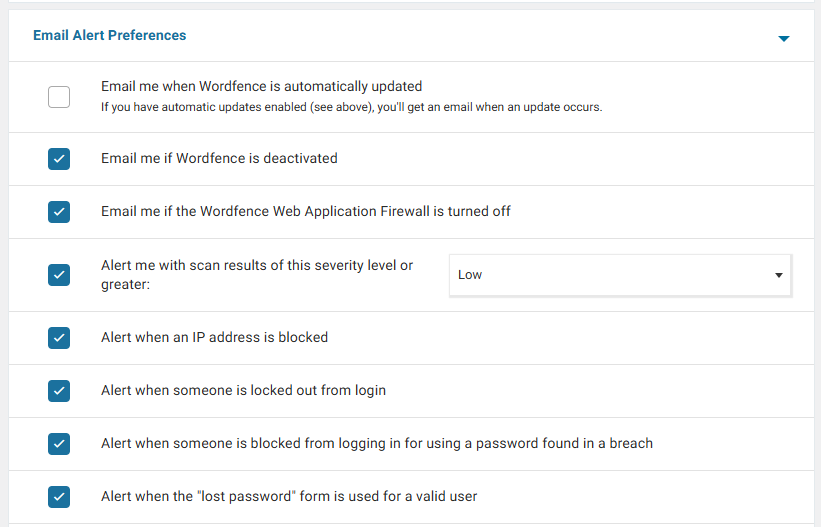
- Go to Wordfence > All Options > Email Alert Preferences.
- Choose which alerts you want to receive, such as:
- Critical problems.
- Login attempts.
6.2 Set Notification Thresholds
- Adjust the thresholds to avoid excessive alerts while staying informed about critical events.
Step 7: Utilizing Wordfence Blocking Features
Wordfence allows you to block unwanted traffic.
7.1 Block IPs
- Under Wordfence > Blocking, manually add IP addresses or use the logs to block suspicious ones.
7.2 Country Blocking
- Available in the premium version, this feature blocks traffic from specific countries.
- Under Wordfence > Blocking, manually add IP addresses or use the logs to block suspicious ones.
Worried about website security?
Learn how to install Wordfence on WordPress and keep threats at bay with just one click!

Step 8: Optimizing Wordfence for Performance
Security measures should not slow down your website.
8.1 Exclude Commonly Used Files
- Go to Firewall > Optimize Firewall and exclude files like media uploads from scanning.
8.2 Use Cache Compatibility
- Ensure Wordfence works seamlessly with your caching plugin to improve site speed.
- Go to Firewall > Optimize Firewall and exclude files like media uploads from scanning.
Step 9: Upgrading to Wordfence Premium
The free version is powerful, but upgrading to premium unlocks advanced features like:
- Real-time IP blocklist.
- Country blocking.
- Priority support.
To upgrade:
- Go to Wordfence > Upgrade to Premium.
- Follow the purchase and activation process.
Step 10: Regular Maintenance and Best Practices
Security is an ongoing process. Here’s how to maintain your site’s security:
10.1 Update WordPress, Plugins, and Themes
Regularly update all components to patch vulnerabilities.
10.2 Run Weekly Scans
- Schedule weekly scans to detect new threats.
10.3 Monitor Traffic
- Use Wordfence’s live traffic view to monitor visitors and block suspicious activity.
Common Issues and Troubleshooting
Issue 1: Wordfence Firewall Conflicts
- Solution: Ensure it’s optimized for your server and exclude conflicting plugins or files.
Issue 2: Excessive Email Alerts
- Solution: Adjust notification settings to reduce the frequency.
Issue 3: Performance Impact
- Solution: Exclude non-critical files from scans and integrate caching.
- Solution: Ensure it’s optimized for your server and exclude conflicting plugins or files.
Final Thoughts
Securing your WordPress site is not optional—it’s a necessity. With Wordfence Security, you have a comprehensive tool that protects against malware, brute force attacks, and other threats. By following this guide, you’ll ensure your website remains secure, fast, and reliable.
Don’t wait until it’s too late. Install and set up Wordfence today to safeguard your online presence!
SDLC CORP WordPress Development Services
SDLC CORP is a leading WordPress development company, offering tailored solutions to help businesses achieve their digital goals. Our comprehensive WordPress development services include custom website design, theme and plugin development, e-commerce integration, and responsive design to ensure a seamless user experience across devices.
In addition to development, we specialize in WordPress SEO services, optimizing your website for search engines to improve rankings, drive traffic, and increase conversions. Our team of skilled developers and SEO experts collaborate to deliver high-performing, visually stunning, and search-engine-friendly websites that align with your business objectives.
Choose SDLC CORP for reliable, scalable, and result-driven WordPress solutions, and take your online presence to the next level.


