Introduction
Setting up a WordPress site can be exciting but challenging, especially if you’re new to website management. With the right guidance, you can seamlessly create a functional, customizable, and professional website. Partnering with a trusted WordPress Development Company ensures that the setup process goes smoothly and all essential components, like hosting, domain, and security, are properly configured. In this guide, we’ll walk you through the WordPress setup process step-by-step, covering essential aspects like theme selection, plugins, and customization to help you get started confidently.
Expert WordPress Development Solutions
Elevate your website with our expertise.
How to Download XAMPP: A Step-by-Step Guide
Are you looking to set up a local server environment for your web development projects? XAMPP is a popular choice among developers for its ease of use and versatility. In this guide, we will walk you through the process of downloading XAMPP on your computer.
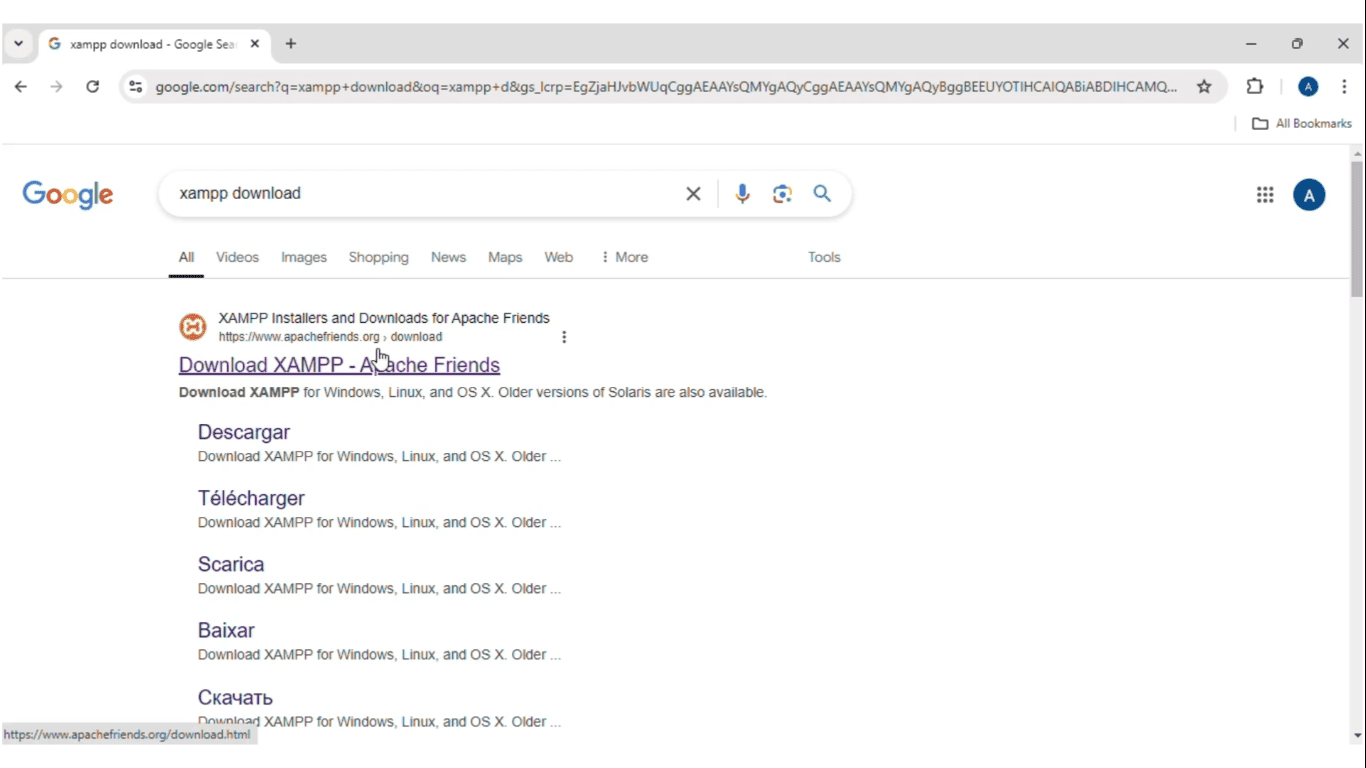
Step 1: Open Your Browser
Begin by launching your preferred web browser. For this tutorial, we will use Google Chrome, but you can use any browser you like.
Step 2: Search for XAMPP Download
In the search bar, type “XAMPP Download” and press Enter. This will bring up a list of results related to XAMPP.
Step 3: Visit the Official Website
Look for the link that says [apachefriends.org > download]. This is the official site for XAMPP, ensuring you get the latest and most secure version of the software.
Step 4: Choose Your Version
Once you’re on the Apache Friends website, navigate to the download section. Here, you will find various versions of XAMPP tailored to different operating systems. Click on the one that corresponds to your system (Windows, macOS, or Linux).
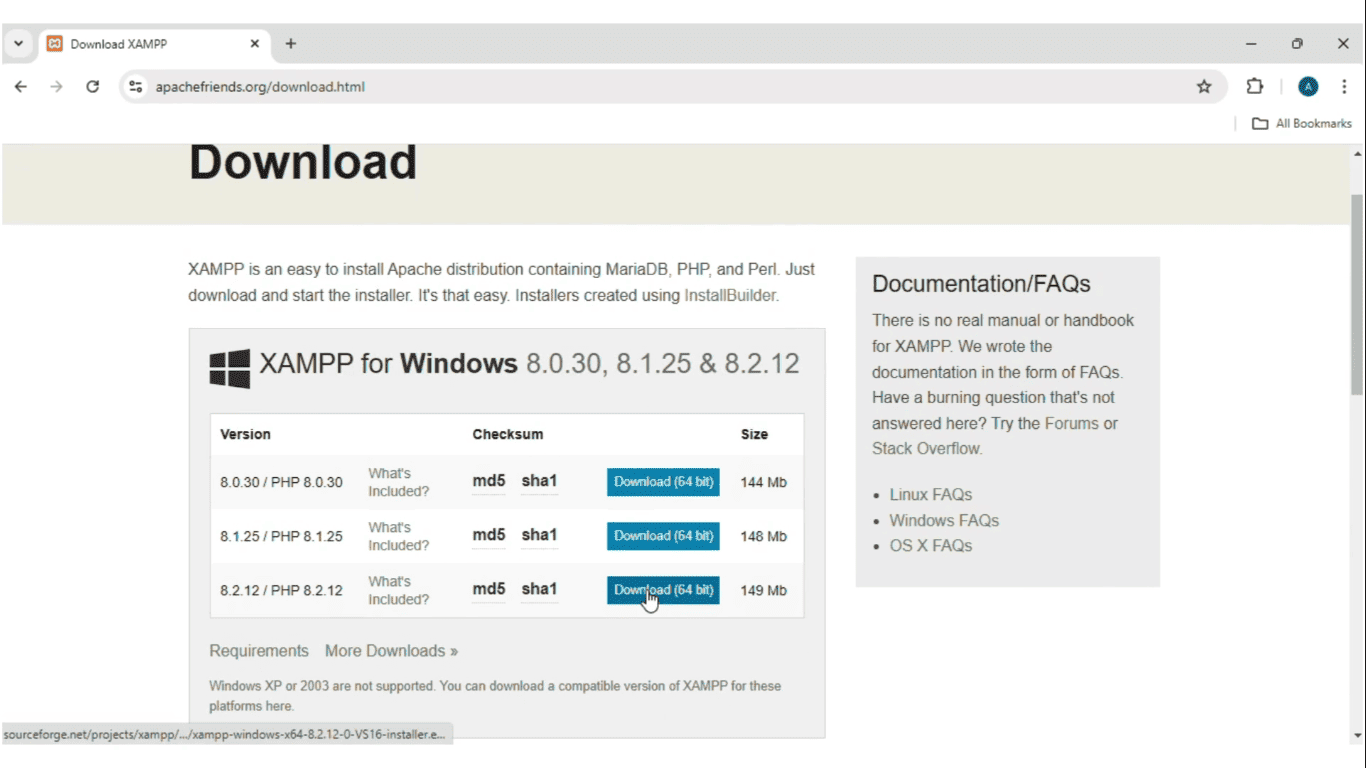
Step 5: Start the Download
After clicking the download button, you may notice a brief waiting period as your file prepares to download. Please be patient; the download should start automatically in a few seconds.
Conclusion
Once the download is complete, you will have XAMPP ready for installation. This software will allow you to create a local server environment to test and develop your applications efficiently.
Stay tuned for our next post, where we will guide you through the installation process!
How to Install XAMPP: A Step-by-Step Guide
Congratulations on downloading XAMPP! Now it’s time to install it on your computer. Follow this simple step-by-step guide to get started.
Step 1: Locate the Downloaded File
After the download is complete, go to your Downloads folder. Here, you’ll find the XAMPP installation file.
Step 2: Begin the Installation
Double-click on the XAMPP file to start the installation process.
Step 3: Handle Any Warnings
If a warning box appears, simply click ‘OK’ to proceed.
Step 4: Follow the Installation Wizard
The XAMPP installation wizard will guide you through the setup. Click ‘Next’ repeatedly until you reach the ‘Finish’ button.
Step 5: Complete the Installation
Before you finish, make sure to check the checkbox to start the XAMPP Control Panel. Then click on the ‘Finish’ button.
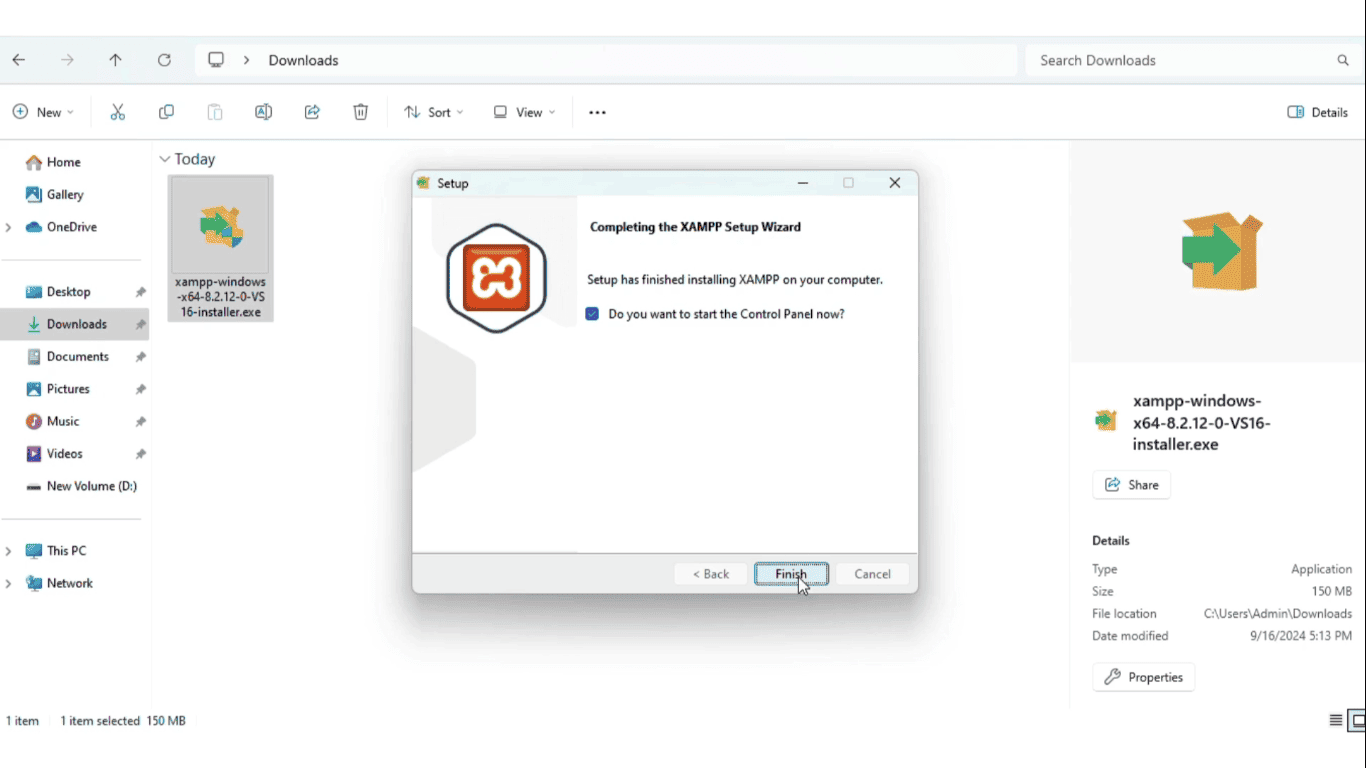
Step 6: Start the XAMPP Control Panel
Once the installation is complete, the XAMPP Control Panel will open. Here, you can start your local servers. Click on ‘Start’ next to both the Apache server and the MySQL server.
Step 7: Allow Windows Security
If a Windows Security box pops up, click ‘Allow’ to enable the servers to run without interruptions.
Final Overview
You’ve successfully installed XAMPP on your computer! Now you can begin developing and testing your applications in a local server environment. Stay tuned for more tutorials on how to make the most out of XAMPP!
Custom WordPress Development Services
Tailored solutions for your business needs.
How to Download WordPress: A Step-by-Step Guide
Now that you have XAMPP installed, the next step in your web development journey is downloading WordPress. This popular content management system will help you create and manage your website effortlessly. Follow these simple steps to download WordPress.
Step 1: Start Your Browser
Begin by launching your web browser. For this tutorial, we will use Google Chrome, but any browser will work just fine.
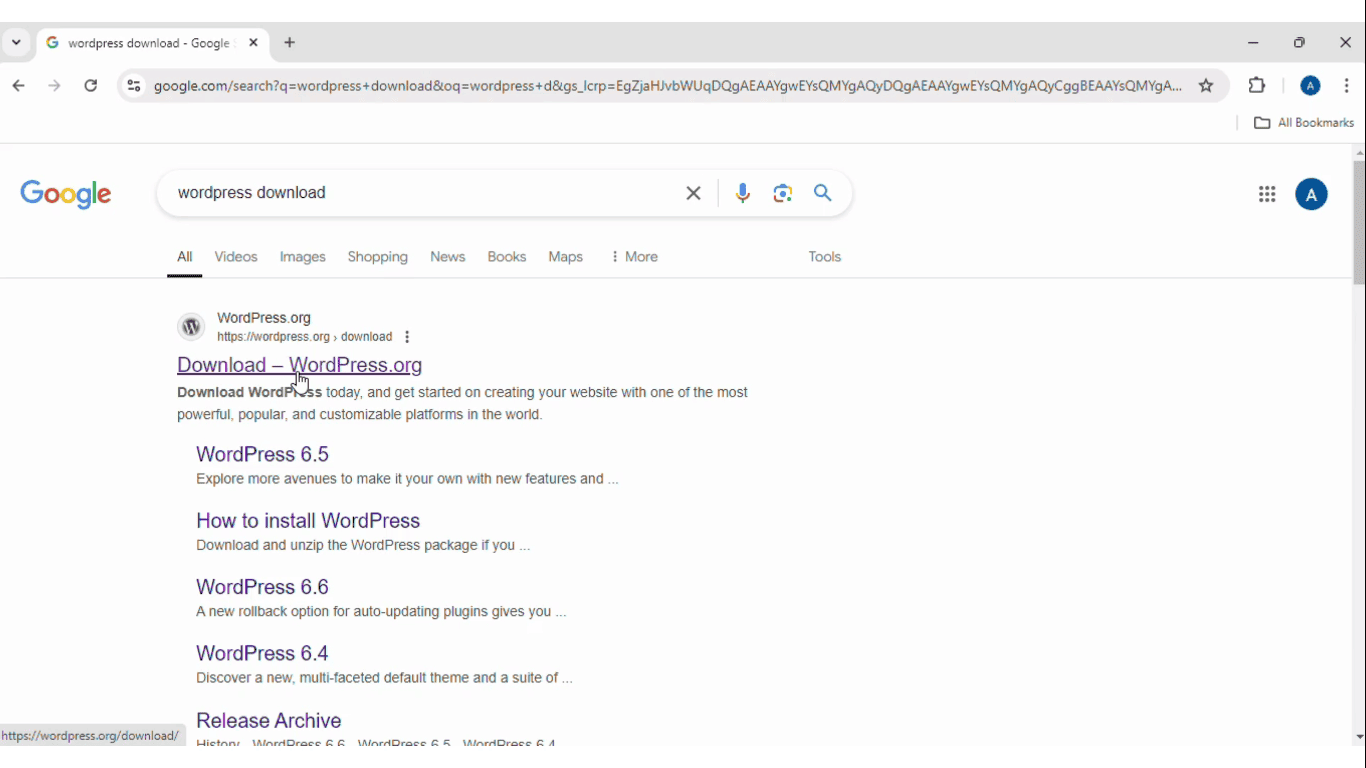
Step 2: Search for WordPress Download
In the search bar, type “WordPress Download” and hit Enter. This will present you with a list of search results related to downloading WordPress.
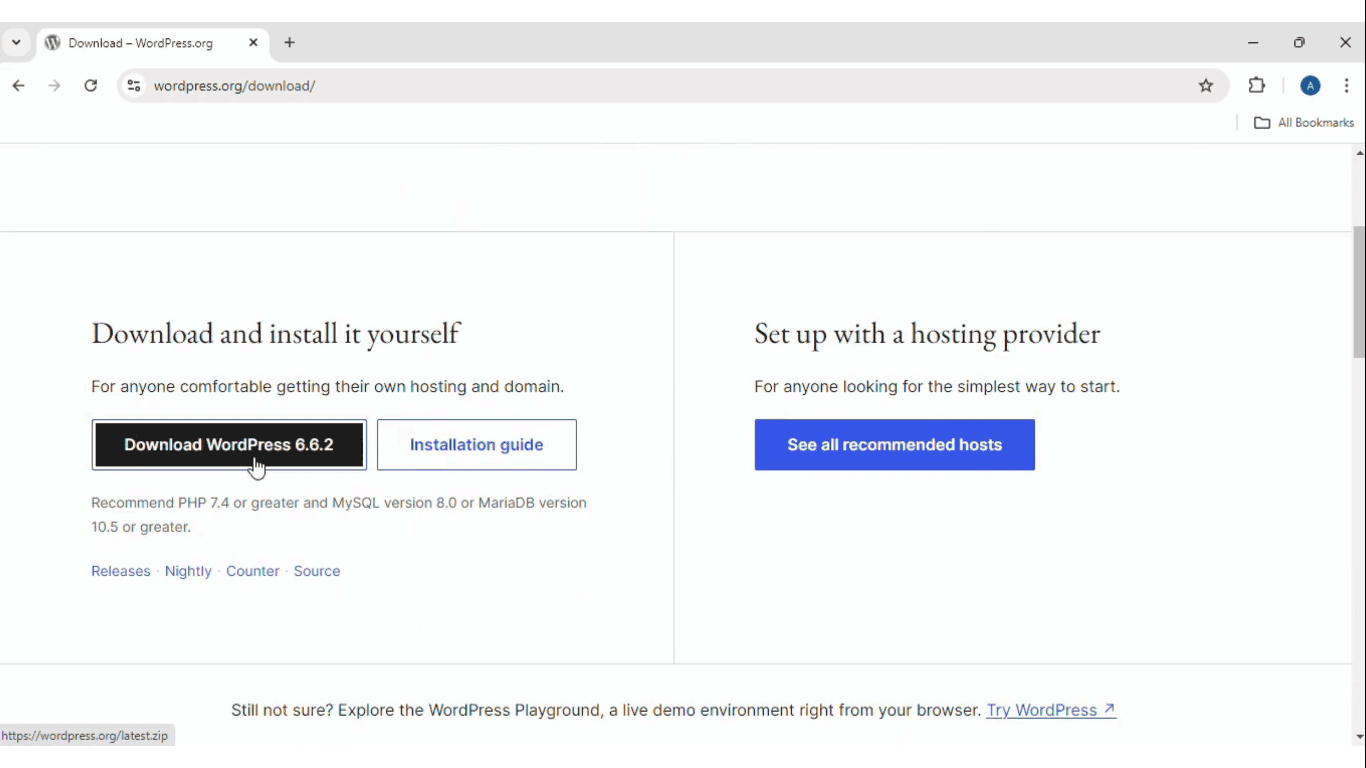
Step 3: Visit the Official WordPress Site
Look for the link that says [wordpress.org > download]. This link will take you to the official WordPress website, ensuring you are downloading the most recent and secure version.
Step 4: Download WordPress
On the WordPress download page, locate the button that says ‘Download WordPress’ and click on it. This will begin the download of the WordPress installation package.
Key Takeaways
You have successfully downloaded WordPress! Next, you’ll be ready to install it on your local server using XAMPP. Stay tuned for our next tutorial where we’ll guide you through the installation process.
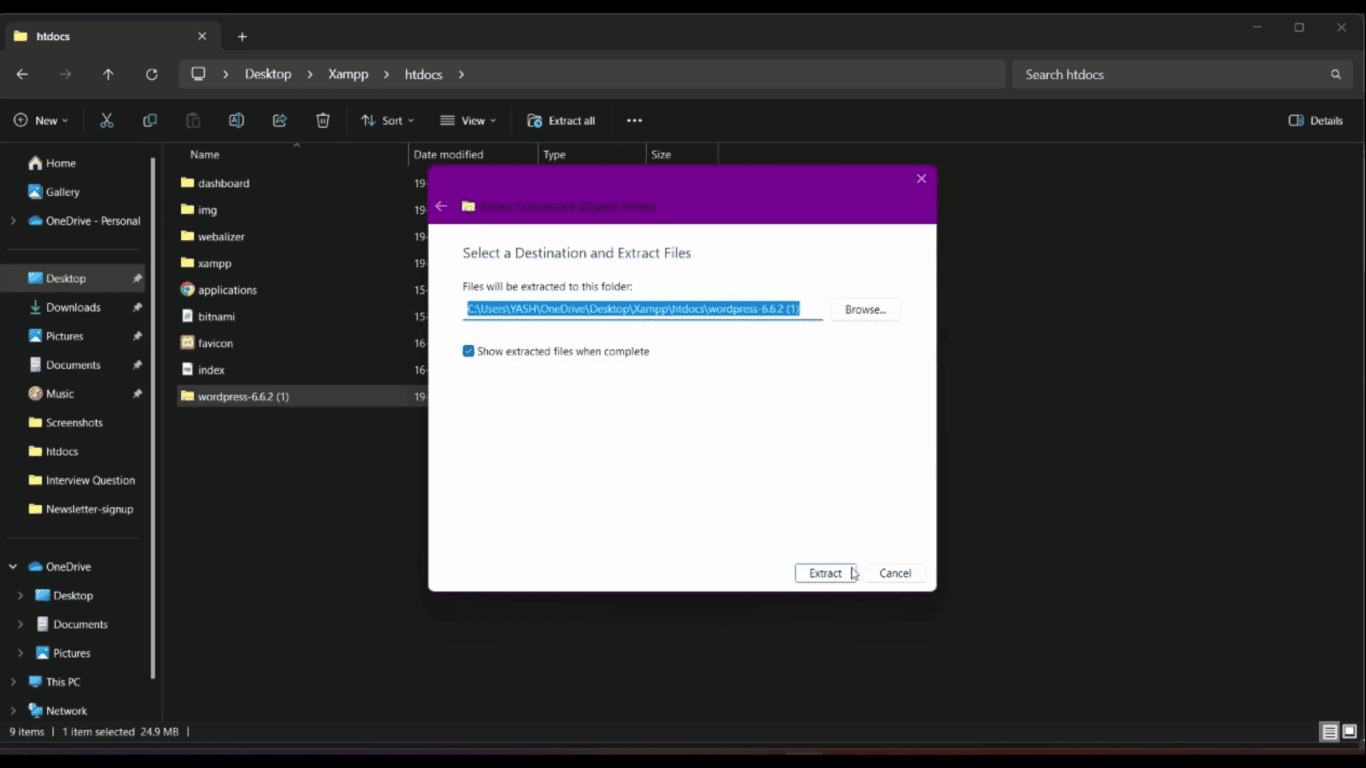
How to Extract the WordPress Files: A Step-by-Step Guide
Now that you’ve downloaded WordPress, the next step is to extract the files so you can install it on your local server. Follow these simple steps to extract the WordPress files.
Step 1: Retrieve the Downloaded File
Open your Downloads folder where the WordPress zip file is located.
Step 2: Extract the Files
Right-click on the WordPress zip file and select ‘Extract All’ from the context menu.
Step 3: Check the Extraction Options
A window will pop up prompting you to choose the extraction location. Make sure to check the checkbox that allows you to view the extracted files once the extraction is complete.
Step 4: Select Your Version
Once you’re on the Apache Friends website, navigate to the download section. Here, you will find various versions of XAMPP tailored to different operating systems. Click on the one that corresponds to your system (Windows, macOS, or Linux).
Summary
Once the extraction is complete, you’ll have all the necessary WordPress files ready for installation. In our next tutorial, we’ll guide you through the installation process on your local XAMPP server. Stay tuned!
How to Create a PHP Database Using XAMPP: A Step-by-Step Guide
With WordPress downloaded and extracted, the next step is to create a database for your site. This is essential for storing your WordPress content and settings. Follow these steps to create a PHP database using XAMPP.
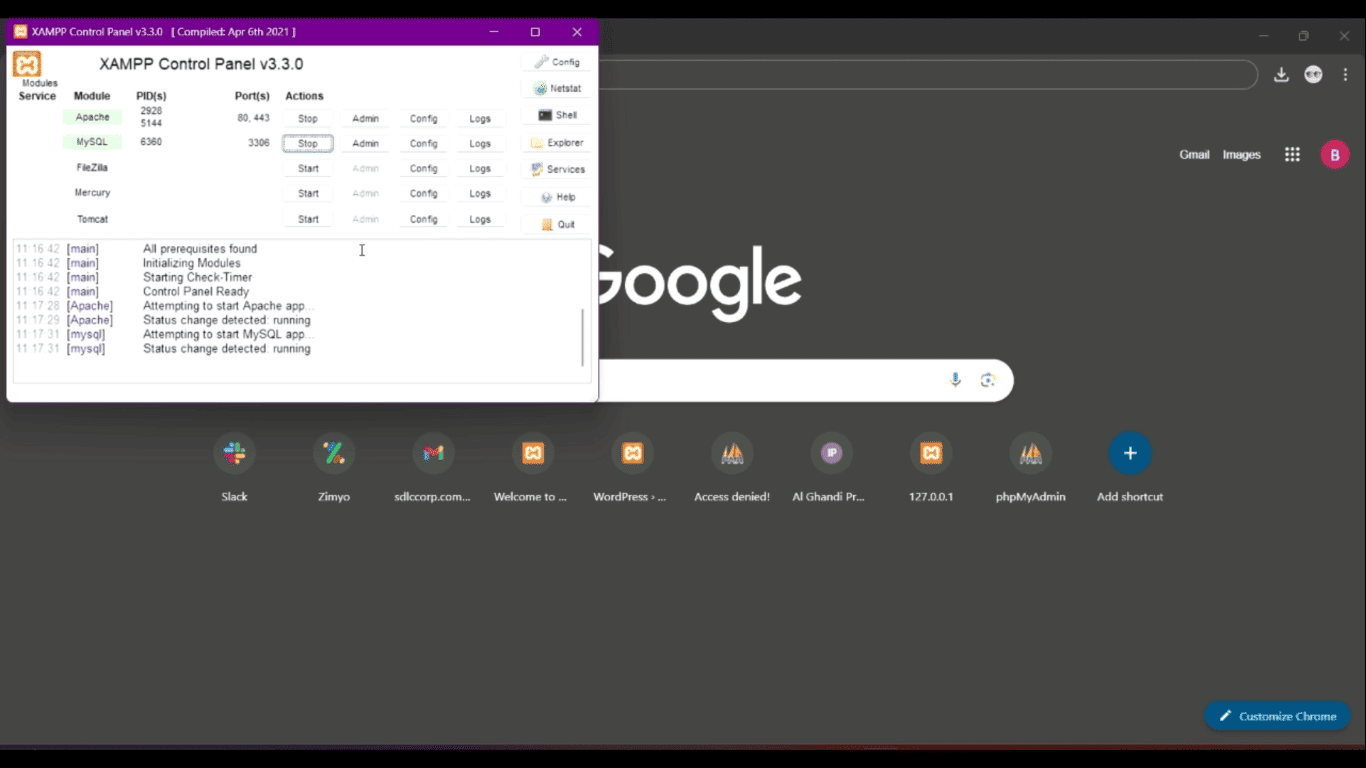
Step 1: Start XAMPP Services
Open the XAMPP Control Panel on your computer. Start both the Apache and MySQL services by clicking the ‘Start’ button next to each service.
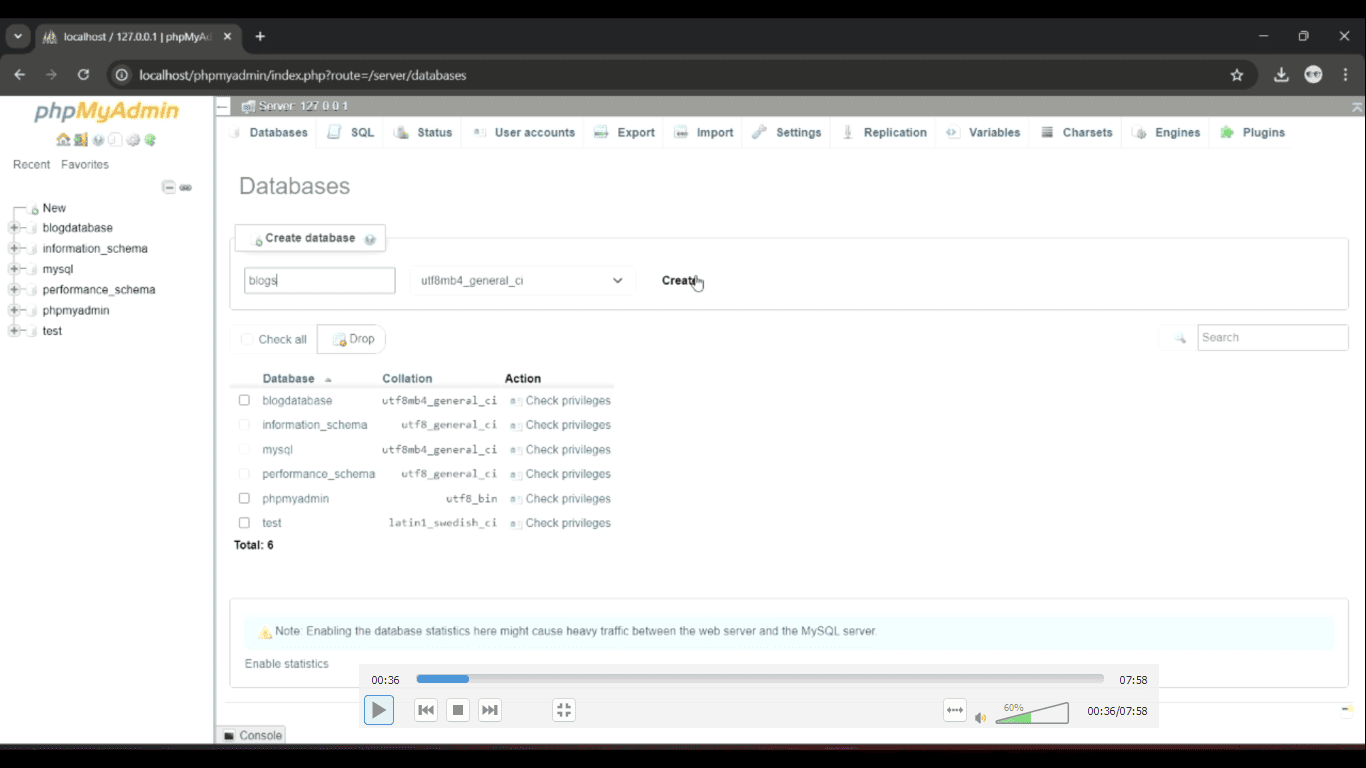
Step 2: Access phpMyAdmin
Open your web browser (Google Chrome or any other) and enter [localhost/dashboard] in the address bar. This will take you to the XAMPP dashboard.
Step 3: Navigate to phpMyAdmin
In the XAMPP dashboard, click on phpMyAdmin. This will open the database management tool.
Step 4: Create a New Database
In phpMyAdmin, look at the sidebar and click on ‘New’.
- Type your desired database name (e.g., mytestdb).
- Click on the ‘Create’ button.
Final Thoughts
You are now ready to connect your WordPress installation to the newly created database. Stay tuned for our next tutorial, where we’ll guide you through the WordPress installation process using this database.
How to Log into WordPress: A Step-by-Step Guide
With your database set up, you’re ready to install WordPress and log in to your new site. Follow these steps to complete the installation and access your WordPress dashboard.
Step 3: Access WordPress Installation
Open Google Chrome, open a new tab, and enter [localhost/wordpress] in the address bar. This might take a few seconds to load.
Step 4: Select Language
Choose your preferred language from the list and click on ‘Continue’.
Step 5: WordPress Welcome Screen
You will see the WordPress welcome box. Click on ‘Let’s go!’ to proceed.
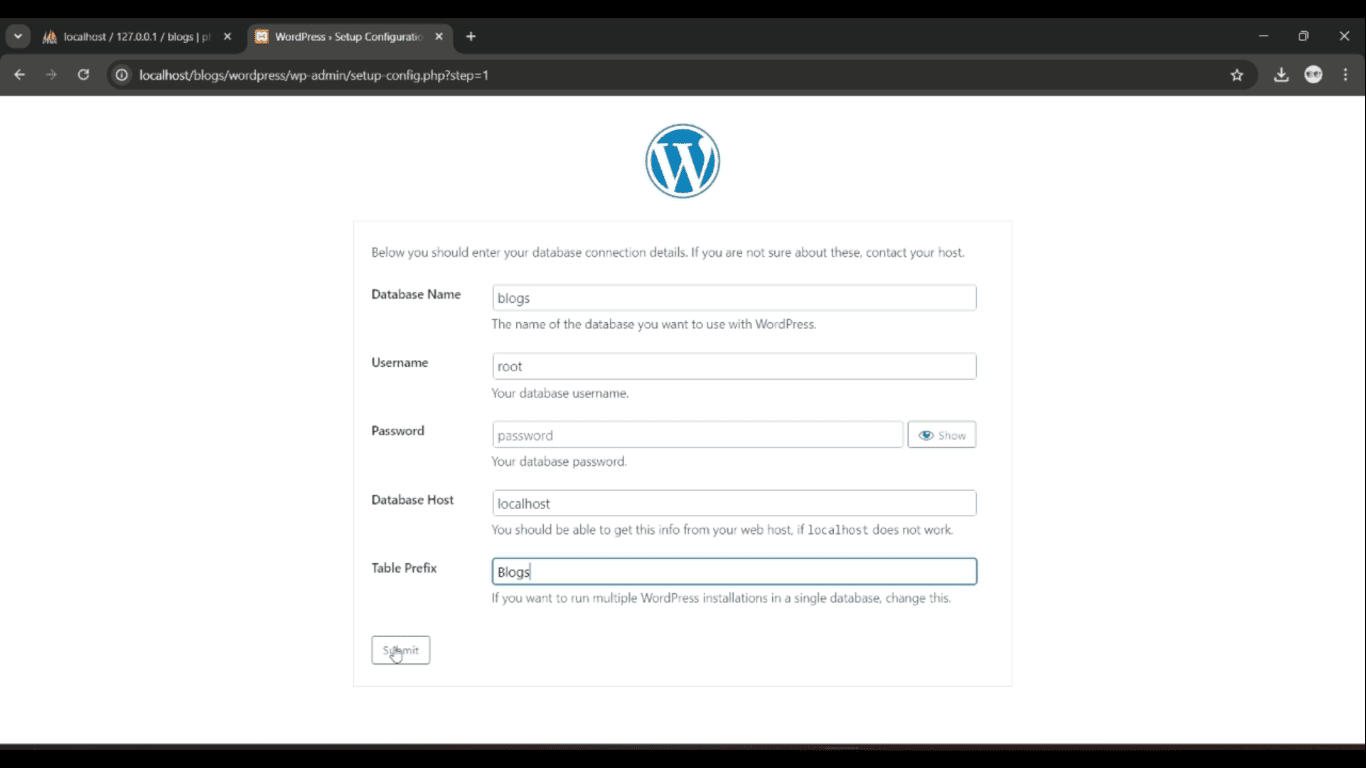
Step 6: Database Configuration
- Type the database name you created earlier.
- Enter the username you set up.
- Type the password you assigned.
Now, click on ‘Run the installation’.
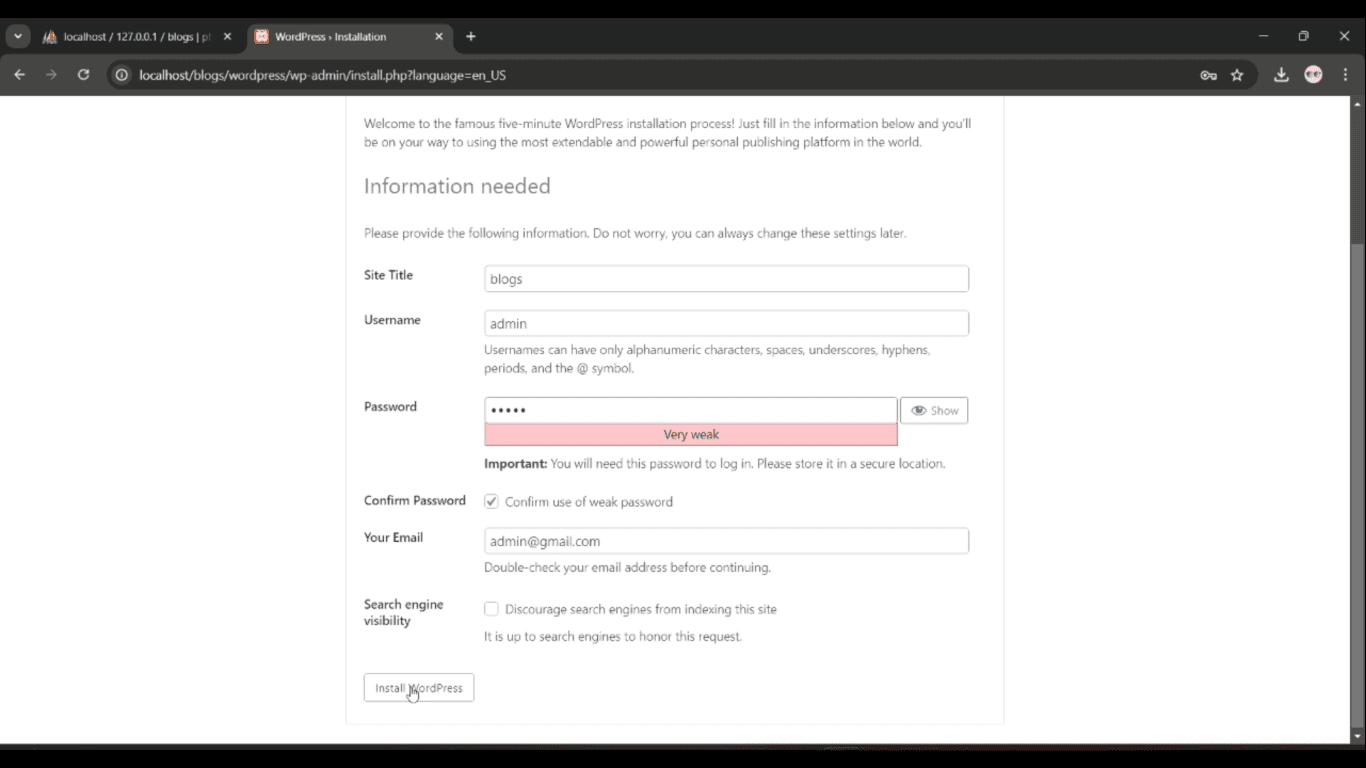
Step 7: Fill in Website Information
The website information box will appear. Fill in the required details:
- Site Title
- Username
- Password
Once you’ve filled in this information, click on ‘Install WordPress’.
Step 8: Complete Installation
You will see a message indicating that ‘WordPress has been installed’. Click on ‘Login’ to access your site.
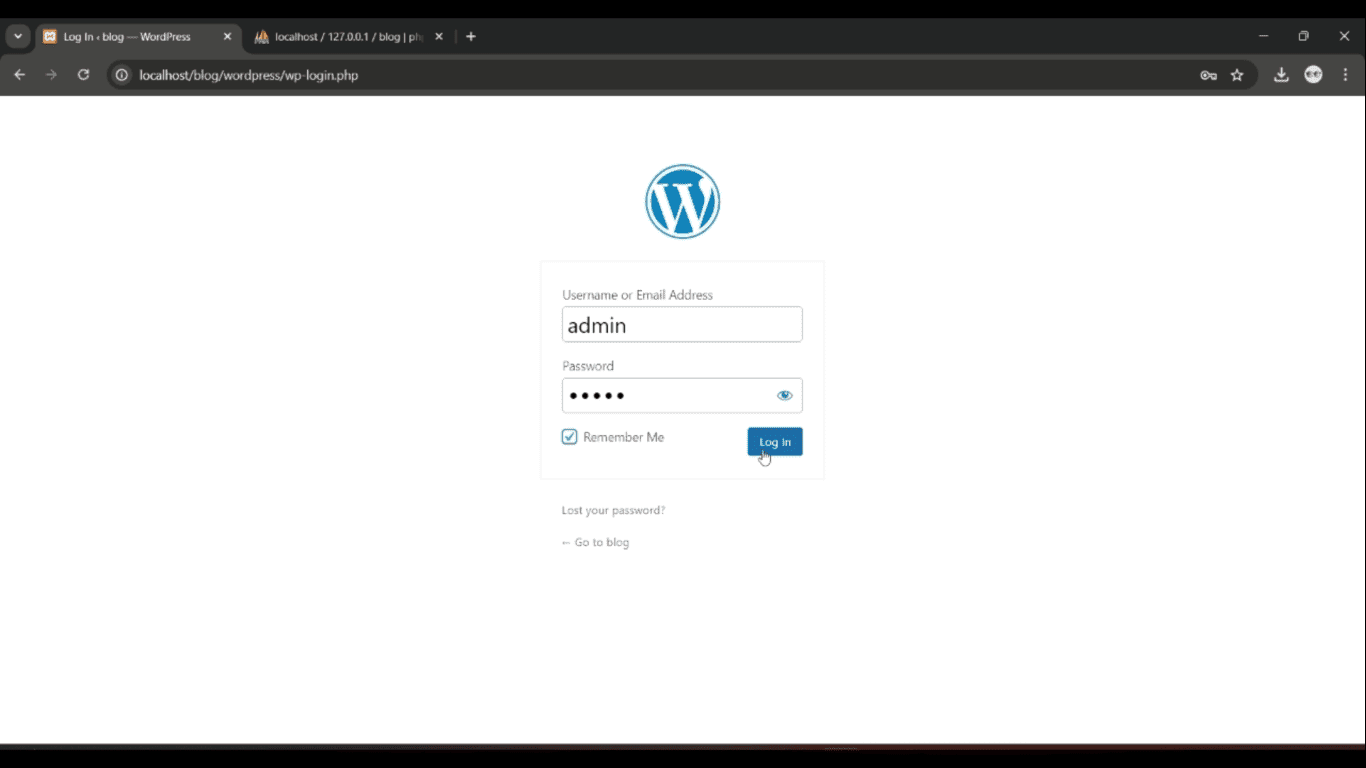
Step 9: Log into WordPress
Type in the username and password you just created, then click on ‘Login’.
Step 10: Access the Dashboard
Congratulations! The WordPress dashboard will now be displayed. You can explore the various features and settings available.
Step 11: View Your Demo Website
To view your WordPress demo website, click on the home icon in the dashboard. This will take you to your newly created WordPress site, ready for customization!
Conclusion
You have successfully installed and logged into WordPress! Now you can start creating and managing your content. Stay tuned for more tutorials on how to make the most out of your WordPress experience.