Learning how to build a chess game using Python is one of the best ways to understand object oriented programming, game logic, and graphical user interfaces. In 2025, Python continues to dominate beginner and advanced game development tutorials due to its simplicity, rich libraries, and growing developer ecosystem. Chess, being a rule heavy and logic intensive game, is an ideal choice for learning complex programming principles and building a deployable game product.
Whether you’re a student, a hobbyist, or a Python developer planning to work on commercial games, this comprehensive tutorial will walk you through everything from setting up your board and rules to building an interactive GUI and integrating an AI opponent. To delve deeper into AI integrations, check out our Machine Learning Development Services. By the end, you’ll also learn how to package and distribute your game as a fully functional application.
What You Need to Build a Chess Game
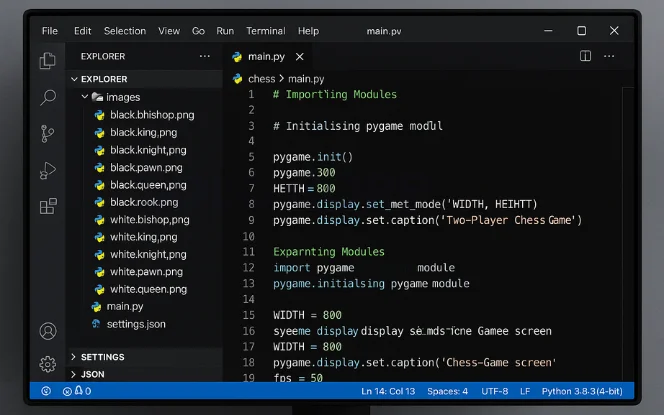
Before you start coding, here’s what you’ll need:
Basic understanding of Python – Know how to use variables, loops, and functions.
Python 3.11+ installed – Ensure the latest version of Python is installed and running.
pygamelibrary – Required to handle graphics, rendering, and user interaction.Image folder for assets – Store and manage chess piece images (PNG format) for GUI use.
Installing Pygame
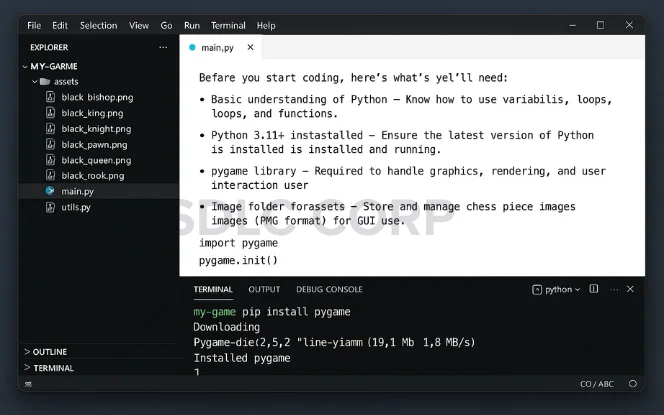
To install the pygame library, open your terminal or command prompt and run:
pip install pygame
Once installed, you can import it in your code using:
import pygame
Basic Functions Used in the Python PyGame Module
Here are key functions from pygame used to build our chess game:
pygame.init(): Initializes all PyGame modules and prepares the environment to run the game.pygame.display.set_mode(): Creates the main display window and defines its dimensions.pygame.display.set_caption(): Sets the title that appears at the top of the game window.pygame.draw.rect(): Draws rectangles on the screen, used to create chessboard squares.pygame.image.load(): Loads image files from your system, like chess pieces.pygame.transform.scale(): Scales loaded images to fit the dimensions of each square (75×75 pixels).screen.blit(): Places images on the screen, used to render chess pieces over the board.pygame.event.get(): Retrieves user actions like mouse clicks and quitting the game.pygame.mouse.get_pos(): Captures the position of the mouse cursor during clicks for move detection.
Creating the Game Window
					pygame.init()
screen = pygame.display.set_mode((600, 600))
pygame.display.set_caption("Python Chess Game")
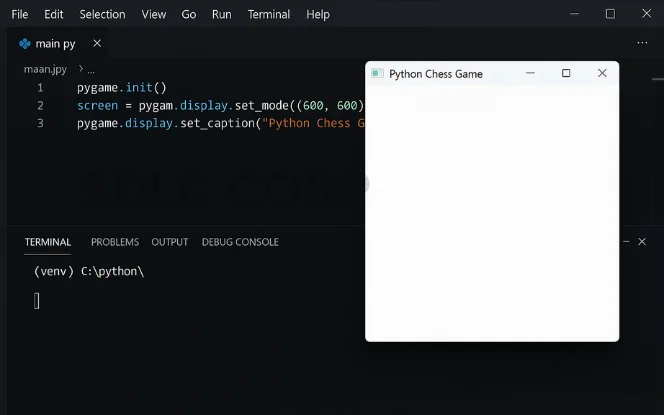
- Set window size to 600×600 pixels : This ensures the chessboard fits perfectly with 75px tiles.
- Set window title with
set_caption(): Displays a custom game name in the title bar.
Designing the Chess Board
Next, draw the 8×8 grid for the chessboard:
					colors = [pygame.Color("white"), pygame.Color("gray")]
for row in range(8):
  for col in range(8):
    color = colors[(row + col) % 2]
    pygame.draw.rect(screen, color, pygame.Rect(col*75, row*75, 75, 75))
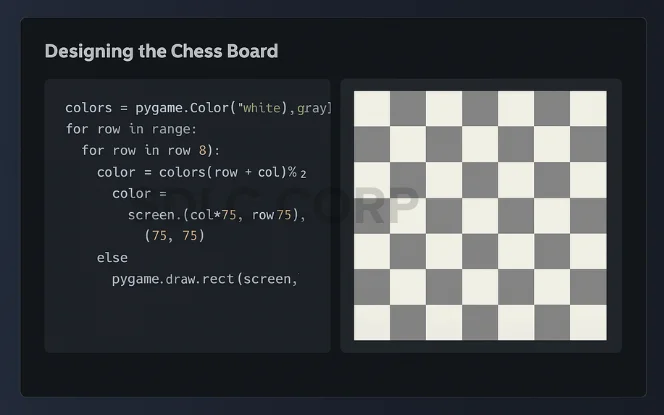
- Alternating tile colors – Use
(row + col) % 2to switch between white and gray for a classic chessboard look. - 75×75 pixel squares – Ensures a consistent layout that perfectly fits an 8×8 chess grid on a 600×600 window.
Loading Chess Piece Images
Load and display images of each chess piece:
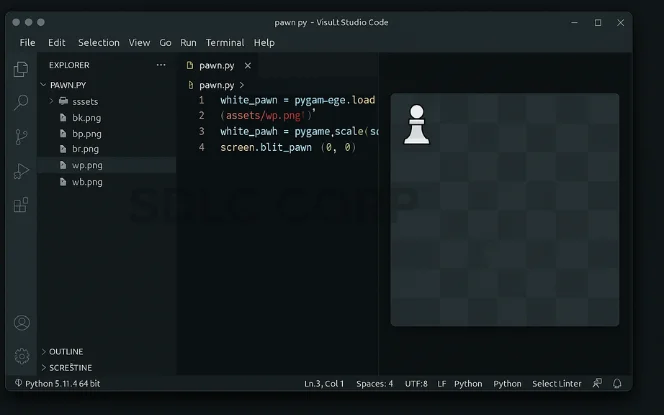
					white_pawn = pygame.image.load("assets/wp.png")
white_pawn = pygame.transform.scale(white_pawn, (75, 75))
screen.blit(white_pawn, (0, 0))
- Store chess piece images in
/assets– Organize your image files (king, queen, pawn, etc.) in a dedicated folder for easier asset management. - Use
pygame.transform.scale()for resizing – This resizes each image to fit perfectly within a 75×75 pixel square for accurate placement.
Placing the Pieces on the Board
					board = [
    ["bR", "bN", "bB", "bQ", "bK", "bB", "bN", "bR"],
    ["bP"] * 8,
    ["--"] * 8,
    ["--"] * 8,
    ["--"] * 8,
    ["--"] * 8,
    ["wP"] * 8,
    ["wR", "wN", "wB", "wQ", "wK", "wB", "wN", "wR"]
]
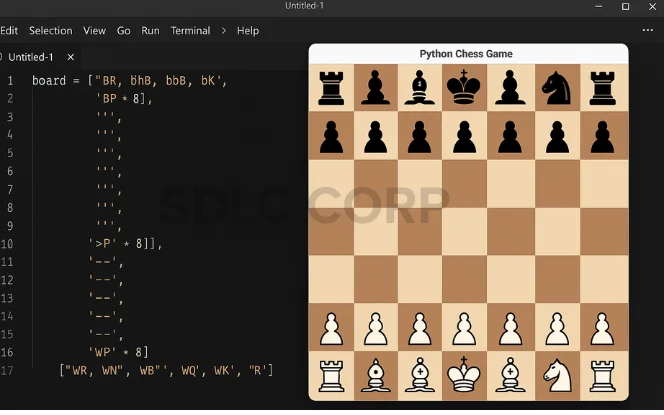
- “wP” = White Pawn – Represents a white pawn on the board in the 2D matrix.
- “bR” = Black Rook – Indicates a black rook’s starting position.
- “–” = Empty Square – Denotes an empty tile with no piece placed.
Handling Player Moves
					for event in pygame.event.get():
  if event.type == pygame.MOUSEBUTTONDOWN:
    pos = pygame.mouse.get_pos()
    col = pos[0] // 75
    row = pos[1] // 75
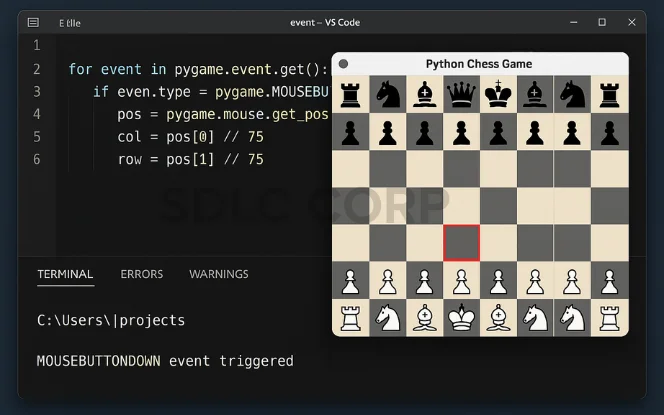
- Detect clicked square – Use mouse position to identify the selected tile on the board.
- Capture piece coordinates – Store row and column values to track which piece is being moved.
Adding Game Logic
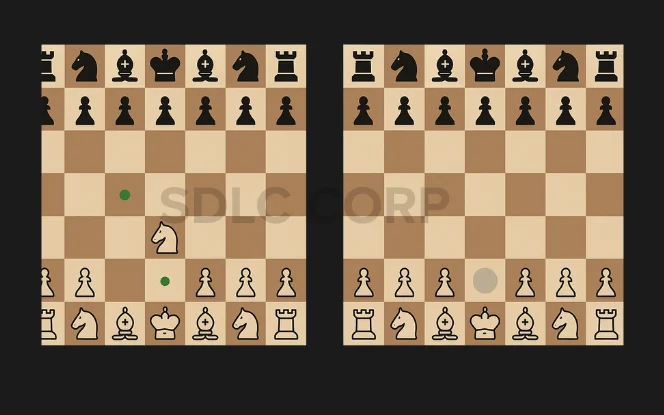
Include the following logic elements:
Switch turns after each move – Alternate control between players after every valid move.
Validate legal moves (optional) – Ensure that pieces move only according to chess rules.
Block control of opponent pieces – Prevent users from selecting and moving the opponent’s pieces.
Advanced users can add logic for:
- Check/checkmate detection – Evaluate king safety and determine endgame scenarios.
- Castling, promotion, and en passant – Implement special moves to mimic real chess rules and improve game realism.
Working of Code
The chess game code works through a structured approach using Python and the pygame module. Here’s a breakdown of how the logic flows:
- Initialize Game and Window – The game starts by importing
pygame, setting screen dimensions, and loading fonts, timers, and game variables. - Load Images and Assets – Images for each chess piece are loaded and scaled to fit the board squares.
- Define Piece Logic – Separate functions manage how each piece (king, queen, rook, bishop, knight, pawn) moves based on standard chess rules.
- Draw Functions –
draw_board(),draw_pieces(), and others render the game state visually onto the screen. - Handle User Input – Mouse clicks detect which square was clicked, allowing players to select and move pieces.
- Manage Turns and Valid Moves – The code tracks whose turn it is, validates moves, highlights options, and blocks invalid moves.
- Checkmate and Captures – If a piece is captured, it’s removed from the board. The game ends when the king is captured, and a game over screen appears.
- Game Loop and Restart – The main loop keeps the game running, and pressing
ENTERresets the board.
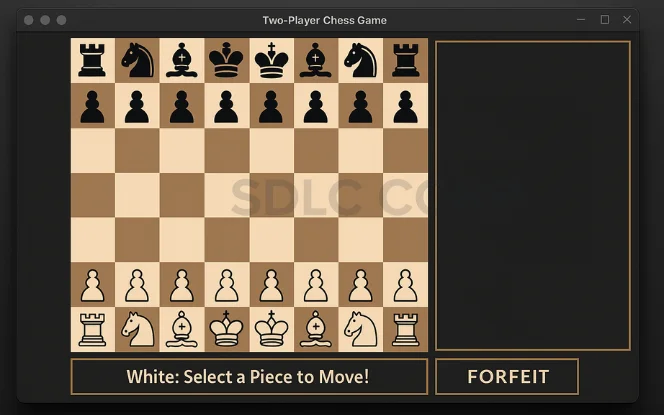
Program for Building Chess Game Using Python PyGame
					# Importing Modules
import pygame
# Initialising pygame module
pygame.init()
# Setting width and height of the Chess Game screen
WIDTH = 800
HEIGHT = 800
screen = pygame.display.set_mode([WIDTH, HEIGHT])
pygame.display.set_caption('Two-Player Chess Game')
font = pygame.font.Font('freesansbold.ttf', 20)
medium_font = pygame.font.Font('freesansbold.ttf', 40)
big_font = pygame.font.Font('freesansbold.ttf', 50)
timer = pygame.time.Clock()
fps = 60
# game variables and images
white_pieces = ['rook', 'knight', 'bishop', 'king', 'queen', 'bishop', 'knight', 'rook',

                'pawn', 'pawn', 'pawn', 'pawn', 'pawn', 'pawn', 'pawn', 'pawn']

white_locations = [(0, 0), (1, 0), (2, 0), (3, 0), (4, 0), (5, 0), (6, 0), (7, 0),

                   (0, 1), (1, 1), (2, 1), (3, 1), (4, 1), (5, 1), (6, 1), (7, 1)]

black_pieces = ['rook', 'knight', 'bishop', 'king', 'queen', 'bishop', 'knight', 'rook',

                'pawn', 'pawn', 'pawn', 'pawn', 'pawn', 'pawn', 'pawn', 'pawn']

black_locations = [(0, 7), (1, 7), (2, 7), (3, 7), (4, 7), (5, 7), (6, 7), (7, 7),

                   (0, 6), (1, 6), (2, 6), (3, 6), (4, 6), (5, 6), (6, 6), (7, 6)]

captured_pieces_white = []
captured_pieces_black = []

# 0 - whites turn no selection: 1-whites turn piece selected: 2- black turn no selection, 3 - black turn piece selected
turn_step = 0
selection = 100
valid_moves = []
# load in game piece images (queen, king, rook, bishop, knight, pawn) x 2
black_queen = pygame.image.load('./images/black queen.png')
black_queen = pygame.transform.scale(black_queen, (80, 80))
black_queen_small = pygame.transform.scale(black_queen, (45, 45))
black_king = pygame.image.load('./images/black king.png')
black_king = pygame.transform.scale(black_king, (80, 80))
black_king_small = pygame.transform.scale(black_king, (45, 45))
black_rook = pygame.image.load('./images/black rook.png')
black_rook = pygame.transform.scale(black_rook, (80, 80))
black_rook_small = pygame.transform.scale(black_rook, (45, 45))
black_bishop = pygame.image.load('./images/black bishop.png')
black_bishop = pygame.transform.scale(black_bishop, (80, 80))
black_bishop_small = pygame.transform.scale(black_bishop, (45, 45))
black_knight = pygame.image.load('./images/black knight.png')
black_knight = pygame.transform.scale(black_knight, (80, 80))
black_knight_small = pygame.transform.scale(black_knight, (45, 45))
black_pawn = pygame.image.load('./images/black pawn.png')
black_pawn = pygame.transform.scale(black_pawn, (65, 65))
black_pawn_small = pygame.transform.scale(black_pawn, (45, 45))
white_queen = pygame.image.load('./images/white queen.png')
white_queen = pygame.transform.scale(white_queen, (80, 80))
white_queen_small = pygame.transform.scale(white_queen, (45, 45))
white_king = pygame.image.load('./images/white king.png')
white_king = pygame.transform.scale(white_king, (80, 80))
white_king_small = pygame.transform.scale(white_king, (45, 45))
white_rook = pygame.image.load('./images/white rook.png')
white_rook = pygame.transform.scale(white_rook, (80, 80))
white_rook_small = pygame.transform.scale(white_rook, (45, 45))
white_bishop = pygame.image.load('./images/white bishop.png')
white_bishop = pygame.transform.scale(white_bishop, (80, 80))
white_bishop_small = pygame.transform.scale(white_bishop, (45, 45))
white_knight = pygame.image.load('./images/white knight.png')
white_knight = pygame.transform.scale(white_knight, (80, 80))
white_knight_small = pygame.transform.scale(white_knight, (45, 45))
white_pawn = pygame.image.load('./images/white pawn.png')
white_pawn = pygame.transform.scale(white_pawn, (65, 65))
white_pawn_small = pygame.transform.scale(white_pawn, (45, 45))

white_images = [white_pawn, white_queen, white_king,

                white_knight, white_rook, white_bishop]

small_white_images = [white_pawn_small, white_queen_small, white_king_small, white_knight_small,

                      white_rook_small, white_bishop_small]

black_images = [black_pawn, black_queen, black_king,

                black_knight, black_rook, black_bishop]

small_black_images = [black_pawn_small, black_queen_small, black_king_small, black_knight_small,

                      black_rook_small, black_bishop_small]

 piece_list = ['pawn', 'queen', 'king', 'knight', 'rook', 'bishop']

 # check variables/ flashing counter
counter = 0
winner = ''
game_over = False

# draw main game board
def draw_board():

    for i in range(32):

        column = i % 4

        row = i // 4

        if row % 2 == 0:

            pygame.draw.rect(screen, 'light gray', [

                             600 - (column * 200), row * 100, 100, 100])

        else:

            pygame.draw.rect(screen, 'light gray', [

                             700 - (column * 200), row * 100, 100, 100])

        pygame.draw.rect(screen, 'gray', [0, 800, WIDTH, 100])

        pygame.draw.rect(screen, 'gold', [0, 800, WIDTH, 100], 5)

        pygame.draw.rect(screen, 'gold', [800, 0, 200, HEIGHT], 5)

        status_text = ['White: Select a Piece to Move!', 'White: Select a Destination!',

                       'Black: Select a Piece to Move!', 'Black: Select a Destination!']

        screen.blit(big_font.render(

            status_text[turn_step], True, 'black'), (20, 820))

        for i in range(9):

            pygame.draw.line(screen, 'black', (0, 100 * i), (800, 100 * i), 2)

            pygame.draw.line(screen, 'black', (100 * i, 0), (100 * i, 800), 2)

        screen.blit(medium_font.render('FORFEIT', True, 'black'), (810, 830))


# draw pieces onto board
def draw_pieces():

    for i in range(len(white_pieces)):

        index = piece_list.index(white_pieces[i])

        if white_pieces[i] == 'pawn':

            screen.blit(

                white_pawn, (white_locations[i][0] * 100 + 22, white_locations[i][1] * 100 + 30))

        else:

            screen.blit(white_images[index], (white_locations[i]

                        [0] * 100 + 10, white_locations[i][1] * 100 + 10))

        if turn_step < 2:

            if selection == i:

                pygame.draw.rect(screen, 'red', [white_locations[i][0] * 100 + 1, white_locations[i][1] * 100 + 1,

                                                 100, 100], 2)


    for i in range(len(black_pieces)):

        index = piece_list.index(black_pieces[i])

        if black_pieces[i] == 'pawn':

            screen.blit(

                black_pawn, (black_locations[i][0] * 100 + 22, black_locations[i][1] * 100 + 30))

        else:

            screen.blit(black_images[index], (black_locations[i]

                        [0] * 100 + 10, black_locations[i][1] * 100 + 10))

        if turn_step >= 2:

            if selection == i:

                pygame.draw.rect(screen, 'blue', [black_locations[i][0] * 100 + 1, black_locations[i][1] * 100 + 1,

                                                  100, 100], 2)


# function to check all pieces valid options on board
def check_options(pieces, locations, turn):
    moves_list = []

    all_moves_list = []

    for i in range((len(pieces))):

        location = locations[i]

        piece = pieces[i]

        if piece == 'pawn':

            moves_list = check_pawn(location, turn)

        elif piece == 'rook':

            moves_list = check_rook(location, turn)

        elif piece == 'knight':

            moves_list = check_knight(location, turn)

        elif piece == 'bishop':

            moves_list = check_bishop(location, turn)

        elif piece == 'queen':

            moves_list = check_queen(location, turn)

        elif piece == 'king':

            moves_list = check_king(location, turn)

        all_moves_list.append(moves_list)

    return all_moves_list

 # check king valid moves
def check_king(position, color):

    moves_list = []

    if color == 'white':

        enemies_list = black_locations

        friends_list = white_locations

    else:

        friends_list = black_locations

        enemies_list = white_locations

    # 8 squares to check for kings, they can go one square any direction

    targets = [(1, 0), (1, 1), (1, -1), (-1, 0),

               (-1, 1), (-1, -1), (0, 1), (0, -1)]

    for i in range(8):

        target = (position[0] + targets[i][0], position[1] + targets[i][1])

        if target not in friends_list and 0 <= target[0] <= 7 and 0 <= target[1] <= 7:

            moves_list.append(target)

    return moves_list

 # check queen valid moves
def check_queen(position, color):

    moves_list = check_bishop(position, color)

    second_list = check_rook(position, color)

    for i in range(len(second_list)):

        moves_list.append(second_list[i])

    return moves_list

 # check bishop moves
def check_bishop(position, color):

    moves_list = []

    if color == 'white':

        enemies_list = black_locations

        friends_list = white_locations

    else:

        friends_list = black_locations

        enemies_list = white_locations

    for i in range(4):  # up-right, up-left, down-right, down-left

        path = True

        chain = 1

        if i == 0:

            x = 1

            y = -1

        elif i == 1:

            x = -1

            y = -1

        elif i == 2:

            x = 1

            y = 1

        else:

            x = -1

            y = 1

        while path:

            if (position[0] + (chain * x), position[1] + (chain * y)) not in friends_list and \

                    0 <= position[0] + (chain * x) <= 7 and 0 <= position[1] + (chain * y) <= 7:

                moves_list.append(

                    (position[0] + (chain * x), position[1] + (chain * y)))

                if (position[0] + (chain * x), position[1] + (chain * y)) in enemies_list:

                    path = False

                chain += 1

            else:

                path = False

    return moves_list

 # check rook moves
def check_rook(position, color):

    moves_list = []

    if color == 'white':

        enemies_list = black_locations

        friends_list = white_locations

    else:

        friends_list = black_locations

        enemies_list = white_locations

    for i in range(4):  # down, up, right, left

        path = True

        chain = 1

        if i == 0:

            x = 0

            y = 1

        elif i == 1:

            x = 0

            y = -1

        elif i == 2:

            x = 1

            y = 0

        else:

            x = -1

            y = 0

        while path:

            if (position[0] + (chain * x), position[1] + (chain * y)) not in friends_list and \

                    0 <= position[0] + (chain * x) <= 7 and 0 <= position[1] + (chain * y) <= 7:

                moves_list.append(

                    (position[0] + (chain * x), position[1] + (chain * y)))

                if (position[0] + (chain * x), position[1] + (chain * y)) in enemies_list:

                    path = False

                chain += 1

            else:

                path = False

    return moves_list

# check valid pawn moves
def check_pawn(position, color):

    moves_list = []

    if color == 'white':

        if (position[0], position[1] + 1) not in white_locations and \

                (position[0], position[1] + 1) not in black_locations and position[1] < 7:

            moves_list.append((position[0], position[1] + 1))

        if (position[0], position[1] + 2) not in white_locations and \

                (position[0], position[1] + 2) not in black_locations and position[1] == 1:

            moves_list.append((position[0], position[1] + 2))

        if (position[0] + 1, position[1] + 1) in black_locations:

            moves_list.append((position[0] + 1, position[1] + 1))

        if (position[0] - 1, position[1] + 1) in black_locations:

            moves_list.append((position[0] - 1, position[1] + 1))

    else:

        if (position[0], position[1] - 1) not in white_locations and \

                (position[0], position[1] - 1) not in black_locations and position[1] > 0:

            moves_list.append((position[0], position[1] - 1))

        if (position[0], position[1] - 2) not in white_locations and \

                (position[0], position[1] - 2) not in black_locations and position[1] == 6:

            moves_list.append((position[0], position[1] - 2))

        if (position[0] + 1, position[1] - 1) in white_locations:

            moves_list.append((position[0] + 1, position[1] - 1))

        if (position[0] - 1, position[1] - 1) in white_locations:

            moves_list.append((position[0] - 1, position[1] - 1))

    return moves_list

 # check valid knight moves
def check_knight(position, color):

    moves_list = []

    if color == 'white':

        enemies_list = black_locations

        friends_list = white_locations

    else:

        friends_list = black_locations

        enemies_list = white_locations

    # 8 squares to check for knights, they can go two squares in one direction and one in another

    targets = [(1, 2), (1, -2), (2, 1), (2, -1),

               (-1, 2), (-1, -2), (-2, 1), (-2, -1)]

    for i in range(8):

        target = (position[0] + targets[i][0], position[1] + targets[i][1])

        if target not in friends_list and 0 <= target[0] <= 7 and 0 <= target[1] <= 7:

            moves_list.append(target)

    return moves_list

# check for valid moves for just selected piece
def check_valid_moves():

    if turn_step < 2:

        options_list = white_options

    else:

        options_list = black_options

    valid_options = options_list[selection]

    return valid_options

# draw valid moves on screen
def draw_valid(moves):

    if turn_step < 2:

        color = 'red'

    else:

        color = 'blue'

    for i in range(len(moves)):

        pygame.draw.circle(

            screen, color, (moves[i][0] * 100 + 50, moves[i][1] * 100 + 50), 5)


# draw captured pieces on side of screen
def draw_captured():

    for i in range(len(captured_pieces_white)):

        captured_piece = captured_pieces_white[i]

        index = piece_list.index(captured_piece)

        screen.blit(small_black_images[index], (825, 5 + 50 * i))

    for i in range(len(captured_pieces_black)):

        captured_piece = captured_pieces_black[i]

        index = piece_list.index(captured_piece)

        screen.blit(small_white_images[index], (925, 5 + 50 * i))


# draw a flashing square around king if in check
def draw_check():

    if turn_step < 2:

        if 'king' in white_pieces:

            king_index = white_pieces.index('king')

            king_location = white_locations[king_index]

            for i in range(len(black_options)):

                if king_location in black_options[i]:

                    if counter < 15:

                        pygame.draw.rect(screen, 'dark red', [white_locations[king_index][0] * 100 + 1,

                                                              white_locations[king_index][1] * 100 + 1, 100, 100], 5)

    else:

        if 'king' in black_pieces:

            king_index = black_pieces.index('king')

            king_location = black_locations[king_index]

            for i in range(len(white_options)):

                if king_location in white_options[i]:

                    if counter < 15:

                        pygame.draw.rect(screen, 'dark blue', [black_locations[king_index][0] * 100 + 1,

                                                               black_locations[king_index][1] * 100 + 1, 100, 100], 5)

def draw_game_over():
    pygame.draw.rect(screen, 'black', [200, 200, 400, 70])

    screen.blit(font.render(

        f'{winner} won the game!', True, 'white'), (210, 210))

    screen.blit(font.render(f'Press ENTER to Restart!',

                True, 'white'), (210, 240))

 # main game loop
black_options = check_options(black_pieces, black_locations, 'black')
white_options = check_options(white_pieces, white_locations, 'white')
run = True
while run:

    timer.tick(fps)

    if counter < 30:

        counter += 1

    else:

        counter = 0

    screen.fill('dark gray')

    draw_board()

    draw_pieces()

    draw_captured()

    draw_check()

    if selection != 100:

        valid_moves = check_valid_moves()

        draw_valid(valid_moves)

    # event handling

    for event in pygame.event.get():

        if event.type == pygame.QUIT:

            run = False

        if event.type == pygame.MOUSEBUTTONDOWN and event.button == 1 and not game_over:

            x_coord = event.pos[0] // 100

            y_coord = event.pos[1] // 100

            click_coords = (x_coord, y_coord)

            if turn_step <= 1:

                if click_coords == (8, 8) or click_coords == (9, 8):

                    winner = 'black'

                if click_coords in white_locations:

                    selection = white_locations.index(click_coords)

                    if turn_step == 0:

                        turn_step = 1

                if click_coords in valid_moves and selection != 100:

                    white_locations[selection] = click_coords

                    if click_coords in black_locations:

                        black_piece = black_locations.index(click_coords)

                        captured_pieces_white.append(black_pieces[black_piece])

                        if black_pieces[black_piece] == 'king':

                            winner = 'white'

                        black_pieces.pop(black_piece)

                        black_locations.pop(black_piece)

                    black_options = check_options(

                        black_pieces, black_locations, 'black')

                    white_options = check_options(

                        white_pieces, white_locations, 'white')

                    turn_step = 2

                    selection = 100

                    valid_moves = []

            if turn_step > 1:

                if click_coords == (8, 8) or click_coords == (9, 8):

                    winner = 'white'

                if click_coords in black_locations:

                    selection = black_locations.index(click_coords)

                    if turn_step == 2:

                        turn_step = 3

                if click_coords in valid_moves and selection != 100:

                    black_locations[selection] = click_coords

                    if click_coords in white_locations:

                        white_piece = white_locations.index(click_coords)

                        captured_pieces_black.append(white_pieces[white_piece])

                        if white_pieces[white_piece] == 'king':

                            winner = 'black'

                        white_pieces.pop(white_piece)

                        white_locations.pop(white_piece)

                    black_options = check_options(

                        black_pieces, black_locations, 'black')

                    white_options = check_options(

                        white_pieces, white_locations, 'white')

                    turn_step = 0

                    selection = 100

                    valid_moves = []

        if event.type == pygame.KEYDOWN and game_over:

            if event.key == pygame.K_RETURN:

                game_over = False

                winner = ''

                white_pieces = ['rook', 'knight', 'bishop', 'king', 'queen', 'bishop', 'knight', 'rook',

                                'pawn', 'pawn', 'pawn', 'pawn', 'pawn', 'pawn', 'pawn', 'pawn']

                white_locations = [(0, 0), (1, 0), (2, 0), (3, 0), (4, 0), (5, 0), (6, 0), (7, 0),

                                   (0, 1), (1, 1), (2, 1), (3, 1), (4, 1), (5, 1), (6, 1), (7, 1)]

                black_pieces = ['rook', 'knight', 'bishop', 'king', 'queen', 'bishop', 'knight', 'rook',

                                'pawn', 'pawn', 'pawn', 'pawn', 'pawn', 'pawn', 'pawn', 'pawn']

                black_locations = [(0, 7), (1, 7), (2, 7), (3, 7), (4, 7), (5, 7), (6, 7), (7, 7),

                                   (0, 6), (1, 6), (2, 6), (3, 6), (4, 6), (5, 6), (6, 6), (7, 6)]

                captured_pieces_white = []

                captured_pieces_black = []

                turn_step = 0

                selection = 100

                valid_moves = []

                black_options = check_options(

                    black_pieces, black_locations, 'black')

                white_options = check_options(

                    white_pieces, white_locations, 'white')


    if winner != '':

        game_over = True

        draw_game_over()


    pygame.display.flip()
pygame.quit()
Conclusion
Building a fully functional chess game using Python and Pygame is a great way to explore event handling, rendering, and object-oriented programming. Whether you’re just starting or planning to expand with AI, multiplayer, or UI upgrades, this foundation gives you the tools to scale.
Looking to turn your project into a professional-grade product?
Partner with our Chess Game Development Company for feature-rich, scalable solutions.
Need expert support? Hire Game Developers who specialize in custom board games and Contact Us to discuss your idea today.
FAQ's
How Do I Start Building A Chess Game In Python?
Is Pygame Good For Making A Chess Game?
Do I Need Advanced Python Knowledge To Make A Chess Game?
How Can I Detect Valid Moves In A Python Chess Game?
Can I Add Multiplayer Or AI To My Python Chess Game?
What Assets Do I Need For Building A Chess Game In Pygame?
Can I Deploy This Chess Game Online Or As An App?
Where Can I Hire Developers To Upgrade My Python Chess Game?
You can Hire Game Developers from SDLC Corp to enhance your chess game with multiplayer, mobile compatibility, or AI features.


